
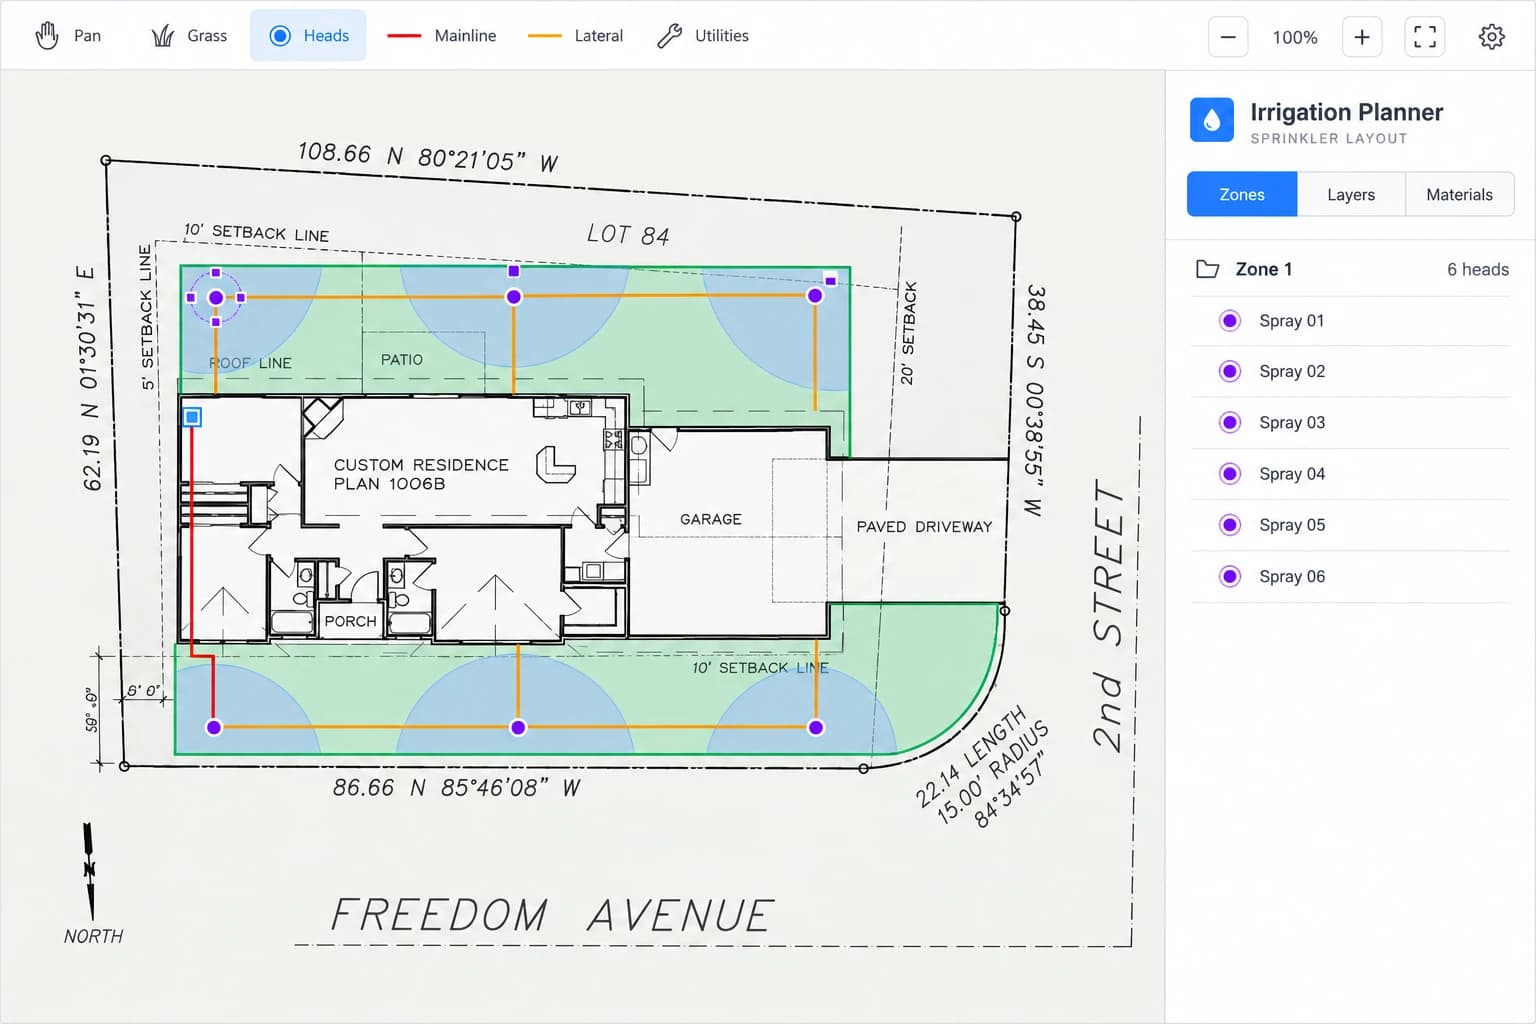
Designing a sprinkler system used to mean a tape measure, graph paper, and a lot of guessing. With the Areaplane Irrigation Planner, you can sketch the whole layout in the browser — heads, zones, drip lines, and a real bill of materials — using a calibrated property image.
This guide walks through the whole process for a typical residential lot. By the end you'll have a printable PDF report you can take to the supply house.
A note before we start. This tool and this guide are for planning and learning. They are not a substitute for a licensed irrigation specialist. Always verify your static pressure, available flow, local code, backflow requirements, and freeze depth before you trench or buy parts.
Step 1: Measure Your Water Supply
Every irrigation system is constrained by two numbers: pressure and flow.
- Static pressure (PSI) — what the pipe sits at with no water moving. A cheap gauge at the hose bib gives you this in seconds. Most North American residential systems sit at 40–80 PSI.
- Available flow (GPM) — how many gallons per minute you can actually pull. The bucket test is the easiest: open the spigot all the way and time how long it takes to fill a 5-gallon bucket.
300 / seconds = GPM. A 5-gallon bucket that fills in 30 seconds is 10 GPM.
10 GPM is a reasonable default, but measure yours. A system designed for 10 GPM that only has 6 GPM will struggle to cover anything.
Step 2: Upload a Floor Plan or Satellite Image
Open the Irrigation Planner and drop in a reference image of your property:
- A site plan from your builder
- A property survey from your home purchase
- A screenshot from Google Maps at the right zoom level
The image just has to be clear enough that you can see lawn edges, the house footprint, and any beds.
Step 3: Calibrate the Scale
Click the Settings gear → Set scale. Click two points on a known dimension — a curb panel, a wall segment, a labeled driveway width — and enter the real measurement.
This is the single most important step in the whole workflow. Every radius, every pipe length, every GPM calculation depends on it. If your scale is off by 10 %, your bill of materials is off by 10 %.
Step 4: Outline the Turf and Obstacles
Use the Grass tool to trace each lawn area. The planner uses these polygons to:
- Auto-size each head's radius so the wedge stays inside the polygon.
- Suggest sprinkler types based on the largest inscribed circle (small areas → spray; medium → MP rotator; large → rotor).
Anything you don't trace is treated as "do not water" — driveways, walkways, pools, and so on.
Step 5: Place Sprinkler Heads
The planner gives you four head types in a single Heads dropdown:
- Spray — Short-radius watering. Select a nozzle whose arc, radius, and flow suit the area and operating pressure.
- MP Rotator — Multi-stream rotary nozzles. Verify model-specific radius, precipitation rate, and pressure requirements; low application rates do not guarantee that runoff cannot occur.
- Rotor — Rotating heads for larger areas. Use manufacturer spacing and flow data for the selected nozzle.
- Drip — Lines for beds or planters. Check emitter spacing, flow, filtration, and pressure regulation for the actual product.
Head-to-head spacing. Use coverage that reaches adjacent heads where the manufacturer’s layout guidance calls for it. Overlap alone does not establish matched precipitation: the nozzle type, arc, pressure, and flow also matter.
Step 6: Group Heads into Zones
Zones exist because your water supply can only run a few heads at once. Open the Zones panel and create one zone per cluster of heads that share a valve.
The default planning budget keeps each zone's total GPM below min(POC GPM × 0.75, 12). The planner colors over-cap zones red so you don't have to do the math.
You can drag heads (and drip lines) between zones in the sidebar — useful for shuffling things around as you balance flow.
Step 7: Lay Out the Plumbing
- Mainline — From your POC (point of connection) to the valve boxes. The planner draws this as a single red polyline and bumps the BOM with 1" Schedule 40 PVC.
- Lateral — From each valve to the heads on that zone. Drawn as orange polylines, 3/4" Schedule 40 PVC.
- Swing pipe — The last 12–18" of flex pipe from the lateral up to each head's inlet. Two SBE-050 elbows per head (one MNPT × barb at the lateral, one MNPT × barb at the head) plus a length of SP-100.
Drip lines are drawn separately and produce their own tubing + emitter quantities.
Step 8: Export the Plan
When you're happy with the layout, click Settings → Export PDF. You get a multi-page report:
- Cover — title, summary stats (heads, zones, drip lines, coverage), and a plan-view snapshot.
- System overview — scale, turf area, water supply, total demand, plumbing footage.
- Per-zone breakdown — each zone with its heads (type, radius, arc, GPM, suggested catalog model) and drip lines (length, emitter count, GPM).
- Bill of materials — categorized: heads, mainline, lateral, drip, fittings, swing joints, valves and manifolds, valve boxes, control wire, backflow assembly, controller, winterization, and consumables.
You can also export the BOM as a CSV (handy for the supply house) or save the full project as a JSON file you can re-open later.
A Few Things to Verify before You Build
The planner gives you a starting point that's surprisingly close to a finished design — but before you trench:
- Verify static pressure and flow on-site. A pressure gauge and bucket test take five minutes.
- Check local code. Many municipalities require a permit, an inspection, and a specific backflow assembly (PVB, DCVA, or RPZ).
- Check frost depth. In cold climates, mainlines need to be buried below the frost line or designed for winter blow-out.
- Confirm head spacing on-site. Wind, slope, and obstructions can shift effective coverage by several feet.
The Irrigation Planner is intentionally honest about being a planning tool, not professional design software. Use it to learn, to budget, and to walk into the supply house with a list — then verify everything before you put a shovel in the ground.
Start Designing
Open the Irrigation Planner and design your system.
If you want to see the planner in action before you start, the landing page has a live animation of a plan being assembled.
Practice with a Downloadable Site Plan
Download the irrigation starter project. Back up your current design, open the planner, and choose Settings → Open project (.json), then confirm the import. The sample includes a 30 × 20 ft lawn, a calibration line, and example utility points; it has no sprinkler heads yet.
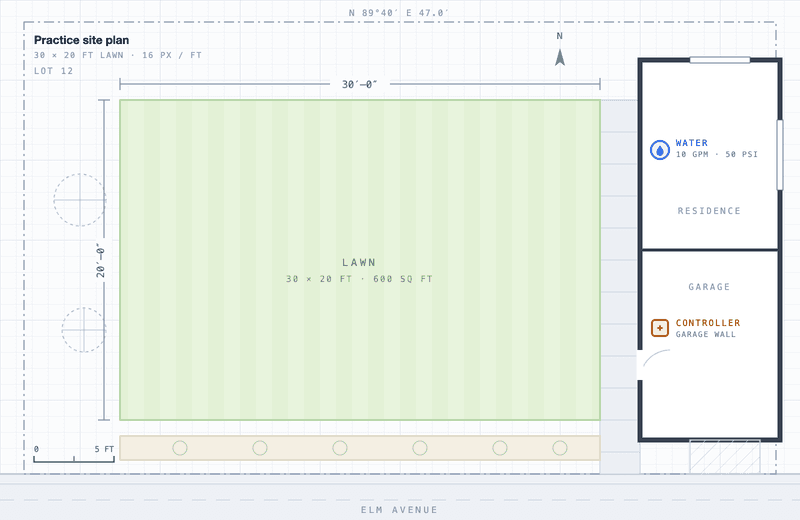
The top green edge is the 30 ft scale reference. The blue marker is the example water source; the amber marker is the controller. Replace the example supply values with your measured flow and pressure before designing.
Example: How Many Heads Fit in a Zone?
With an illustrative 10 GPM supply and 75% planning allowance, the flow budget is 7.5 GPM, provided the valve cap is not lower.
| Assumed heads | Flow calculation | Compared with 7.5 GPM |
|---|---|---|
| Four at 1.5 GPM each | 4 × 1.5 = 6 GPM | Below the budget |
| Six at 1.5 GPM each | 6 × 1.5 = 9 GPM | Above the budget |
These are arithmetic examples, not nozzle specifications. Use each nozzle’s actual flow at the intended arc and operating pressure. A flow budget alone does not prove adequate pressure, matched precipitation, or head-to-head coverage. The planner’s coverage drawing does not model wind or every pressure loss.
Check the Result before Exporting
Inspect the coverage, zone membership, pipe route, and bill of materials. Confirm that beds and turf receive appropriate separate watering. Compare the bill of materials against the chosen manufacturers’ documentation and the requirements for your site.
For a reference image, start with the floor plan measurement guide or satellite area walkthrough. If this is part of a new lawn project, the sod guide explains area allowances and pallet rounding. For a full project that uses these steps from start to finish, see the new build landscaping walkthrough.