
They had an older (1970’s) ranch house on the west side of the Denver metro area. The kitchen had yellowed sheet vinyl which was starting to lift around the patio slider. The hall bathroom had 4 1/4″ square wall tile which started to get soft around the tub and a floor of 1″ mosaic tile with black grout. They wanted to lay a porcelain tile floor in the kitchen and replace the tub surround and floor in the hall bath. However, they wanted to be able to cook while the work was done.
In this post, they measure the rooms using the floor plan included in the listing, calculate boxes, bags and trim sticks needed and schedule the work.
The Project
| House | 1970s single-story ranch, 8 ft ceilings, plywood subfloor over a basement |
| Kitchen | 14 × 16 ft with dinette, island, sheet vinyl |
| Hall bath | 8 × 5 ft, cast-iron tub that stays, 1970s tile on drywall |
| Other bath | A ¾ bath off the primary bedroom, so the hall bath can be out of service |
| Goal | 12 × 24 in porcelain in the kitchen, 2 in hex on the bath floor, 4 × 12 in wall tile to about 7 ft around the tub |
| Approach | Owners do the tile; a plumber replaces the tub/shower valve while the wall is open |
Step 1: The Listing Plan, Scaled and Checked
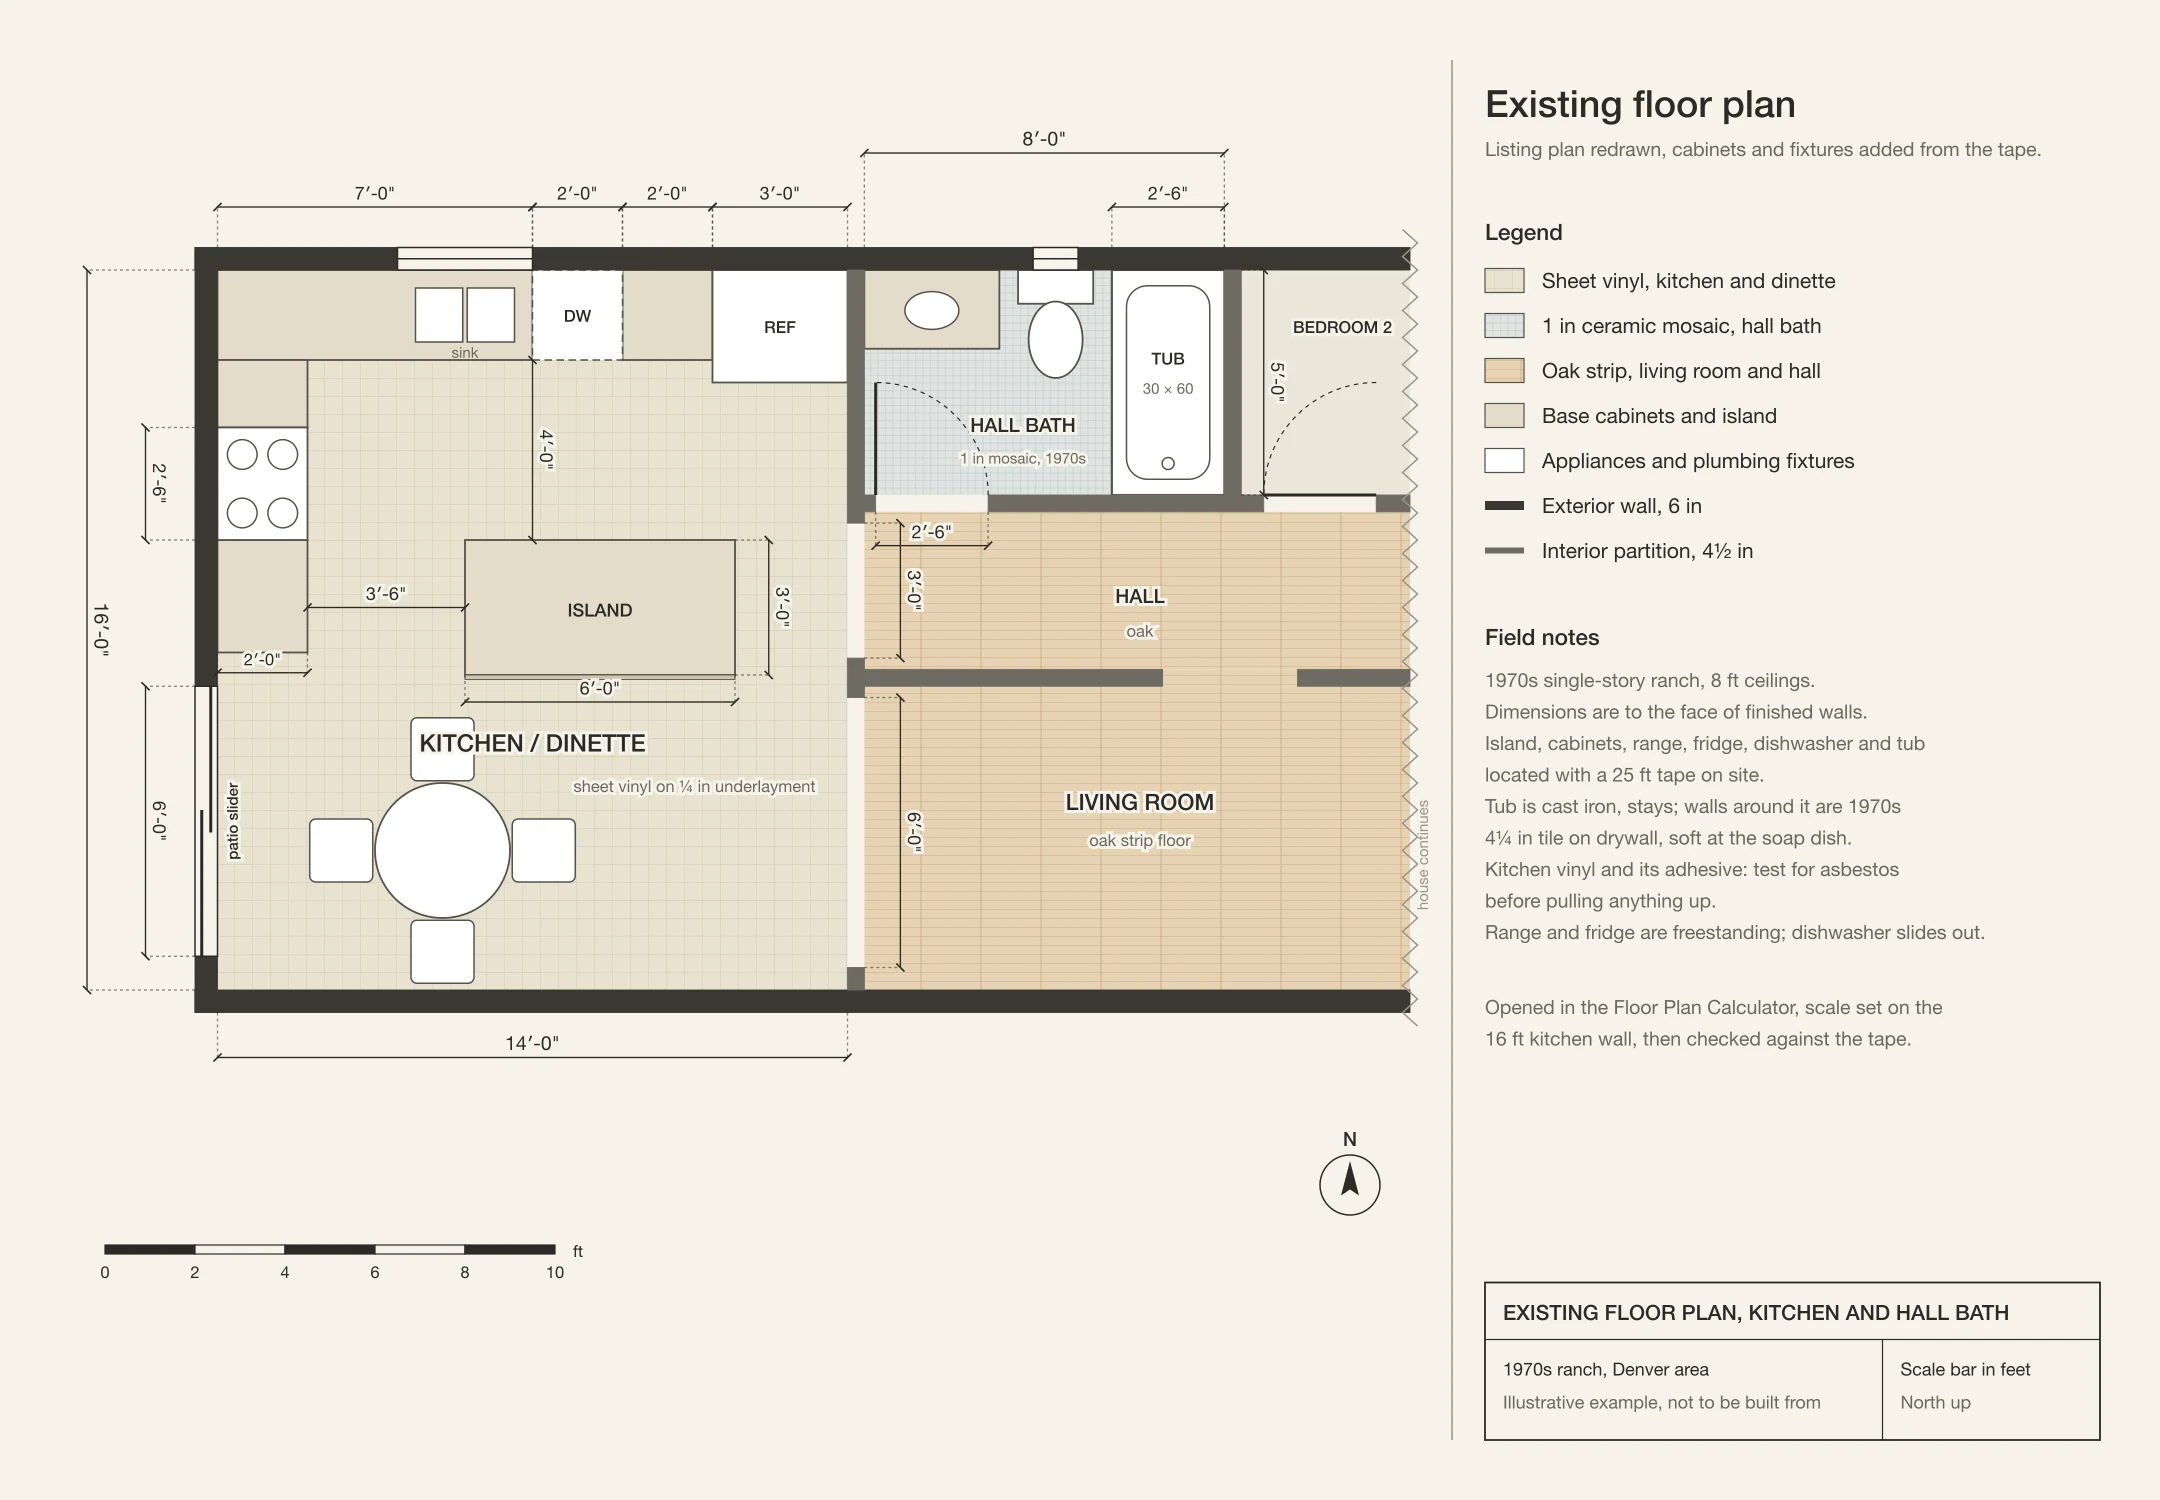
They happened to have the floor plan the realtor gave them when they bought the house, but it did not include any cabinets, the kitchen island or the tub. They printed it out and located and drew in the cabinets, island and tub using a 25’ tape measure. The marked-up plan was then opened in Floor Plan Calculator using the Set Scale tool and the longest wall dimension shown, the 16’ kitchen wall to the east.
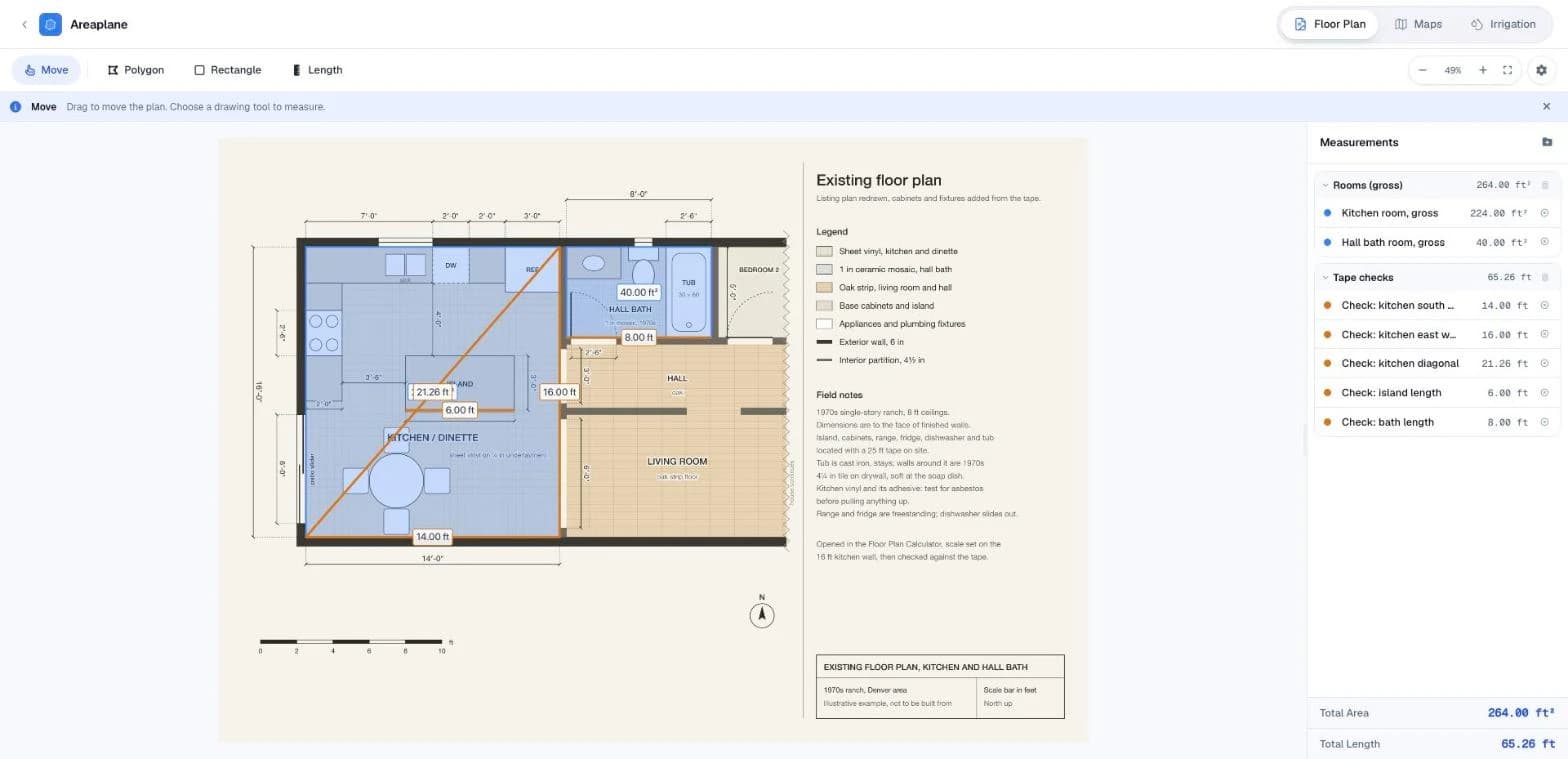
Download the existing-plan project to open it in Areaplane.
They used the Length tool to check the drawing against the tape:
| Check | Areaplane | Tape |
|---|---|---|
| Kitchen south wall | 14.0 ft | 13 ft 11¾ in |
| Kitchen east wall (scale line) | 16.0 ft | 16 ft 0 in |
| Island | 6.0 ft | 6 ft 0 in |
| Bath, door wall | 8.0 ft | 8 ft 0¼ in |
| Tub back wall | 5.0 ft | 4 ft 11⅞ in |
| Kitchen diagonal | 21.26 ft | 21 ft 3 in and 21 ft 3½ in |
It all matched up to within 1/4″. Checking the diagonals is more important for tile than for painting. The two kitchen diagonals measured 1/2″ different which, given the dimensions, means the room is only 0.11 degrees out of square or 3/8″ over the 16’ wall. That much will show up in long grout lines so they decided to snap layout lines off of the island instead of off of a wall.
The gross areas of the two rooms are 224 square feet and 40 square feet.
Step 2: The Tile Takeoff
On another sheet, they determined the areas to be tiled and traced those.
- Under appliances, yes. They decided to tile under all appliances (range, refrigerator and dishwasher bay) for a total of 16.5 square feet so that the appliances could be pulled out at a later date. The floor will be a little higher with the new tile which is ok, but it is a common problem for people to trap the dishwasher in when they raise the floor.
- Under cabinets and island, no. They decided not to tile under the cabinets or the island.
- Bath wall to wall. They decided to tile wall to wall in the bathroom even under the new vanity because the new vanity has a different footprint than the old one and it will be easier to lay out the hex that way. They were not replacing the tub.
Since a polygon cannot have a hole in it (like the island in the middle of the kitchen), they split the kitchen into two polygons using the centerline of the island. Conveniently, the island centerline also divides the job into two phases.
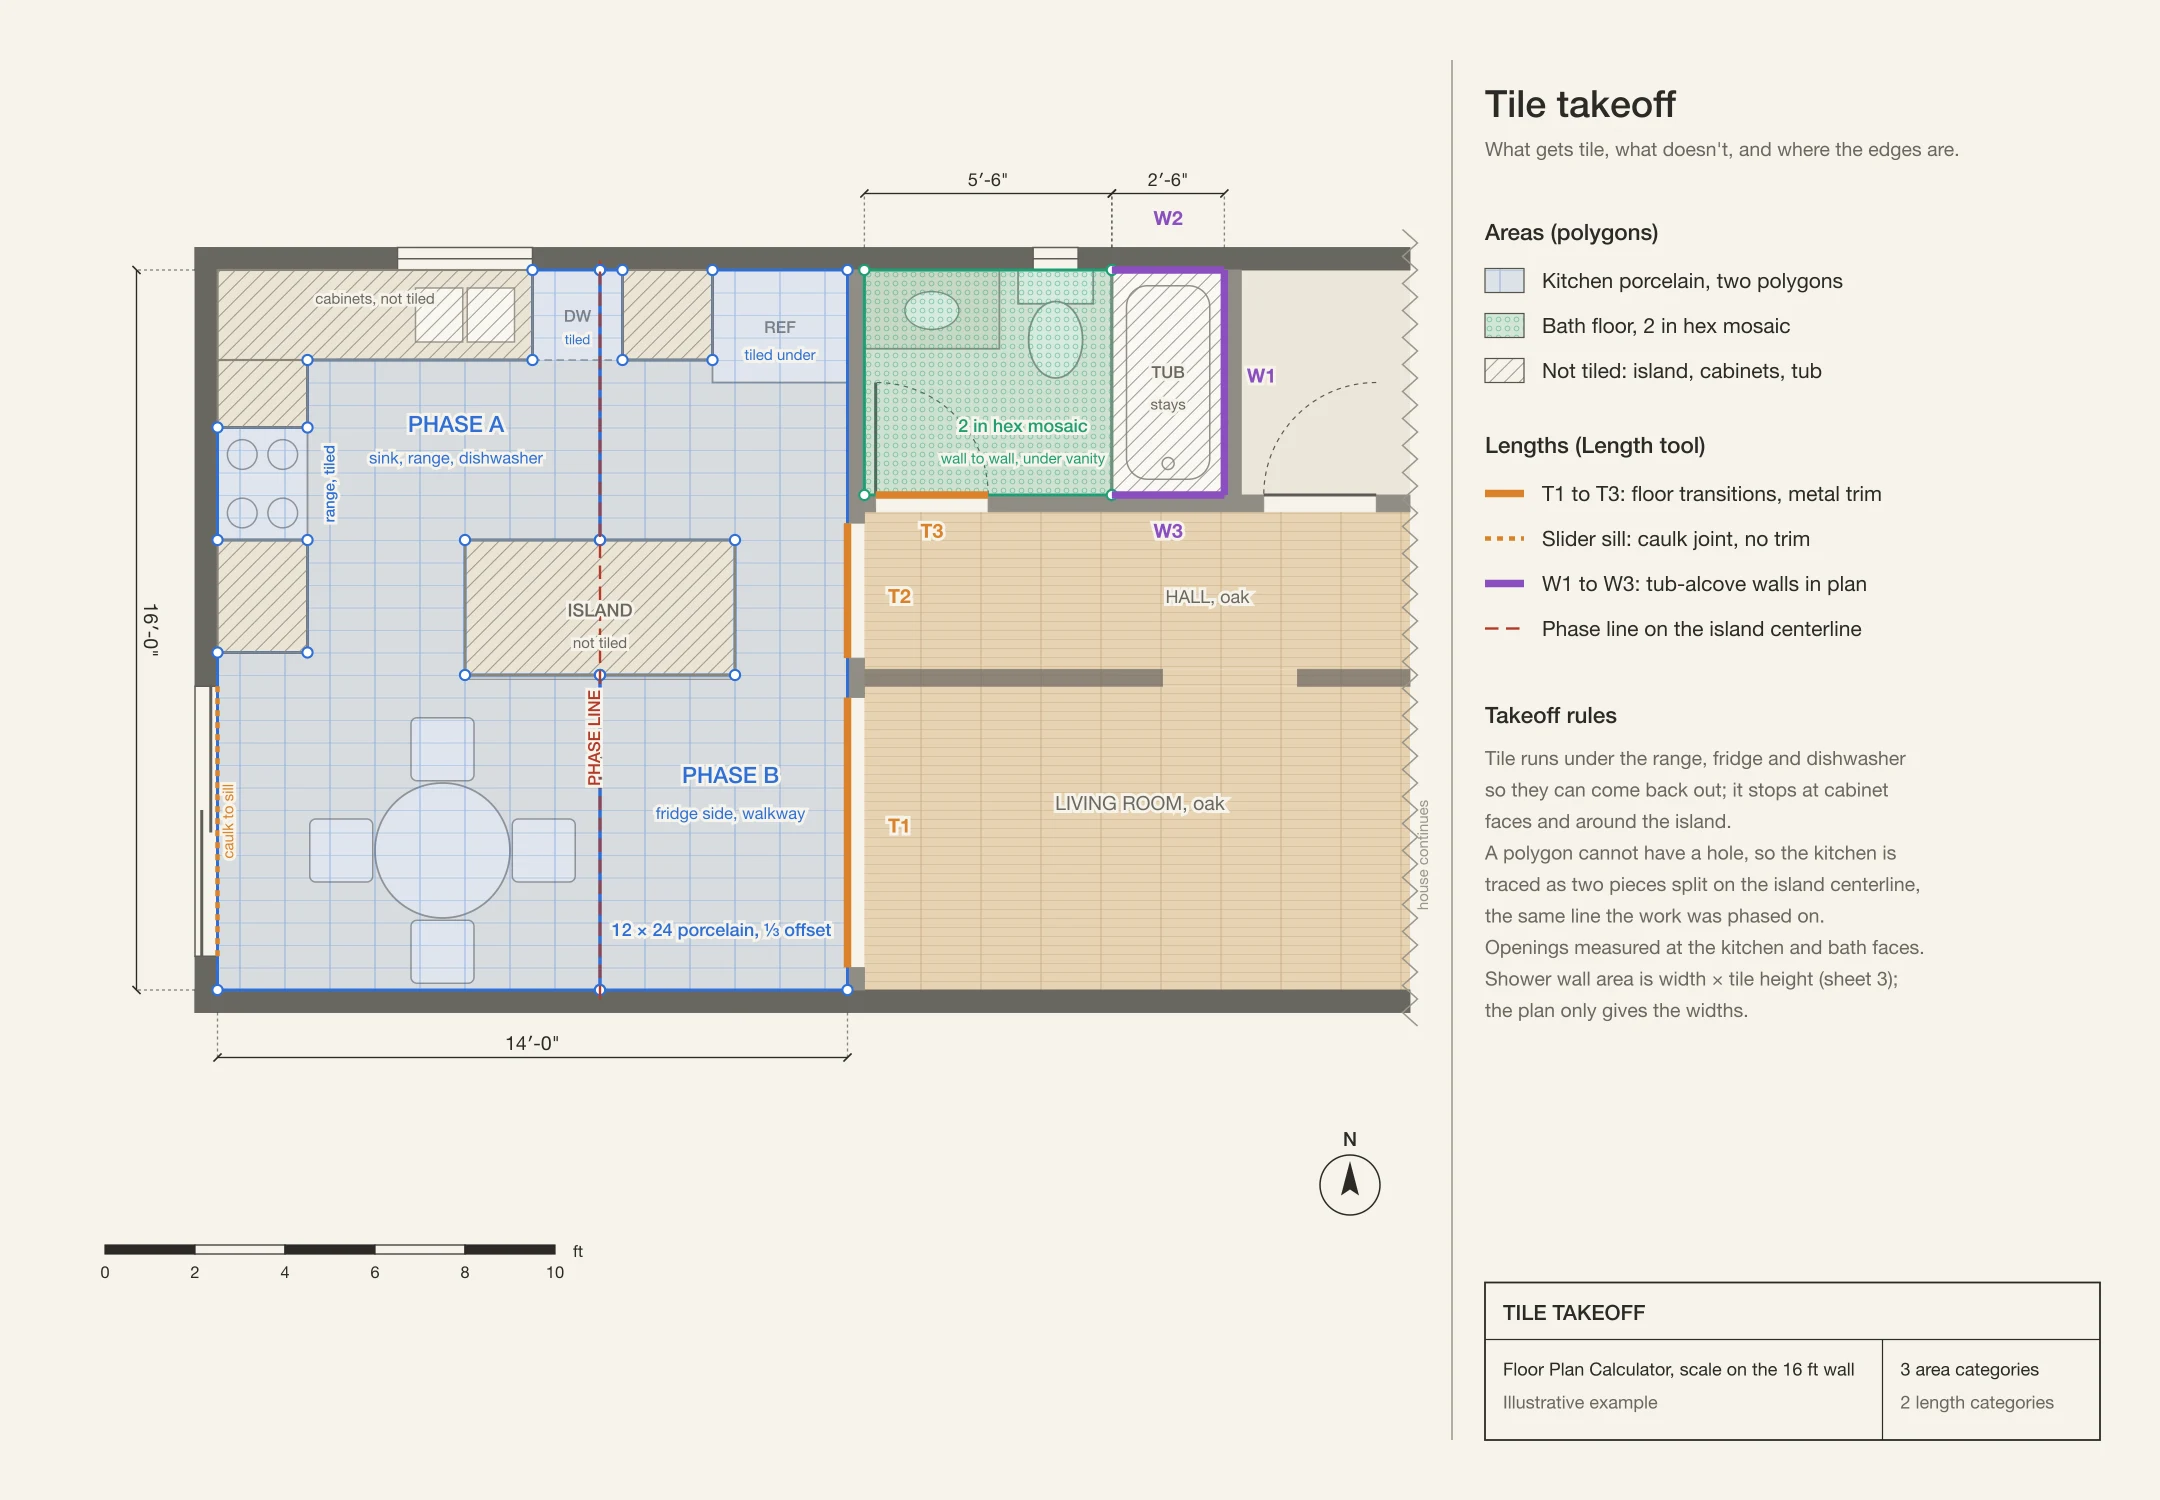
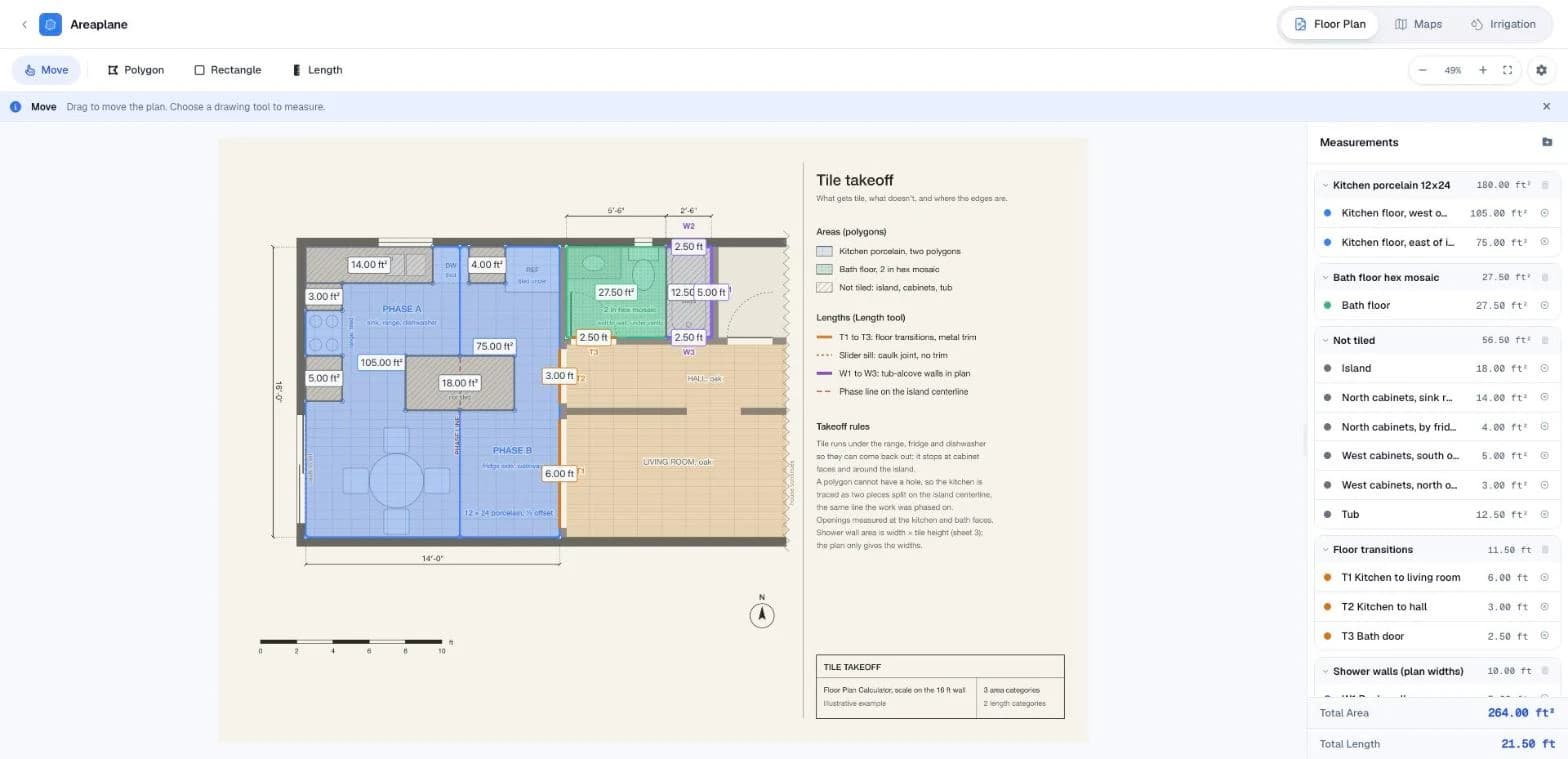
Download the takeoff project to see the polygons and categories.
| Category | Pieces | Total |
|---|---|---|
| Kitchen porcelain | West of island line 105 + east 75 | 180 sq ft |
| Bath floor hex | One rectangle, 5.5 × 5 ft | 27.5 sq ft |
| Not tiled | Island 18, cabinets 26, tub 12.5 | 56.5 sq ft |
| Check | 180 + 27.5 + 56.5 | 264 sq ft = 224 + 40 gross |
| Floor transitions | T1 living room 6, T2 hall 3, T3 bath door 2.5 | 11.5 ft |
| Tub-alcove walls in plan | W1 back 5, W2 and W3 ends 2.5 each | 10 ft |
No trim is needed around the 6’ long patio slider sill since it will be a caulk joint.
Step 3: The Shower Walls
Floor Plan Calculator can only measure what is drawn on the plan and all of the walls are drawn as lines. So, to measure the area to be tiled on the tub surround, they used the widths of the walls they measured on the plan and multiplied by the height they planned to tile. To figure the height, they drew the three walls of the tub alcove out flat on yet another sheet.
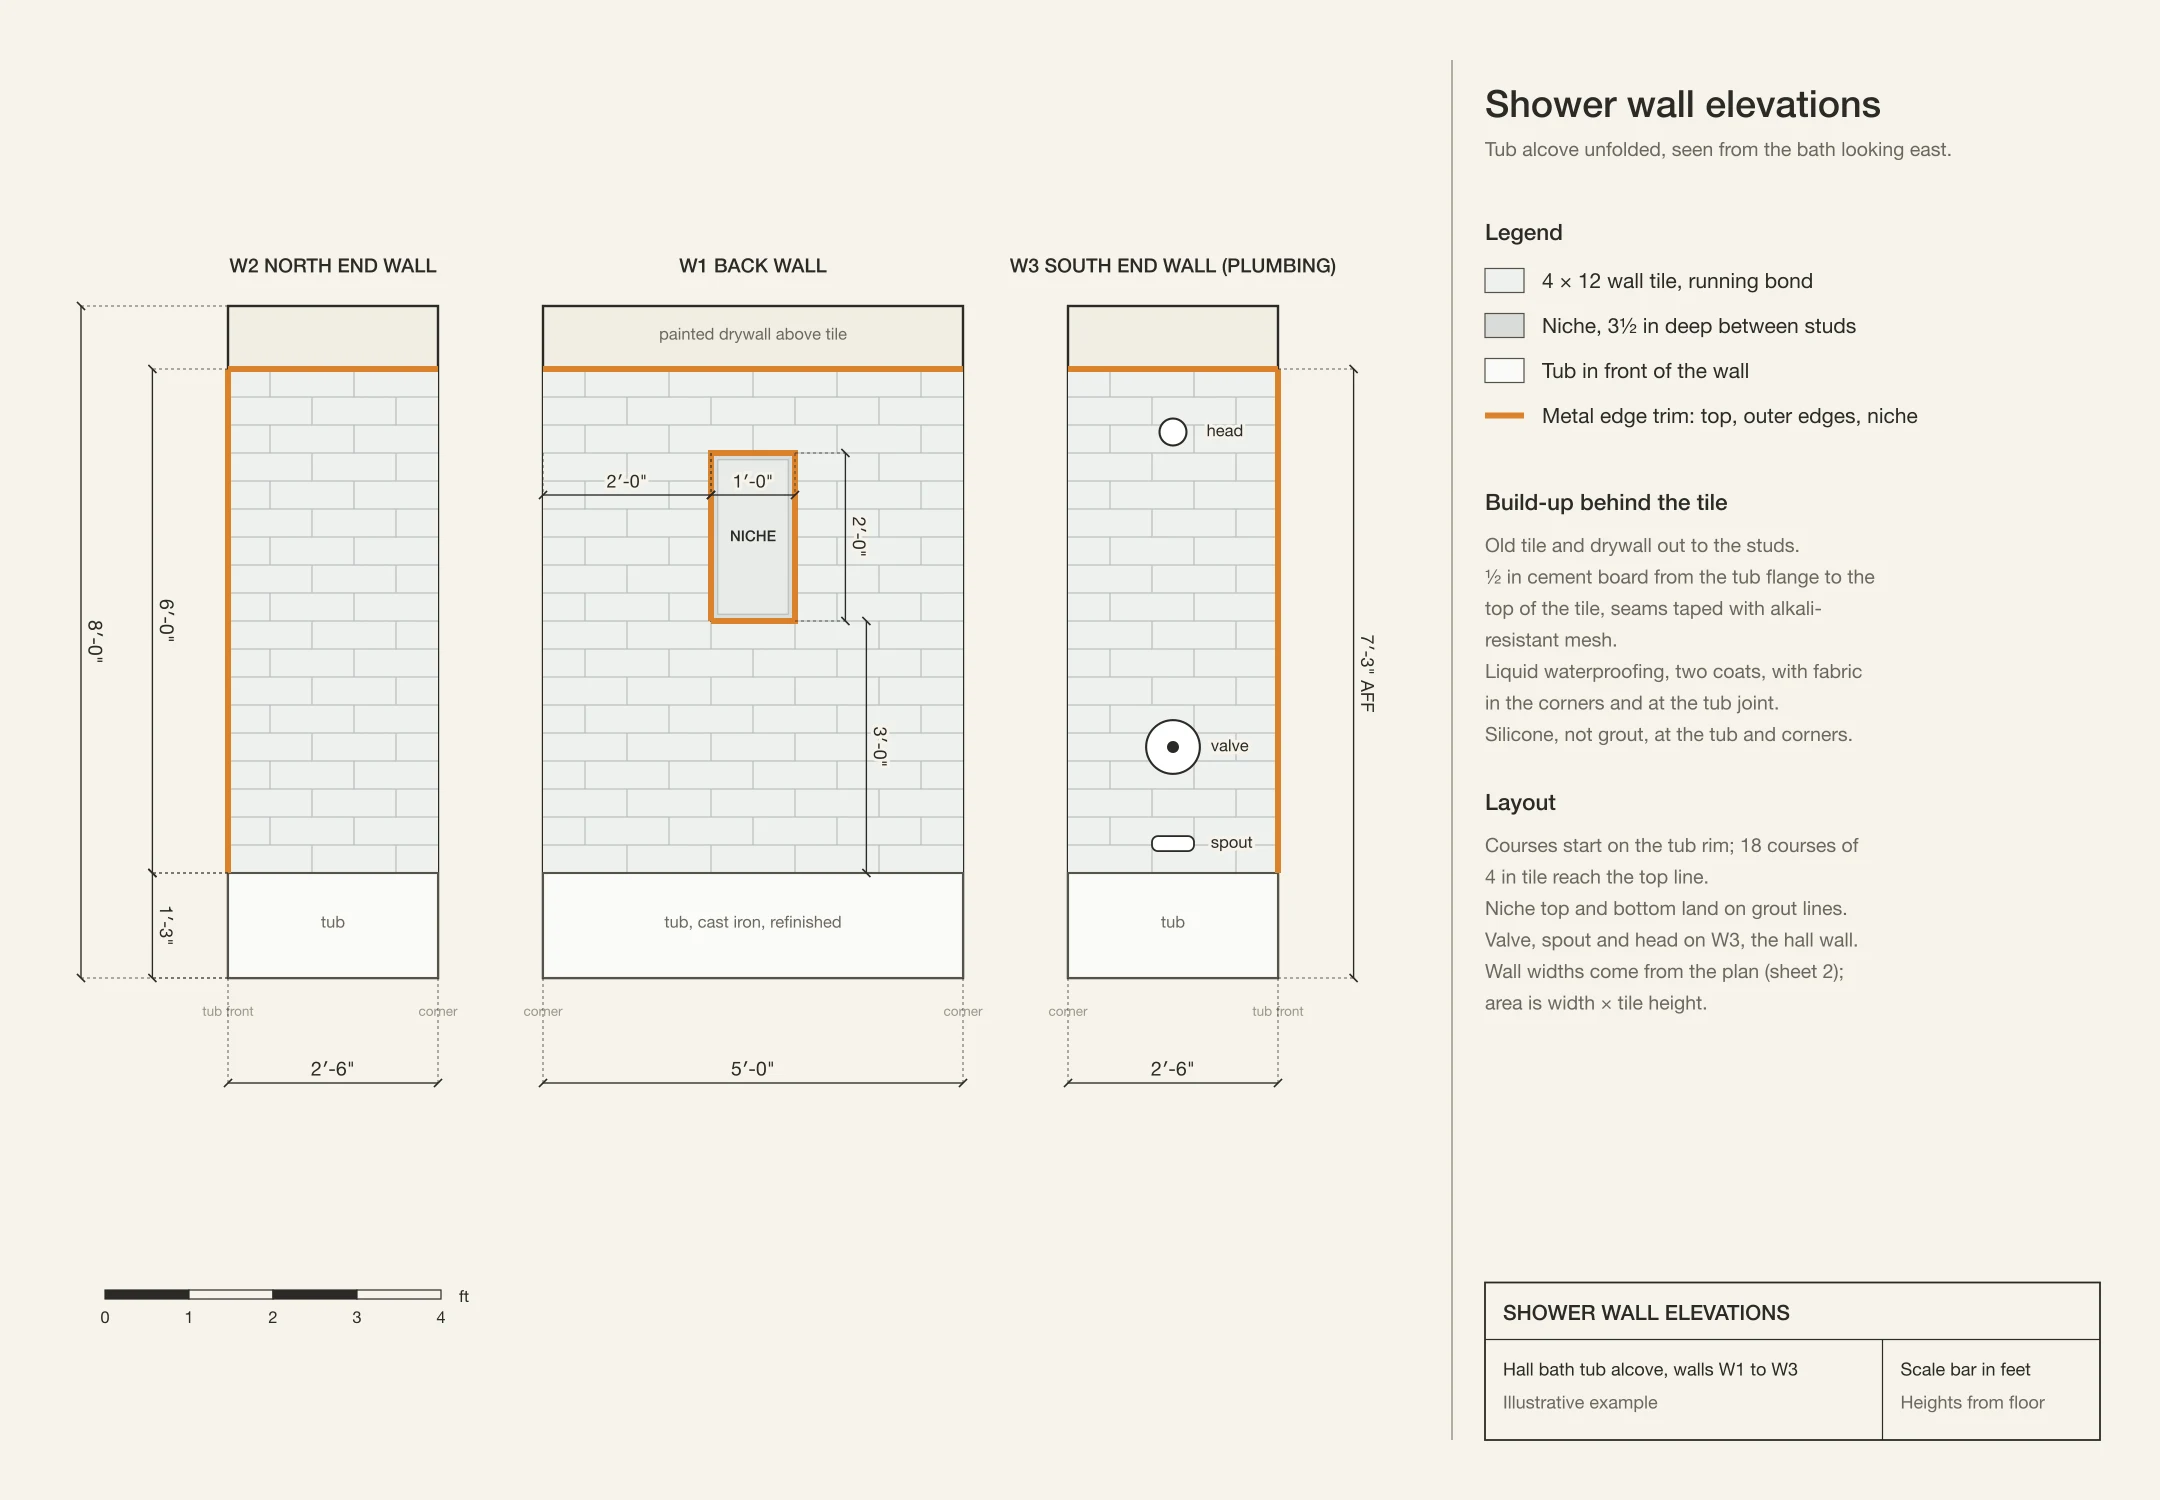
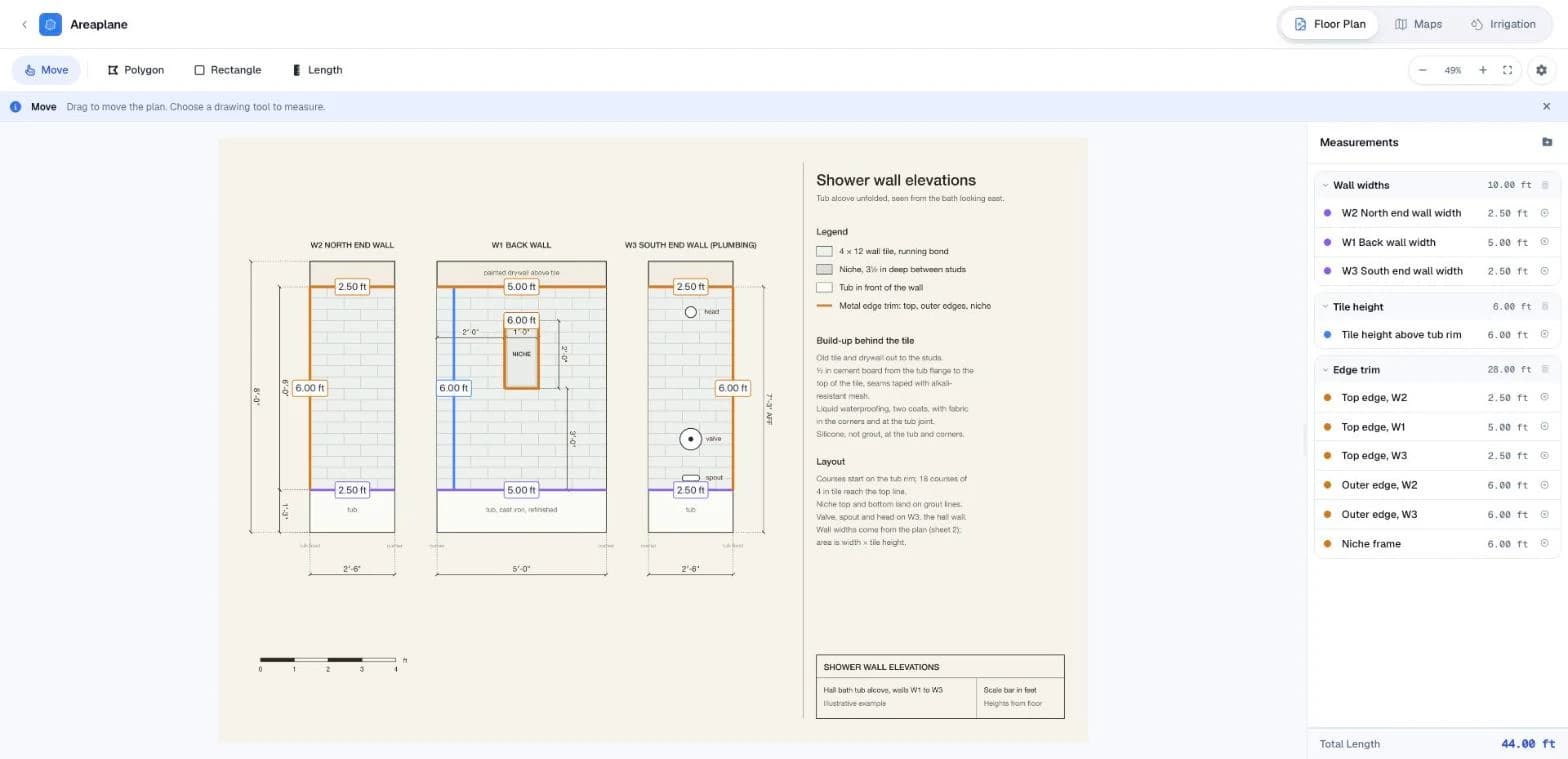
Download the elevation project to check the lengths.
The courses are stepped off from the tub rim, which is 15″ off the floor. 18 courses of 4″ tile is 6 ft, so the top of the wall is 7’-3″ off the floor, a few inches above the shower head. The shower niche is sized to have grout lines at top and bottom.
| Wall | Width | Tile height | Area |
|---|---|---|---|
| W2 north end | 2.5 ft | 6 ft | 15 sq ft |
| W1 back | 5 ft | 6 ft | 30 sq ft |
| W3 south end, plumbing | 2.5 ft | 6 ft | 15 sq ft |
| Niche returns | 2 × (1 + 2) ft perimeter | 3.5 in deep | 1.75 sq ft |
| Total wall tile | 61.75 sq ft |
Note that the back of the niche is already included in the area of the back wall, so just the four returns are added.
Step 4: Turning Areas into Orders
Tile and waste by layout
The percent of waste varies with the layout: least for straight lays, a little more for offset, and the most for diagonal. For large format tile, where one side of the tile is 15″ or more, add about 5 points to the waste percent, because every time you cut a tile, you have a big piece that may not fit somewhere else. The reason that large format tile, over 18″ long, should be offset no more than 1/3, is that tiles this long are rarely perfectly flat. With a 1/2 offset, the high part of the middle of one tile would be butted against the low part of the ends of the adjacent tiles.
| Kitchen layout, 180 sq ft | Allowance | Need | Boxes of 15.5 sq ft |
|---|---|---|---|
| Straight (stacked) | 10% + 5% large format = 15% | 207 sq ft | 14 |
| ⅓ offset | 12% + 5% = 17% | 210.6 sq ft | 14 |
| Diagonal | 18% + 5% = 23% | 221.4 sq ft | 15 |
In this case, the offset didn’t cost anything, so why not? In any case, enough boxes were ordered to get 217 sq ft of tile – 14 boxes, or 112 pieces, which is 20.6% more than the net area. The extra tile will be stored in the basement in case any tiles need to be replaced in the future. It’s important that the extra tile come from the same production lot, since there can be slight variations in color and thickness from one lot to the next.
| Tile | Net | Allowance | Need | Unit of sale | Bought |
|---|---|---|---|---|---|
| 2 in hex, bath floor | 27.5 sq ft | 15% (toilet flange, small room) | 31.6 sq ft | Sheets of 0.94 sq ft | 34 sheets (32.0 sq ft) |
| 4 × 12 wall tile | 61.75 sq ft | 12% (niche, valve cuts) | 69.2 sq ft | Boxes of 10 sq ft | 7 boxes (70 sq ft) |
What goes under the tile
| Item | Basis | Quantity |
|---|---|---|
| Uncoupling membrane, kitchen | 180 sq ft + 10% for seams = 198 sq ft | One 175 + one 54 sq ft roll |
| ¼ in cement board, bath floor | 27.5 sq ft; two 3 × 5 sheets cover 6 × 5 ft | 2 sheets |
| ½ in cement board, tub walls | Back wall 2 sheets laid flat; each end 1 sheet stood up; 1 sheet ripped for the top strips | 5 sheets, bought 6 |
| Liquid waterproofing | 61.75 sq ft at 55 sq ft per gallon, two coats | 2 gallons, plus corner fabric |
The membrane will go on the existing plywood subfloor after the vinyl has been removed. Before ordering the membrane, the vinyl and the glue under the vinyl were tested for asbestos, since a lot of the floors from that era have vinyl with asbestos. This one didn’t, but if yours does, you need to do some googling to find out the rules for your state.
Two other things to check before ordering the membrane: is the floor stiff enough for porcelain tile, which requires L/360, and what will the finished height be with the membrane, thinset and 3/8″ tile? From down in the basement, it looks like the joists are 2×10 at 16″ on center, spanning about 13 ft. Checking a span table, it looks OK with a little bit of margin, and the subfloor will be screwed down again at 6″ on center to the joists. The 3/8″ tile, plus thinset and membrane, will add about 3/4″ to the floor height, which is about the same as the oak flooring in the living room and hall, so a flush transition can be used at T1 to T3 instead of a ramped reducer.
Thinset by trowel
The square feet per 50 lb bag can be found on the bag – use the chart for the size trowel you’ll be using. It will be a lot more for a larger size trowel.
| Use | Trowel | Sq ft per bag | Area | Bags |
|---|---|---|---|---|
| Membrane to plywood | ¼ × 3/16 in V | 100 | 180 | 1.8 → 2 unmodified |
| 12 × 24 tile on membrane | ½ × ½ in square, back-buttered | 40 | 180 | 4.5 → 5 large-format |
| ¼ in board, bath floor | ¼ × ¼ in square | 90 | 27.5 | 0.31 |
| 2 in hex sheets | 3/16 in V | 100 | 27.5 | 0.28 |
| 4 × 12 wall tile | ¼ × ¼ in square | 90 | 61.75 | 0.69 |
| Bath subtotal | 1.28 → 2 modified |
Note: you need to use whatever thinset is specified by the membrane/waterproofing manufacturer.
Grout by joint and tile size
Pounds per sq ft = (L + W) ÷ (L × W) × joint width × tile thickness ÷ 12 × weight, where L, W are in inches, and the weight is 116 lb/cu ft. Note that the amount of grout per square foot is a lot more for smaller tile, since there’s a lot more square feet of joints per sq ft of floor. In this case, there’s over 2.5 times as much grout per sq ft for the hex tile as for the 12×24.
| Area | Tile, joint, depth | lb per sq ft | lb | +25% | Bought |
|---|---|---|---|---|---|
| Kitchen | 12 × 24, ⅛ in, ⅜ in | 0.057 | 10.2 | 12.7 | One 25 lb bag |
| Bath floor, dark gray | 2 in hex, 1/16 in, ¼ in | 0.151 | 4.2 | 5.2 | One 10 lb box |
| Tub walls, white | 4 × 12, 1/16 in, 5/16 in | 0.063 | 3.9 | 4.9 | One 10 lb box |
Edge trim, measured with the Length tool
The trim comes in 8.2 ft (2.5 m) long sticks, and each run has to be a single piece.
| Trim | Runs (ft) | Total | Sticks, as cut |
|---|---|---|---|
| Flush transition, tile to oak | 6, 3, 2.5 | 11.5 ft | 2: 6; 3 + 2.5 |
| Shower edge | Tops 2.5, 5, 2.5; outer edges 6, 6; niche 1, 1, 2, 2 | 28 ft | 4: 6 + 2; 6 + 2; 5 + 2.5; 2.5 + 1 + 1 |
Step 5: A Schedule Around a Working Kitchen
Since there’s another shower in the house, the bathroom was done first. The kitchen will be done in two halves, using the line down the middle of the island as the dividing line. Half “A”, with the sink, range and dishwasher, is 105 sq ft, and half “B”, with the refrigerator and the walkway to the living room, is 75 sq ft. Either half can be used while the other half is being done.
It’s not so much the time required to do the work, but the cure times between the steps. The bags say 24 hours before light foot traffic, and then the floor can be grouted, and the appliances put back on about 72 hours after the grout is done. That means each half of the kitchen will take a weekend and most of the following week to do, even though it only took one long day to set the 105 sq ft of half “A”. For the bathroom, the waterproofing had to cure completely before the tile could be set, and the silicone had to cure for a day before the shower could be used.
| Dates (2026) | Work |
|---|---|
| Jul 11 | Listing plan scaled, tape check, takeoff |
| Jul 13–17 | Vinyl and adhesive samples to a lab: none detected |
| Jul 18 | Tile, membrane, board and trim ordered; plumber booked |
| Aug 1–2 | Bath demo to the studs and subfloor; soft plywood patched at the toilet |
| Aug 4 | Plumber replaces the tub/shower valve |
| Aug 8–9 | Cement board on walls and floor, niche framed, seams taped |
| Aug 10–12, evenings | Waterproofing, two coats, cured |
| Aug 15–16 | Wall tile; grout Aug 18 |
| Aug 22–23 | Hex floor, then grout |
| Aug 29 | Silicone, toilet, vanity, trim; bath back in use |
| Sep 5–7 (Labor Day) | Phase A: vinyl up, membrane, tile to a stepped edge at the island line |
| Sep 9 | Phase A grout; range and dishwasher back Sep 11 |
| Sep 12–13 | Phase B: fridge to the living room, vinyl, membrane, tile |
| Sep 15 | Phase B grout |
| Sep 19 | Transitions, base trim, fridge back; grout sealed a week later |
Where the tile meets the island, there's a "stop" edge that follows the stepped line of the ends of the tile. This was done by scraping the thinset back to the stop-edge after the tile was laid, but before the thinset set. Phase A was the microwave and a new induction cooktop on a folding table in the living room with dishes washed in the bath. Phase B had a sink and range, with the refrigerator on a piece of cardboard in the living room for a week.
The Final Numbers
| Line | Estimate | Final |
|---|---|---|
| Kitchen porcelain, 14 boxes | $673 | $673 |
| Bath hex, 34 sheets | $336 | $336 |
| Wall tile, 7 boxes | $298 | $322 |
| Uncoupling membrane, 2 rolls | $470 | $470 |
| Cement board, screws, mesh tape | $178 | $178 |
| Waterproofing and fabric | $164 | $164 |
| Thinset, 9 bags | $276 | $276 |
| Grout, silicone, sealer | $141 | $141 |
| Edge trim, 6 sticks | $200 | $200 |
| Asbestos test | $100 | $100 |
| Subfloor patch at the toilet | $0 | $65 |
| Plumber, new valve | $650 | $780 |
| Tools: rail cutter, wet saw, leveling clips, trowels | $575 | $575 |
| Disposal, protection, temporary-kitchen supplies | $200 | $215 |
| Total | $4,261 | $4,495 |
The finished cost was $234 over, or 5.5%, due to a $0.35/sf increase in wall tile, extra work for the valve, and patching a piece of subfloor not included in the original plan. There was no error in quantities, although there is a box of porcelain tile, four sheets of hex tile and most of a box of wall tile remaining.
A quote for the tile setting came in at $8,340 for labor. Breaking it out, it was $1350 demo, $2340 kitchen @ $13/sf, $950 bath floor, $3400 surround, and $300 for trim. With the same $2,760 in materials, the test, and the plumber, the total cost for that bid would have been $11,980. Aside from the savings of ~$7500, which was the primary motivation for this project, the waiting time for the tile setter was six weeks. This project required five weekends and a lot of evenings.
Although the quote wasn't used, it provided an excellent check on the quantities in the takeoff, since the items were almost exactly the same. If the subfloor had needed to be rebuilt, or the room had been far out of square, it would have been necessary to use the tile setter for the kitchen part of the job and do just the bath themselves.
What They Would Do Differently
- Be sure to measure the diagonals before buying tile. In this case, the 3/8" didn't matter, but it could have.
- Order the asbestos test as soon as it's known that a remodel is wanted. This was the only week in the project that nothing was done.
- Open up the wall before calling the plumber, to see if a new valve body is needed, rather than a cartridge. This one needed a new body.
- Keep all of the files, in case a replacement tile is needed at some time in the future. The takeoff will tell you exactly what is needed.
Use This on Your Own Tile Project
- Open the listing's or your own drawn plan in Floor Plan Calculator. Set the scale using the longest dimension and check the length of three or four other dimensions, as well as a diagonal, to make sure that the scale is correct, using your tape measure.
- Decide where tile will be used, such as under free-standing appliances, but not under cabinets. Trace around only the areas that will be tiled. If there is an island in the room, trace the areas separately, since a polygon cannot have a hole in it.
- Separately record the areas to be tiled, the areas not to be tiled, and the length of trim. The tiled and not-tiled areas should add up to the entire room.
- Measure the walls by the width and the height that the tile will be set. This should be a whole number of courses.
- Decide on the layout of the tiles before estimating the amount of waste. A higher percentage of waste may be needed if large format tiles are used.
- Estimate the thinset from the trowel size chart and the grout from the width of the joints and the size of the tiles. These should be rounded up to the amount sold.
- Make a phasing plan for a working kitchen along one of the traced lines.
For more, see how to measure square footage from a floor plan and how to measure an irregular room.