
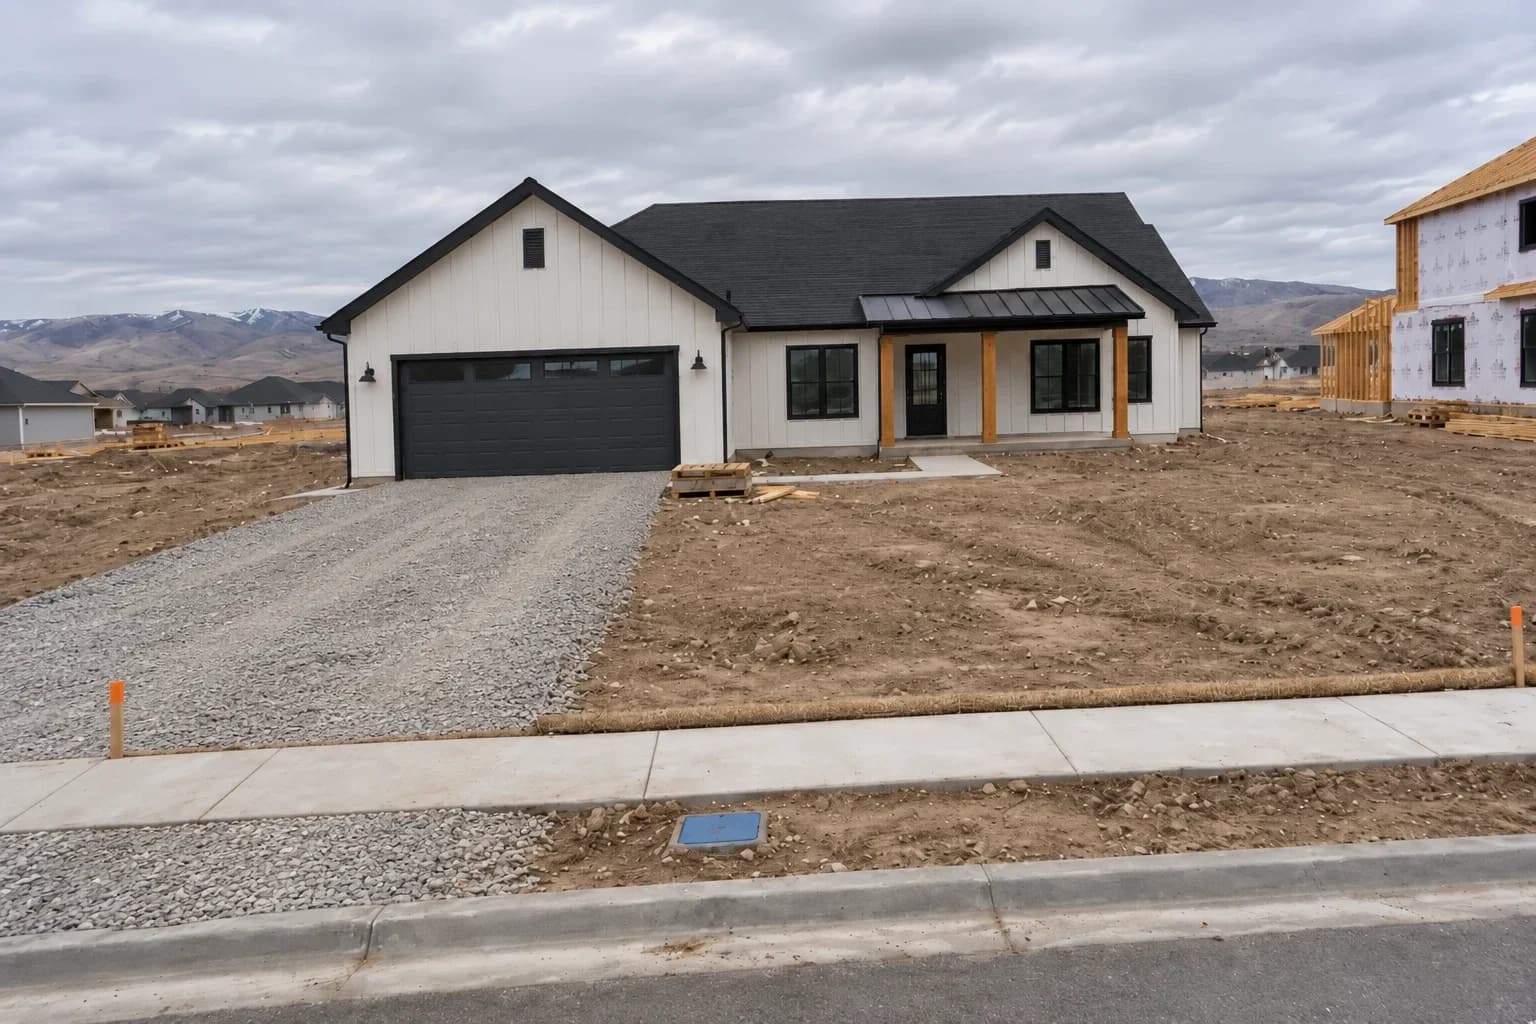
So you finally closed on the new build and got the keys. But as you look at the giant rectangle of dirt, the straw wattle along the curb, and the paperwork from the HOA about getting your front landscaping in before the 6 months are up, you scratch your head. Why do the landscape companies want $38-61k to do the yard, and what does it even include?
This post will walk through one example, from start to finish, of getting the landscaping on a new build done right. It will show how we measured our lot before it was built, got a material takeoff from the plot plan, designed the sprinkler system, and ordered everything we needed to get the work done. All measurements and quantities were generated using Areaplane.
The Project
The setting: Lot 27 in a new subdivision on the edge of a city, in a high desert area with cold winters and hot, dry summers, and clay-loam soil. The local water district requires a backflow preventer for all irrigation systems.
| Item | Detail |
|---|---|
| Lot | 80 × 130 ft, 10,400 sq ft (0.239 ac) |
| House | Single story, 2,784 sq ft footprint including the garage |
| Water | 1 in. service, 72 psi static, 12 GPM measured |
| Goal | Lawn front and back, low-water beds, a paver patio, privacy fence, vegetable beds, automatic irrigation |
| Approach | Homeowners do layout, irrigation, beds, planting, and sod. Fence and patio are contracted. |
The tools used, in order:
- The Google Maps Area Calculator for a first pass on satellite imagery, before closing.
- The Floor Plan Calculator for a precise takeoff on the builder's plot plan.
- The Irrigation Planner for the sprinkler and drip layout, zones, and parts list.
Step 1: A Satellite First Pass, Before Closing
In order to get a rough idea for how much to include in the budget for landscaping, the household needs a number to put in the loan paperwork. Since they don't have the plot plan yet, they go to the map tool, type the address into the search bar, and click "Satellite" from the map type drop-down.
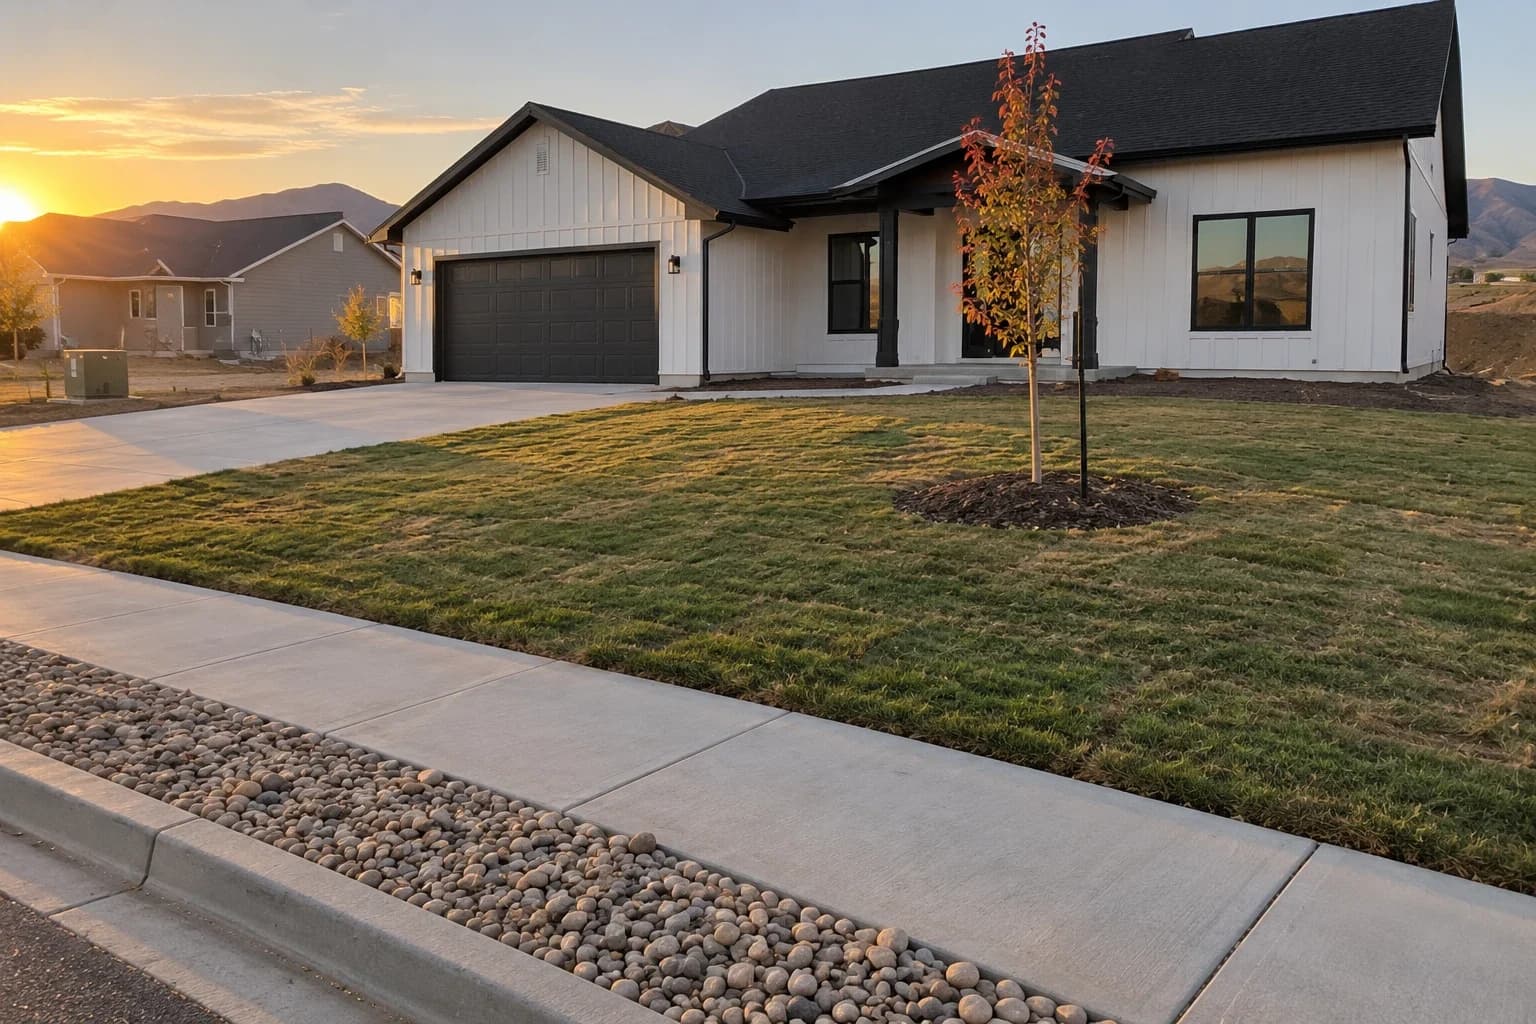
The imagery is from last autumn, but they can tell that the house is framed and roofed, the driveway is in, and the ground is bare. That's good enough for a rough measurement.
They measure the lot, and seeing that it's within 1% of the 10,400 sq ft in the listing, they feel that the lot is measured correctly. They can tell they got it right because they can see the corner stakes and the neighbors' new fences on the satellite imagery.
They measure the open ground, including the park strip along the sidewalk, using one big polygon around the house and concrete. It comes out to 7,190 sq ft.
They measure the length of the fence, from the back corners of the house along the rear and both sides of the house, using the Length tool. It's 256 ft long.
Armed with the open ground area, they call a few landscape contractors and get a rough idea of how much it will cost to put in lawn in half the area and the rest as beds, rock, gravel, and a patio. With the fence and patio contracted out, they estimate around $27,400. That number goes into the loan paperwork, and in the end it is within 6% of the final cost.
Approximating from satellite imagery. If you're using this technique to get a rough estimate, keep in mind that the imagery may be several months out of date, it may not be possible to see the walls of the house if they're behind the roof eaves, and it's very difficult to get an accurate trace at this scale. Make sure to factor in at least 5% in either direction for any numbers you get.
Step 2: The Plot Plan and a Tape Check
When the paperwork for the house closes, the title company hands the household a folder full of papers, including a plot plan from the builder. This plan shows the lot lines and dimensions, the house footprint and setbacks, the finished grades of the site, and the route of the water service, among other things. It also notes that there will be 2" sleeves for the irrigation lines under the driveway and walk, which will be important for the design.
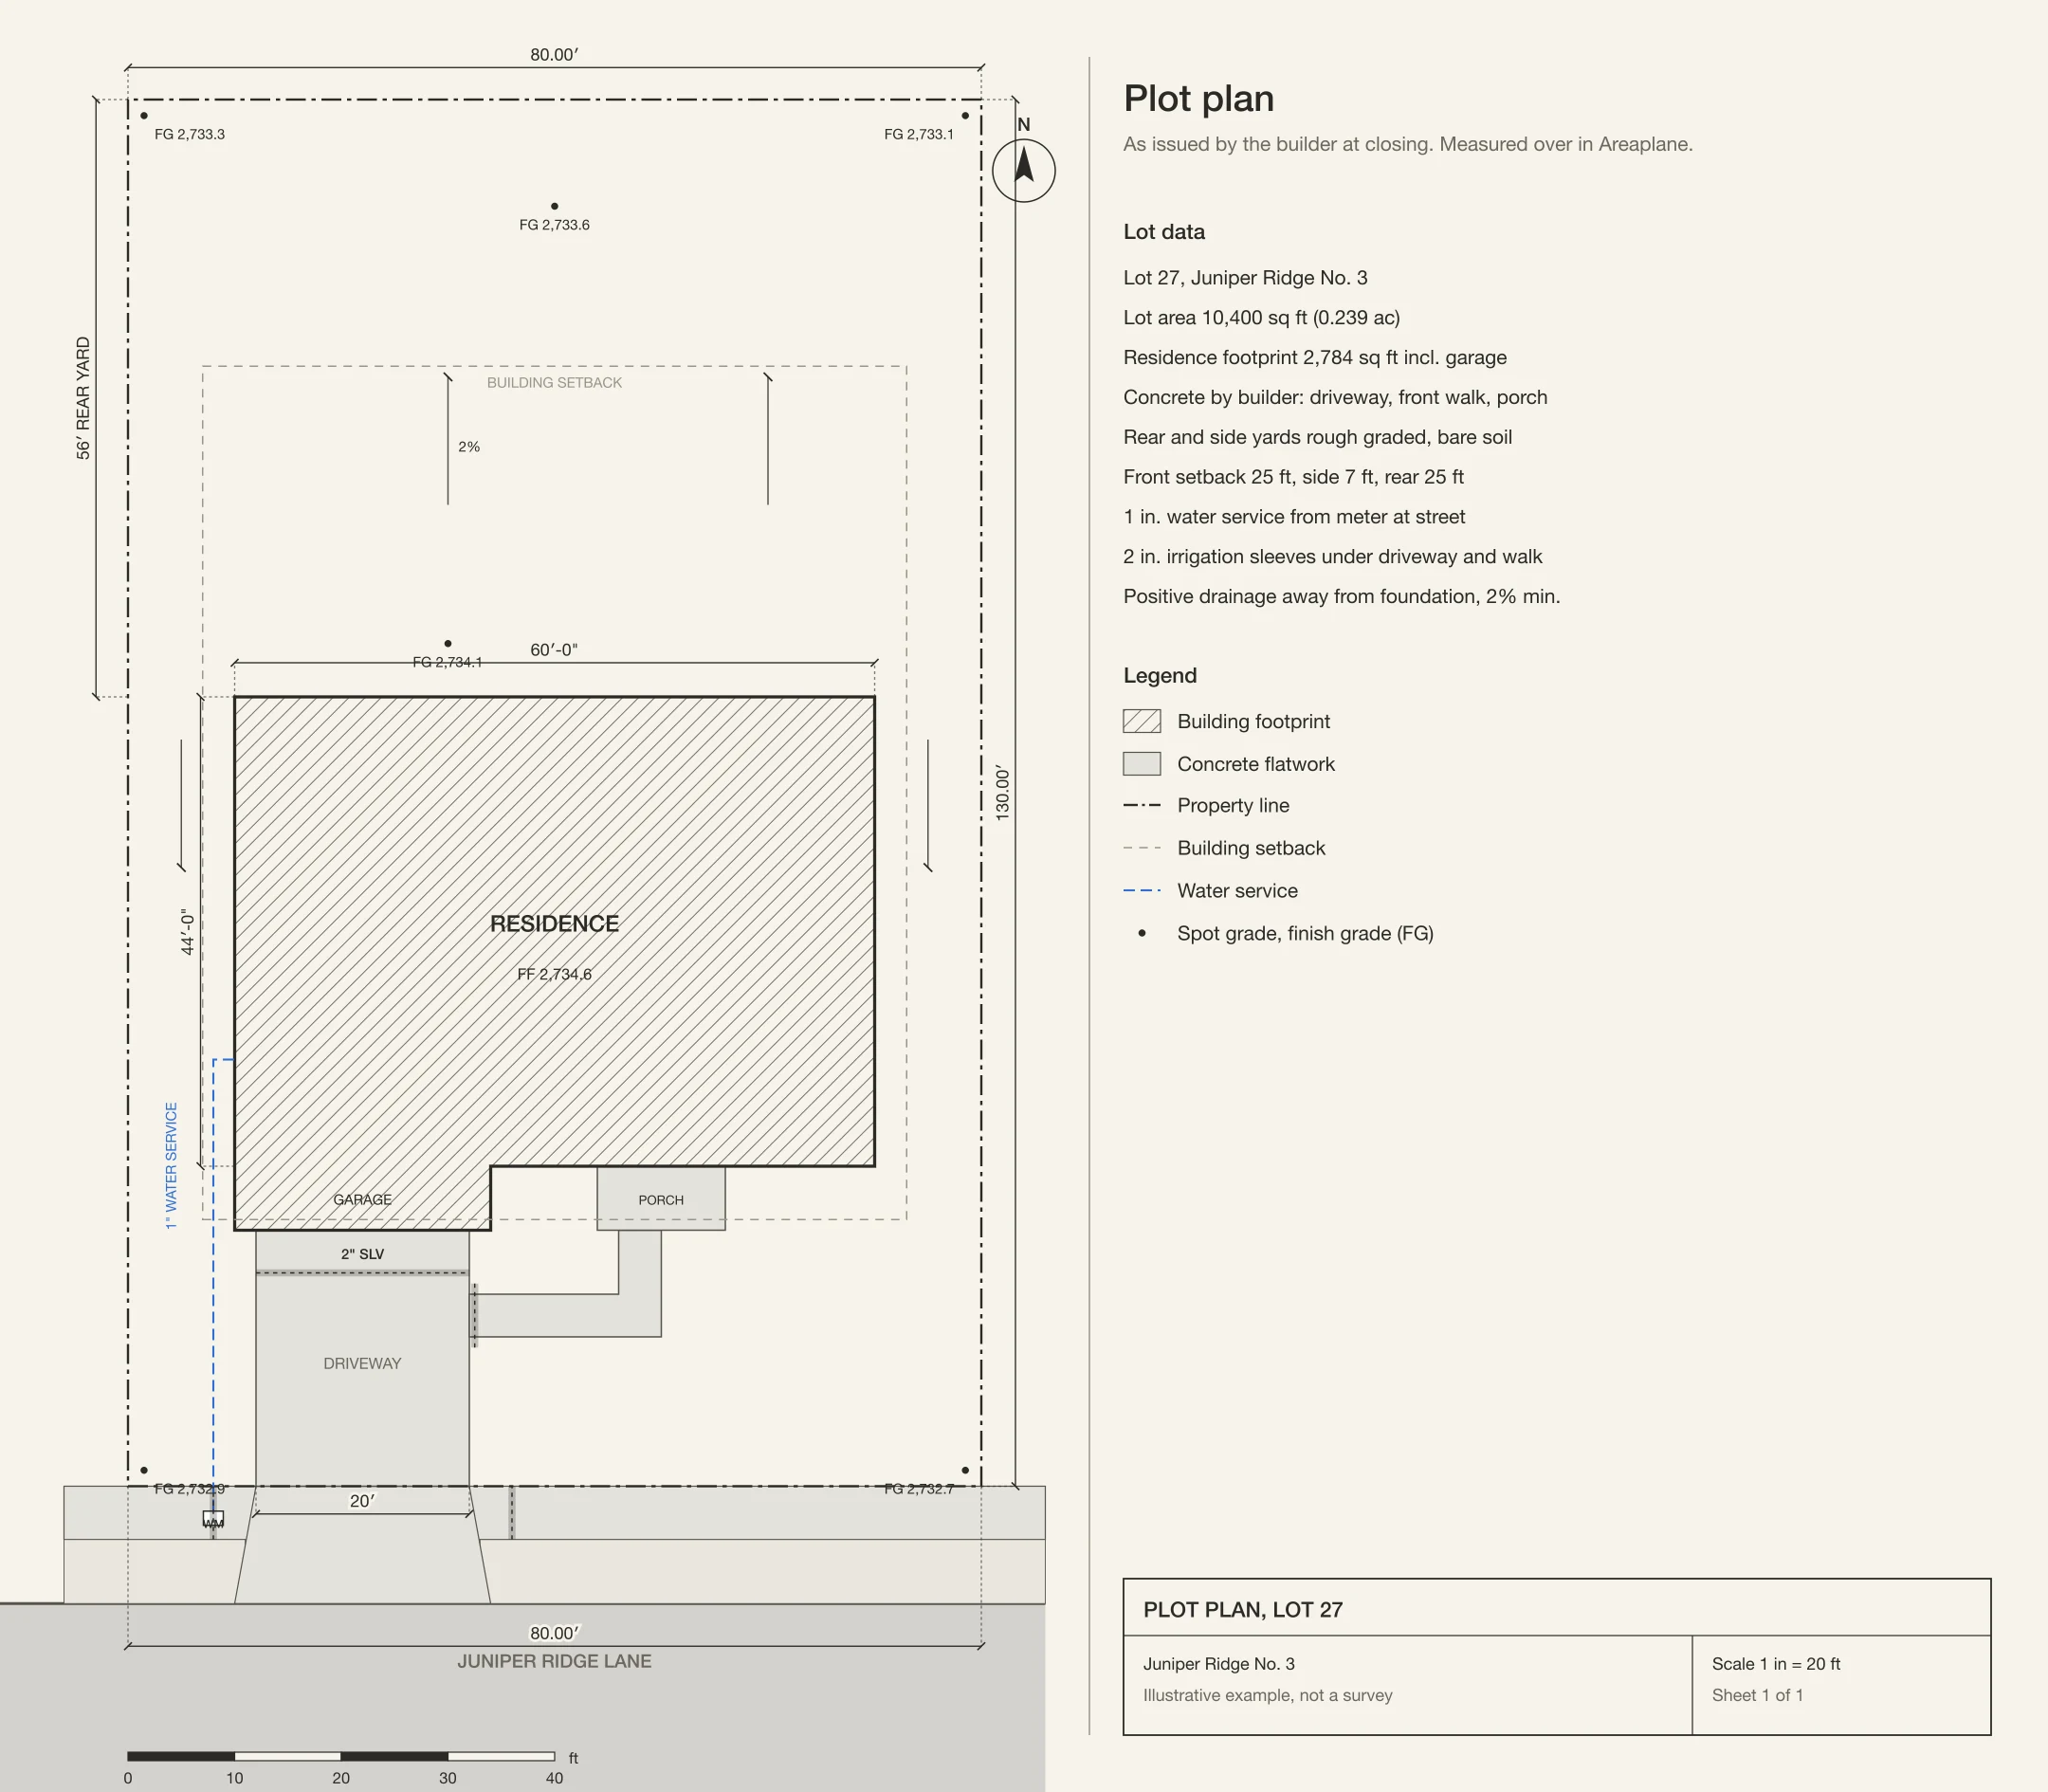
They scan the plan, upload it to the Floor Plan Calculator, and use the Set Scale tool to scale it, by drawing a line along the front lot line and entering 80 for the distance (the lot line is marked 80.00).
They check three lengths on the site with a 100' tape measure, and then use the Length tool to check the corresponding lengths on the plan.
| Check | Tape | Areaplane on the plot plan |
|---|---|---|
| Driveway width | 20 ft 0 in | 20.0 ft |
| House rear wall | 60 ft 1 in | 60.0 ft |
| Rear wall to rear lot line | 56 ft 2 in | 56.0 ft |
Since these all agree, the plan is scaled correctly and they can proceed with measuring. If there had been any major discrepancies, it would indicate that the scan is distorted or the house was not built where it's shown on the plan, and they should scan the plan again or measure more areas of the site to figure out what's off.
Step 3: Design the Yard, Then Measure It
Using the plot plan as a guide, the household sketches out where they want the various parts of their yard. Then they go back to Areaplane and trace out the various surfaces that they need. Some of the design decisions they make are driven by the measurements they take.
They decide not to put in a lawn in the narrow strips between the driveway and the property line, because it's only 12' wide along the street and 10' wide next to the garage. To irrigate it, they'd have to use spray heads, which would require a separate zone from the main lawn. Mowing it would require running one wheel of the mower on the neighbor's side, and spraying it would hit the driveway, which isn't good for the concrete. They decide to fill the area with river rock and put in some drip-irrigated grasses.
They also decide not to put in a lawn in the park strip between the sidewalk and the curb. Although the park strip belongs to the city, it's the household's responsibility to maintain it. It's only 6' wide, and local codes don't allow spray irrigation in strips that narrow. They fill it with rock, put in some more ornamental grasses, plant a tree to provide shade along the street, and hook up the whole thing to a drip system.
First, a plan: The backyard was to be a large paver patio 28×16' immediately outside the back door. The patio would have planting beds along each side, a large deep curved planting bed along the back fence (to support a row of privacy trees), and a gravel pad supporting two raised beds for vegetables in the northeast corner of the yard.
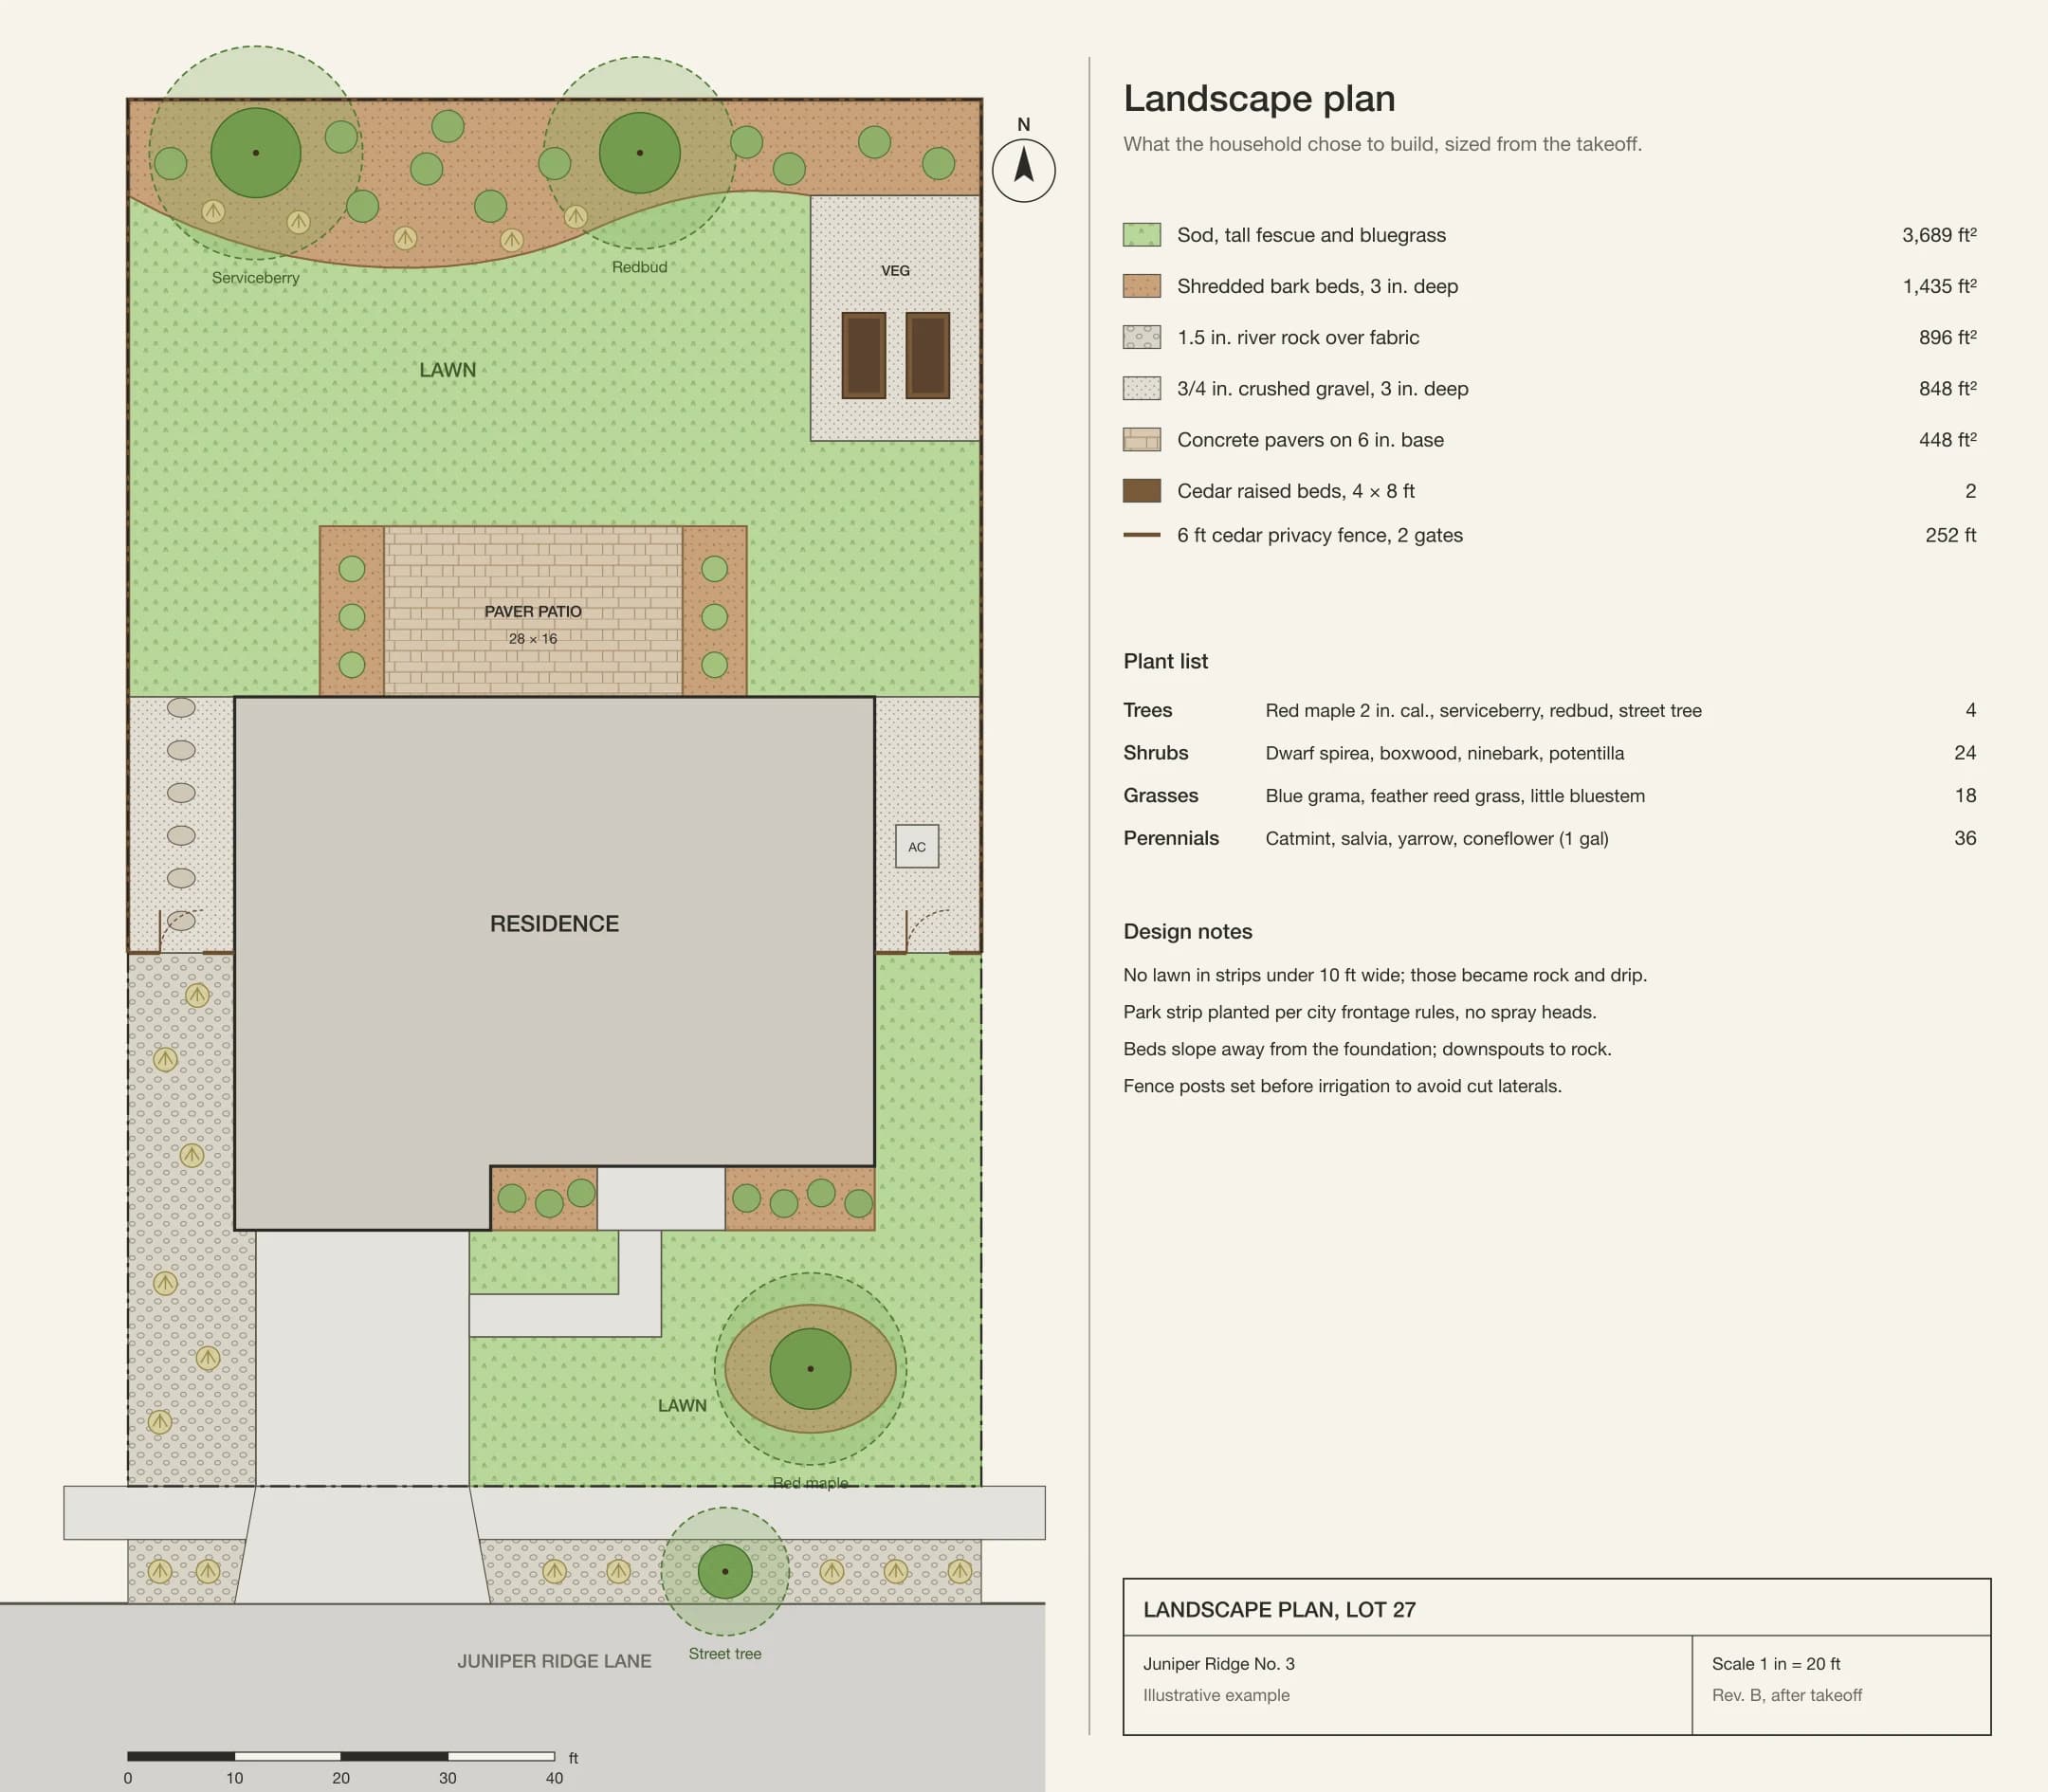
Next, trace it. Each area was traced and a separate polygon created for each area, tagged with its material as the Category. Note that the polygon surrounding the front walk and island bed is part of the lawn; this ensures that the calculated area is the net lawn area, without having to make deductions.
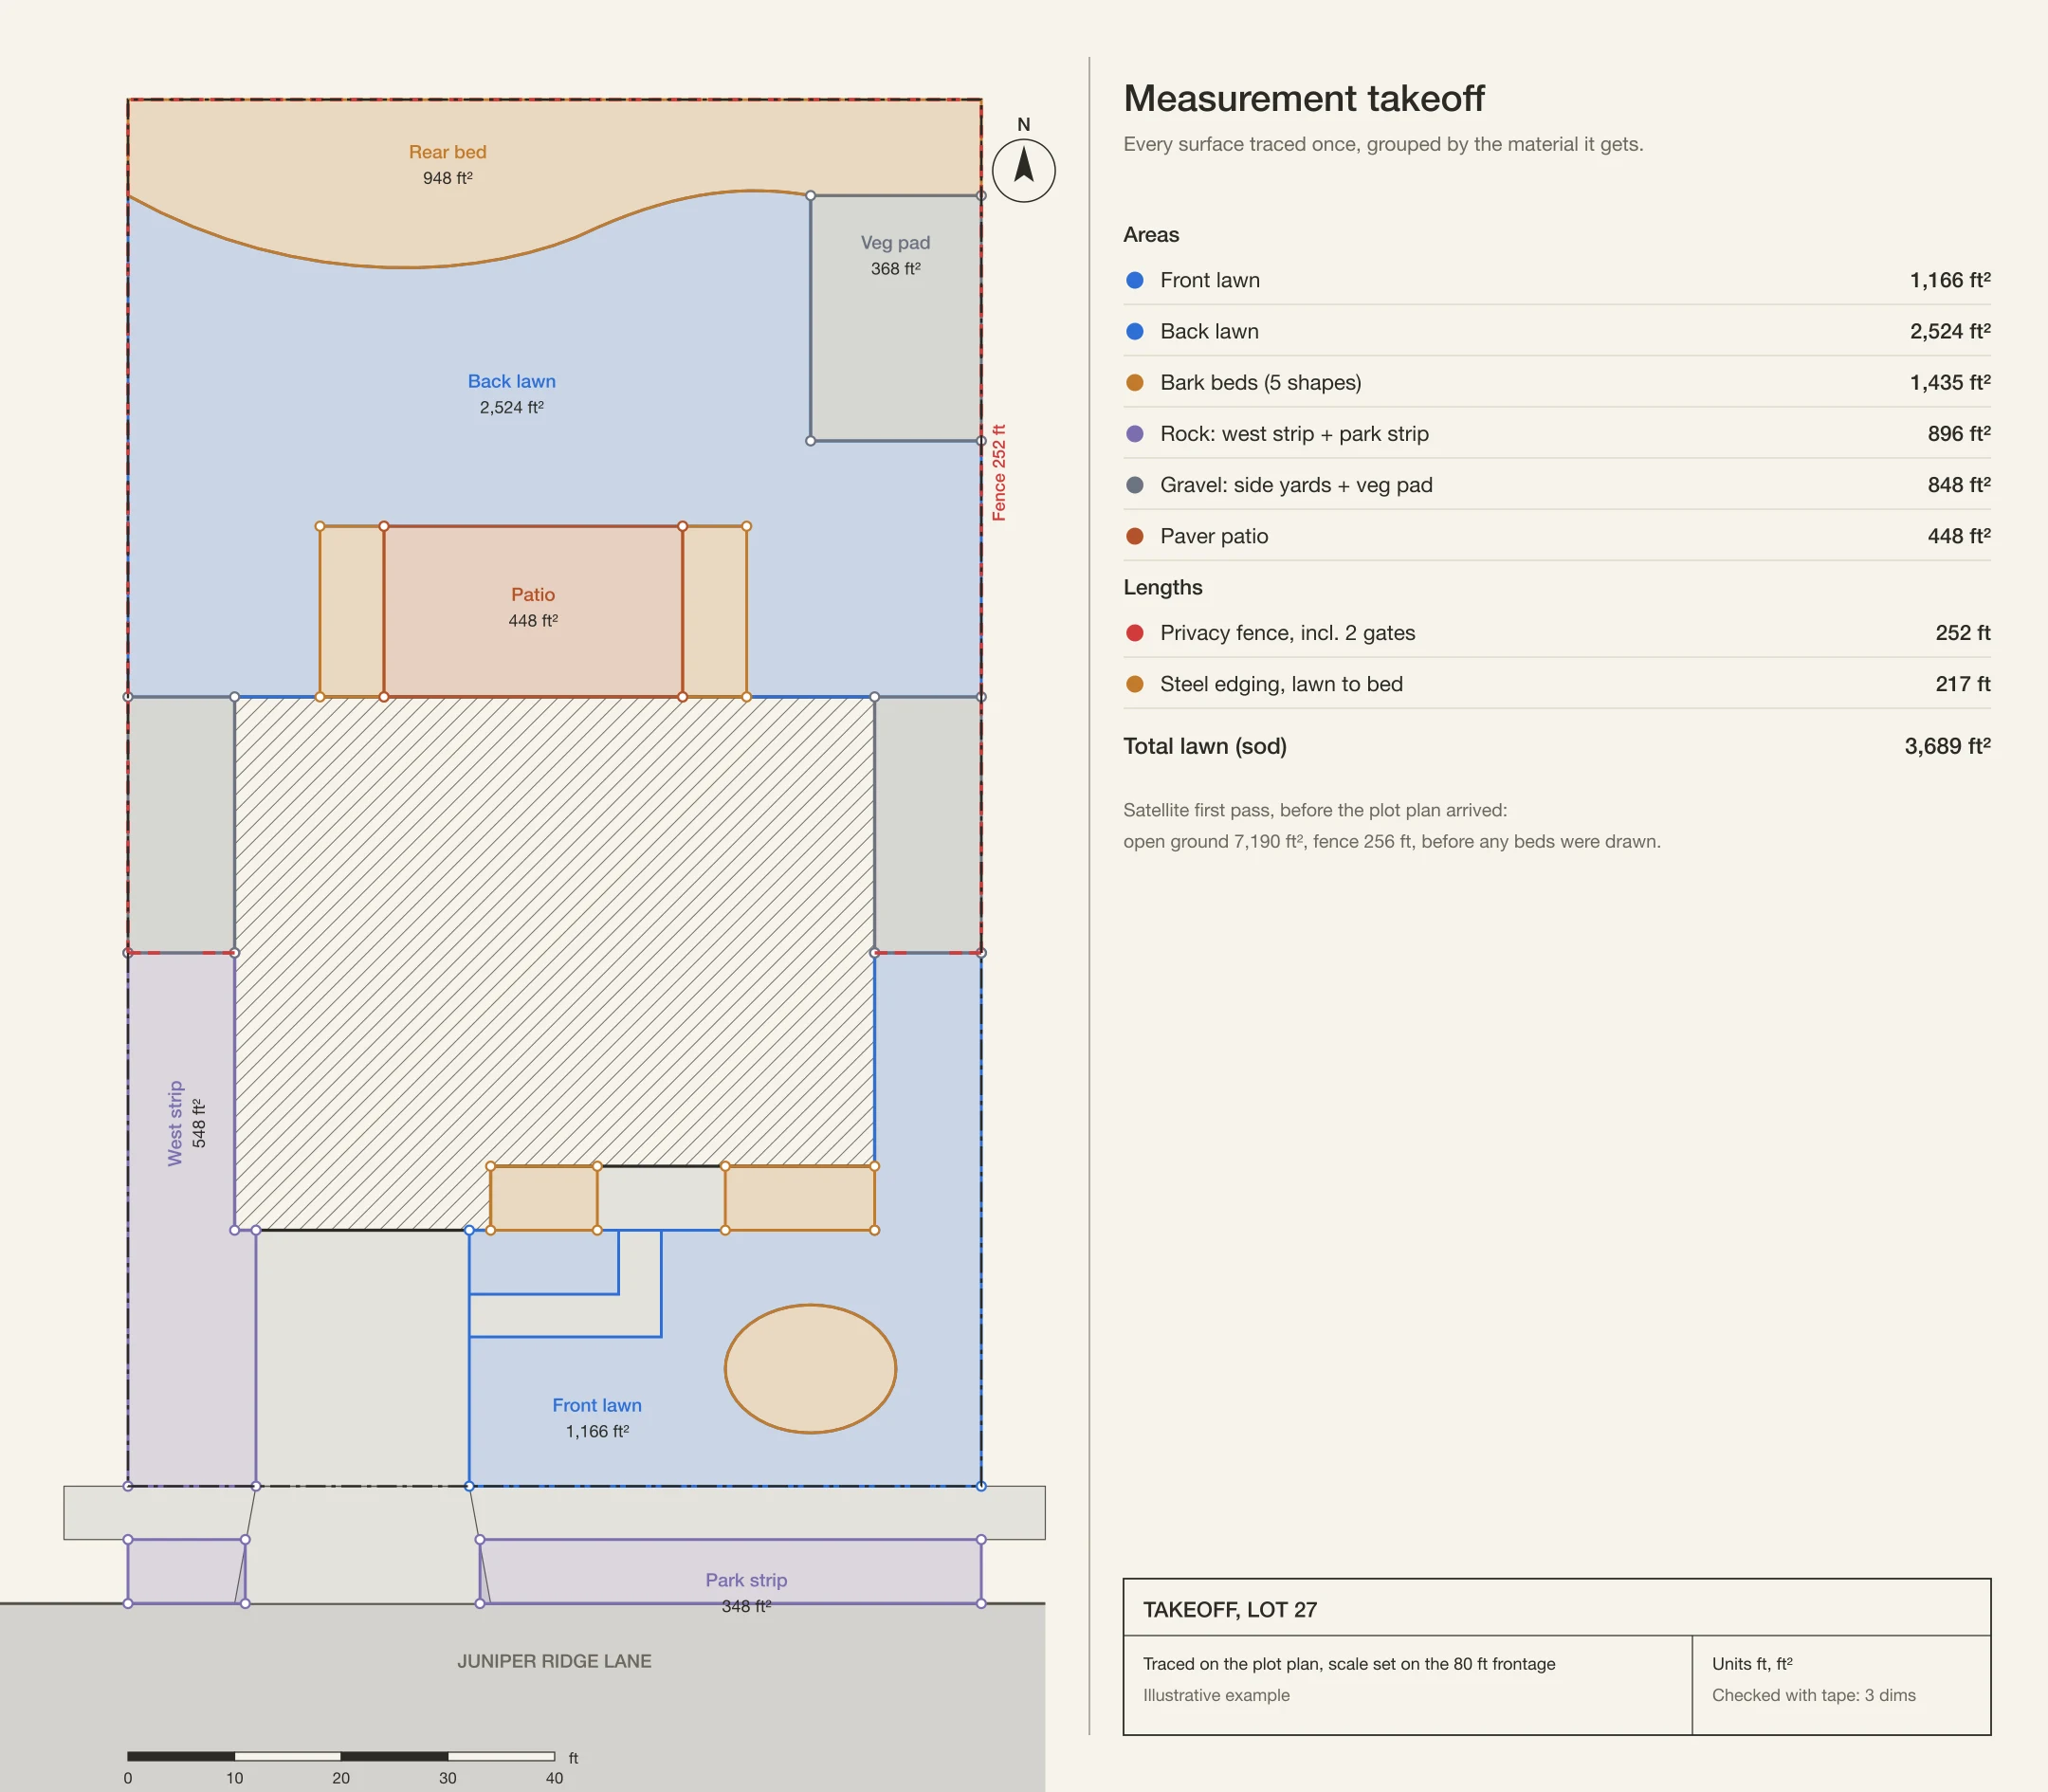
| Surface | Area or length |
|---|---|
| Front lawn | 1,166 sq ft |
| Back lawn | 2,524 sq ft |
| Total lawn | 3,689 sq ft |
| Bark beds (foundation, island, patio beds, rear bed) | 1,435 sq ft |
| River rock (west strip and park strip) | 896 sq ft |
| Crushed gravel (side yards and vegetable pad) | 848 sq ft |
| Paver patio | 448 sq ft |
| Privacy fence including two 4 ft gates | 252 ft |
| Steel edging where lawn meets a bed | 217 ft |
The satellite image was used for a first pass at determining the length of the fence (256' on the map, 252' on the plot plan) and the amount of lawn (about half the open ground, or roughly 3,595 sq. ft., versus 3,689 sq. ft. traced on the plot plan, despite the fact that the planting bed along the rear fence line was enlarged in the design stage).
At this point, download the file. If the design changes, it is quick and easy to trace the changes on the calibrated plot plan, and spend a minute updating the file.
Step 4: Turn Areas into Orders
Next, turn the areas into orders by adding waste factors, adding depths, and rounding to match unit sizes.
Sod
The local sod farm sells sod by the pallet, each containing 450 sq. ft. They have several mixes, but settled on a mix of tall fescue and Kentucky bluegrass.
| Allowance | Area | Pallets |
|---|---|---|
| 5% | 3,689 × 1.05 = 3,874 sq ft | 8.6, round up to 9 |
| 10% | 3,689 × 1.10 = 4,058 sq ft | 9.02, round up to 10 |
Because of the curves bordering the island bed and the rear bed, it seemed that 5% waste was too little. On the other hand, the 10th pallet represented only 8 sq. ft, so the decision was made to order 9 pallets (4,050 sq. ft.), a 9.8% waste factor. If the sod was even a smidge short, the curve of the rear bed could always be moved in a few inches. In the end, there was about 40 sq. ft. left over.
Bulk materials
Cubic yards = square feet × depth in inches ÷ 12 ÷ 27.
| Material | Area | Depth | Volume | Ordered |
|---|---|---|---|---|
| Compost and topsoil blend, lawn | 3,689 sq ft | 1.5 in | 17.1 cu yd | 31 cu yd together |
| Compost and topsoil blend, bark beds | 1,435 sq ft | 3 in | 13.3 cu yd | |
| Shredded bark mulch | 1,435 sq ft | 3 in | 13.3 cu yd | 13.5 cu yd |
| 1.5 in river rock | 896 sq ft | 3 in | 8.3 cu yd | 8.5 cu yd |
| 3/4 in crushed gravel | 848 sq ft | 3 in | 7.9 cu yd | 8 cu yd |
| Patio road base | 448 sq ft | 6 in compacted | 8.3 cu yd | contractor |
| Patio bedding sand | 448 sq ft | 1 in | 1.4 cu yd | contractor |
The builders scrape away the topsoil and compact what's left, so a healthy dose of compost was tilled into the top 6" of all the lawn and bed areas.
Everything else
| Item | Quantity | From |
|---|---|---|
| Steel landscape edging, 16 ft sections | 14 (224 ft) | 217 ft measured |
| Landscape fabric under rock | 1,000 sq ft | 896 sq ft measured |
| Concrete pavers | 470 sq ft | 448 sq ft plus 5% |
| Cedar raised bed kits, 4 × 8 ft | 2 | Design |
| Trees, shrubs, grasses, perennials | 4, 24, 18, 36 | Plant list |
Step 5: Design the Irrigation
Next came the thing that everyone in the house was most afraid of: designing the irrigation. Most do-it-yourself sprinkler system efforts fail at this point. The usual errors are too many heads on a valve, mixing lawns and beds on the same valve, and guessing at what to buy when at the supply house.
Measure the water supply
The first step was to measure the available water pressure and flow. Using a pressure gauge attached to the hose bib, the static pressure was measured at 72 psi. Next, the flow was measured by timing how long it took to fill a 5 gallon bucket using the same hose bib. It took 25 seconds, so the flow was 300/25 = 12 gallons per minute. The zone flow to use in Irrigation Planner is the lesser of 75% of the measured flow or 12 GPM; in this case, the zone flow would be 9.0 GPM.
Set up the plan
After starting Irrigation Planner and opening the scanned plot plan file, the first step was to set the scale of the drawing by measuring the 80 foot long front lot line. The water supply information was then entered on the Water supply tab.
Next, the lawn areas were traced using the Grass tool; the front and back yards required two traces. Everything outside the grass boundary is by definition an area that is not to be watered (patio, planting beds, rock, and gravel).
The next step was to enter the Utilities: the water, the controller, and the valve locations. The water entered the house (1" service) in the garage along the west wall, so that was the point of connection. The controller was also to be located on the wall in the garage, near the point of connection. There were two valve boxes: Box A was to be in the west side yard, just behind the gate, to service the backyard zones; Box B was to be in the front foundation bed, just off the garage, and would be plumbed through a sleeve under the driveway to service the front yard zones.
Place heads and check coverage
The front lawn is about 24 ft deep from sidewalk to the beds along the house foundation, and MP Rotator nozzles can throw about 24 feet, so that's what was selected. They were set to 24 ft, and six of them placed along the sidewalk/bed edge. An additional two heads were added along the east side of the house; they're close enough to the house that they were sized for 10 ft radius.
The back lawn is a bit wider at about 26 ft from the back patio to the bed along the back of the lot, and about 80 feet wide for the whole lot. Here, Rotor heads were selected (a larger gear-driven head built for open lawn), and 11 of them were added at the corners, along the fences, and at the corners of the patio, all set to about 26 ft radius.
The heads were automatically sized (radius and arc) to stay within the boundaries of the area(s) named "Grass". The coverage at the bottom of the screen was kept an eye on while fiddling with the head locations, in order to maximize head-to-head coverage. A little overspray onto the bed at the rear of the lot was okay, in order to water close enough to the bed to prevent a strip of lawn from not getting enough water.
Group the heads into zones
Using the Zones panel, six zones were made, combining heads of the same type, and keeping the beds separate from the lawn areas:
| Zone | Area | Heads | Flow | Against 9.0 GPM budget |
|---|---|---|---|---|
| 1 | Front lawn | 8 MP rotators | 6.9 GPM | ok |
| 2 | Back lawn west | 5 rotors | 8.0 GPM | ok |
| 3 | Back lawn east | 6 rotors | 8.0 GPM | ok |
| 4 | Front beds, west strip, park strip | Drip | 1.6 GPM | ok |
| 5 | Back beds | Drip | 2.1 GPM | ok |
| 6 | Raised vegetable beds | Drip | 0.6 GPM | ok |
The 11 rear rotors were tried as a single zone, but the zone was over-capacity (16 GPM, shown in red in the Zones panel), so they were split into east and west zones to get them within the water budget. Conveniently, this split also separated the two halves of the yard along the patio, which simplified the trenching for the pipes going to them.
The raised vegetable beds are assigned to their own zone, since the vegetables will need a different watering schedule than the shrubs. It's a good idea to separate them this way, even though it does require an extra valve (about $30).
Lay out the pipe
The Mainline was added, starting at the Point of Connection, going to the Pressure Vacuum Breaker (mounted on the outside of the garage wall), from there to each of the valve boxes. Then laterals were run from each valve to each of the heads. Notice that the pipes avoid running under the patio, and only go under the driveway/walk/sidewalk where the builder put in sleeves.
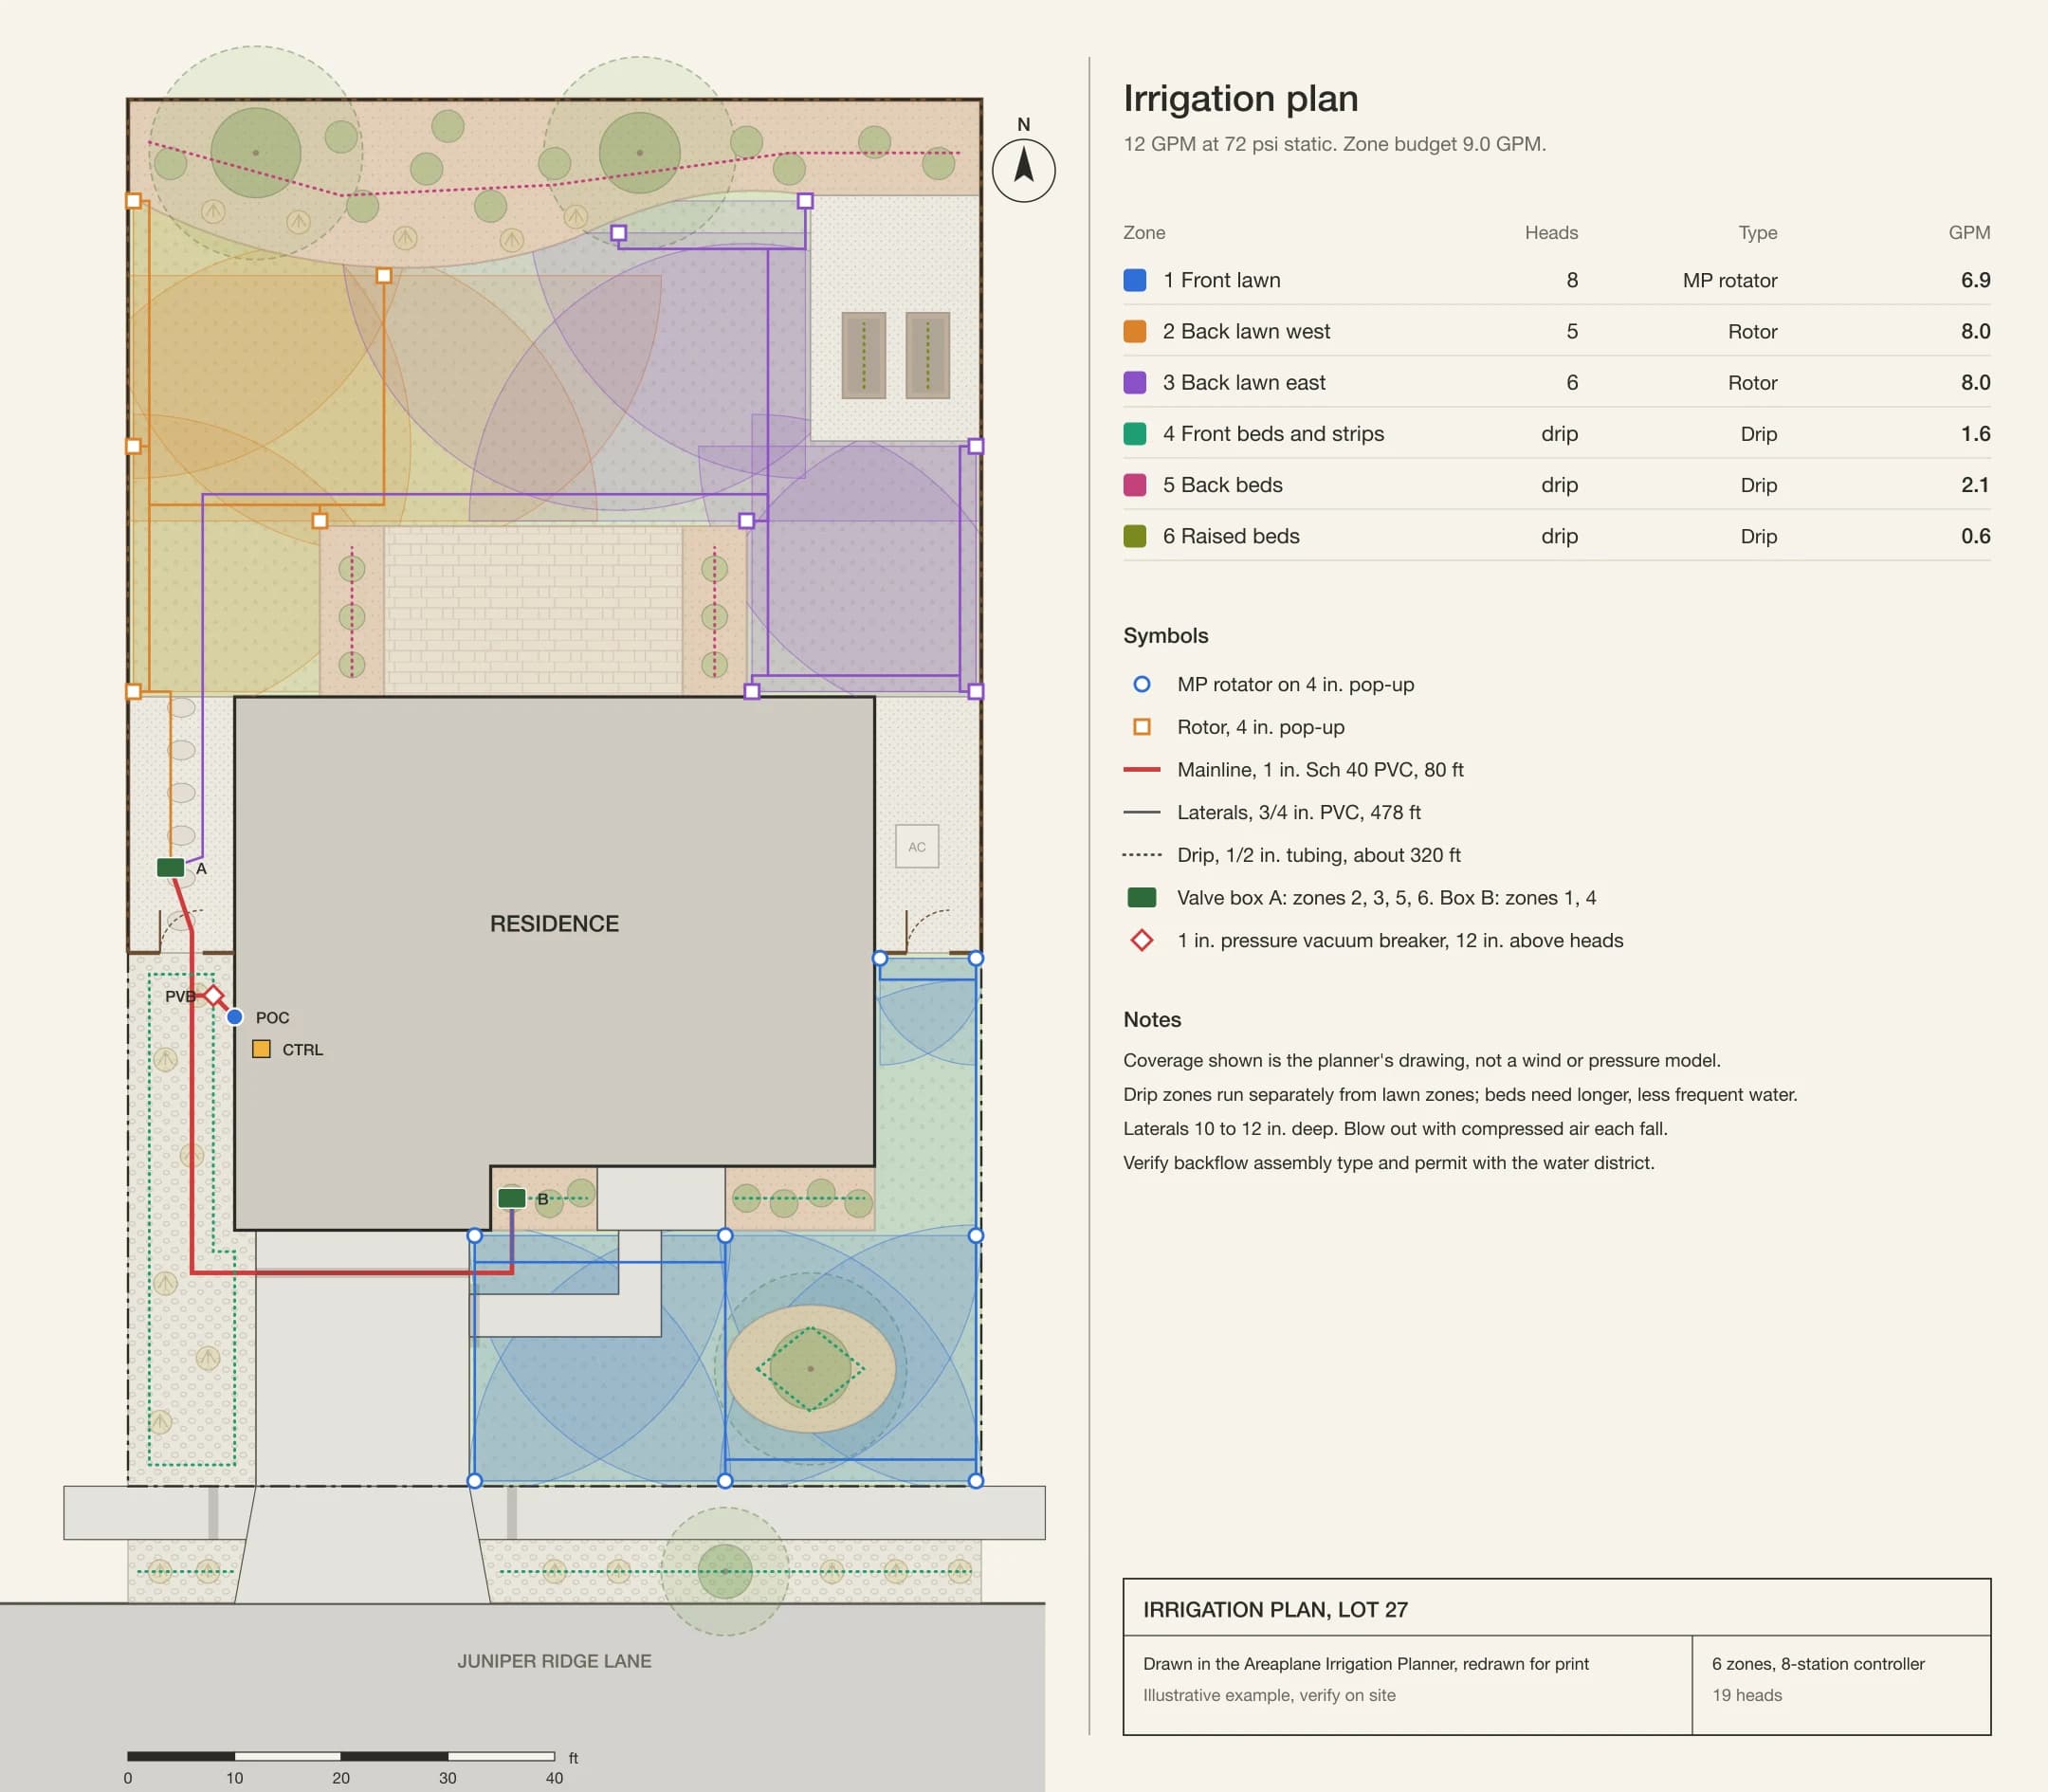
| Plumbing | Length |
|---|---|
| Mainline, 1 in | 80 ft |
| Laterals, 3/4 in | 478 ft |
| Drip tubing, 1/2 in | about 320 ft |
Set watering targets
Using the Water per week and Watering days settings, run times were estimated. For mid-summer, 1.5 inches per week will be needed, on 3 days per week. At these flow rates, the lawn zones will put down about 0.55-0.6 inches per hour, so each lawn zone should be run about 50 minutes on each of those days. Because the soil is a fairly heavy clay-loam, that much water at once will run off, so it's recommended to split those 50 minute run times into two or three cycles, with a soak time in between each cycle to allow the water to soak into the ground.
Note: for the first two weeks after this new sod was laid, the cycles should be run 2-3 times per day for a short time, in order to keep the roots moist enough to establish themselves. After that, they can be gradually reduced down to the above schedule.
Export the parts list
Using the Settings menu, Export PDF report was selected, which generated a multipage PDF report including the plan, each zone, and the Bill of Materials. Then the Export bill of materials (CSV) option was used to email the list to the local irrigation supply house, who had it ready for pickup two days later. The highlights:
- 8 MP rotator nozzles on 4 in pop-up spray bodies, 11 rotors on 4 in pop-ups
- 6 one-inch valves, two valve boxes, an 8-station controller (two spare stations)
- 1 in pressure vacuum breaker
- 1 in mainline, 3/4 in laterals, swing pipe and two elbows per head
- Drip: three pressure regulator and filter kits, 1/2 in tubing, emitters
- 8-conductor irrigation wire for six zones plus common and one spare
The total cost of the parts, according to the planner, was about $1,700; the total at the irrigation supply house (some fittings were changed), was $1,742.
Notes on accuracy: While this is a good tool for planning purposes, the coverage area is only as good as the drawing shows. It doesn't take into account things like wind, slope, or all pressure factors. The flow rates shown are those given by the manufacturer in their catalogs, and are good for planning, but should be double-checked against the manufacturer's specs for each nozzle. Also, make sure to check with your local water district about what type of backflow prevention is required, and if a permit is required. In this case, a backflow preventer was installed and then tested by a certified backflow tester.
Step 6: Build It
The sequence of operations is much different for a new build. In this case, the sequence was roughly: (1) post and pipe installation; (2) hardscape; (3) soil; (4) plants; (5) sod.
| Dates (2026) | Work | Who |
|---|---|---|
| Feb 14 | Satellite first pass, budget | Household |
| Mar 20 | Closing, plot plan in hand | |
| Mar 21–29 | Tape check, design, takeoff, irrigation plan | Household |
| Apr 2 | Utility locate request (811) | Household |
| Apr 6–10 | Fence posts and panels, gates | Fence contractor |
| Apr 11–19 | Mark out, trench, install irrigation, flush, test | Household, rented trencher |
| Apr 21 | Backflow test, permit inspection | Certified tester |
| Apr 25 – May 2 | Patio excavation, base, pavers | Patio contractor |
| May 2–3 | Compost blend delivered, tilled, rough grade | Household, rented skid steer |
| May 9–10 | Edging, beds planted, drip, mulch, rock | Household and friends |
| May 16 | 9 pallets of sod laid and rolled | Household and friends |
| June 1 | First mow | |
| Mid October | Irrigation blow-out | Household |
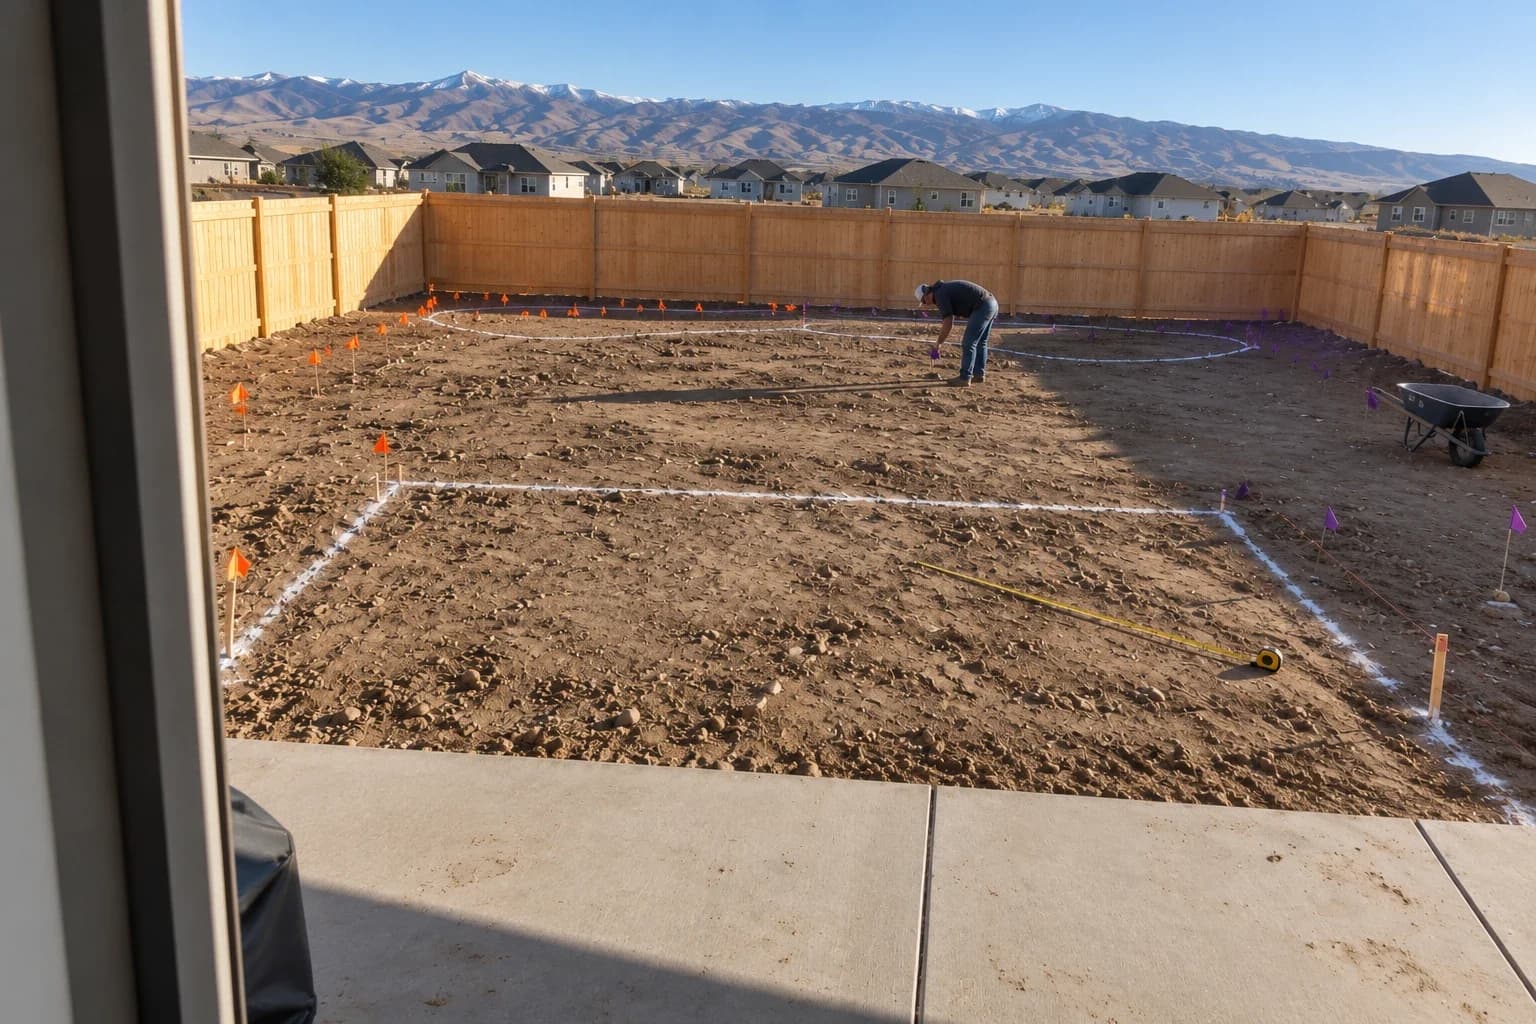
First, the layout. This was straightforward since it could be done directly from the plan. Since the plan had a scale, everything was a certain distance from a corner of the house or a lot line. So, all that was needed was to read off the distances from the plan and pace them off with a tape. Flags were placed at each head and color coded for each zone, in accordance with the planner.
Then the trenching, which took two days with a rented walk-behind trencher. Laterals were installed 10-12" deep, with room for the lines to drain down when the system is blown out each fall. Note that the laterals for the zones in the front were able to be run under the driveway since the sleeve was included in the driveway, as shown on the plot plan. Otherwise, Box B would have had to be installed in the strip to the west and a bore would have been required under the driveway for the laterals to the front lawn.
Lastly, the sod was installed, which took one long Saturday with four people. Nine pallets were needed, about 40 sq. ft. extra, which was used in two areas along the rear bed where the edge was a bit too wide.
The Final Numbers
| Line | Cost |
|---|---|
| Fence, 252 ft and two gates (household share after neighbors split the side runs) | $6,536 |
| Paver patio, 448 sq ft, contracted | $9,856 |
| Irrigation parts, trencher rental, permit, backflow test | $2,085 |
| Compost and topsoil blend, 31 cu yd delivered | $1,668 |
| Sod, 9 pallets delivered | $2,661 |
| Bark, river rock, gravel, fabric | $1,830 |
| Trees, shrubs, grasses, perennials | $2,268 |
| Steel edging | $918 |
| Raised beds and bed soil | $530 |
| Equipment rental (skid steer, tiller, roller) | $565 |
| Total | $28,917 |
The final cost was about 5.5% higher than the pre-closing estimate done via the satellite image ($27.4K), mostly because the fence contractor's price went up between the first quote and the install. The quantities were very close to what was eventually ordered, off by a few percent in most cases (one pallet short for sod vs. the 10%, half a yard of bark left over, etc.). Getting quotes from landscape companies for similar jobs put the costs in the range of $38-61K, so a significant savings was achieved by doing this work, albeit it did take most every weekend from April-mid May.
What They Would Do Differently
A couple of lessons learned that may be helpful for new builds:
- Request the plot plan prior to closing; while the satellite image was close, the plot plan is much better (and most builders will provide it).
- Do check the dimensions with a tape before tracing on the plan; it only took a couple of minutes to check three dimensions and it gave confidence that the quantities would be correct since they were based on the scaled dimensions.
- Do draw the irrigation plan prior to the fence installation; in this case the fence went in first (which is correct), but it would have been better to mark the post locations on the irrigation plan so that the lateral locations along the fence lines could be optimized (generally a foot from the post).
- Keep the project files. Now you have something to keep and a good reference for replacing a bad head or digging up a bed, etc.
Use This Approach on Your Own Lot
When you are ready to crunch some numbers for your first budget, use the map tool to trace your lot, open area and fence line on the satellite image. Once you have the plot plan, calibrate it in the Floor Plan Calculator and check it against 3 dimensions from your tape. Once you have that, you should go ahead and make a design and then trace your different surfaces by material and calculate your orders by adding an allowance and entering the required depth. Then measure your pressure and flow and use the Irrigation Planner to layout your heads, zones and pipe and then export a parts list. Then the order of operations for installing is to first set your fenceposts, then install the irrigation, then your hardscape, then your soil and plants/sod.
For more details, see the satellite area walkthrough, sod installation guide, and residential sprinkler system design guide.