
A church's facilities committee has received 3 bids to sealcoat the church's parking lot: $3,690, $4,268 and $4,421. The bids are widely different, one quotes an area, another quotes a different area, and the third doesn't quote an area at all. The volunteer who's helping the committee, a retired shop teacher, has been asked to find out which bid will be the best value for the church before the September Board meeting.
He decides to measure the lot, figure out what the job needs in gallons and feet, and then compare the bids per unit to see what's the best value.
The Project
| Site | One-story church, suburban Indianapolis, asphalt lot from the original 2004 permit |
| Lot | One 24 ft drive from the street, a two-way aisle, 90° stalls on both sides, five curbed islands |
| Condition | Last sealed about six years ago; gray, raveling at the edges, open joint cracks, faded paint |
| Stalls | 37, including 2 accessible stalls by the main doors |
| Goal | Crack fill, two coats of sealer, restripe, and closed for no more than one week |
| Constraint | Sunday services, a Wednesday evening program, and occasional weddings and funerals on Saturdays |
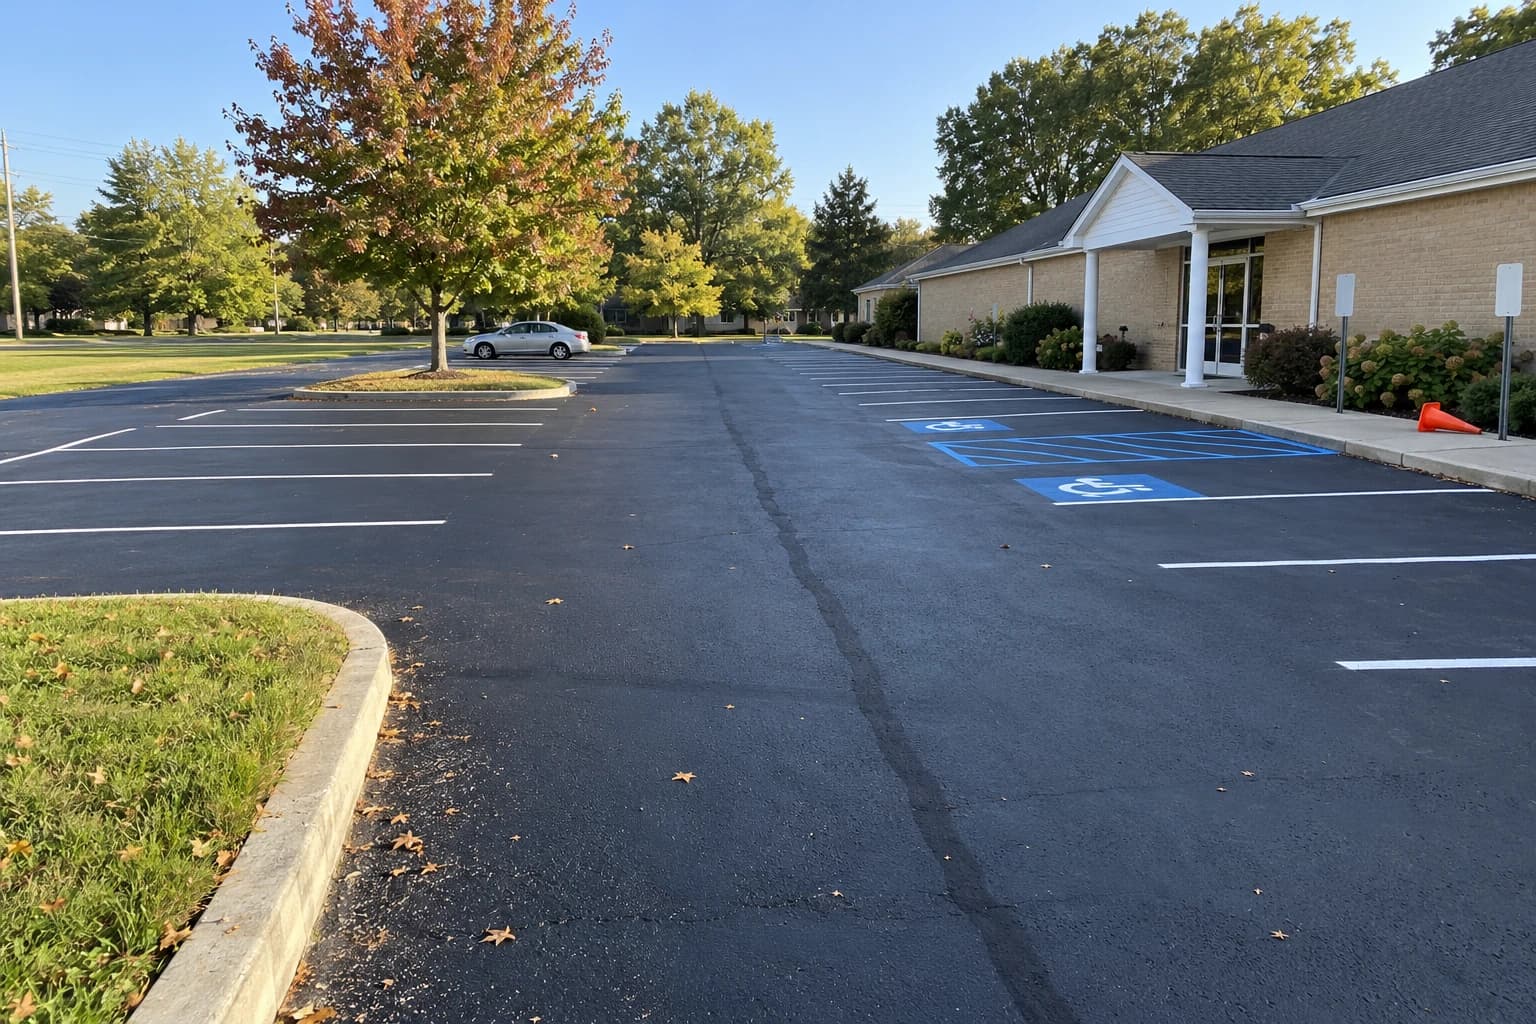
Step 1: A Satellite First Pass
He starts by going to the map tool and searching for the church's address. He changes the display to Satellite and uses the Area tool to trace the outside perimeter of the asphalt area, including islands. He then traces the islands separately to get 5 island areas. He also uses the Length tool to measure the length of the drive and aisle by drawing down the center from the curb at the street to the north end.
| Satellite measurement | Result |
|---|---|
| Paved outline including islands | 13,086 sq ft |
| Five islands | 1,003 sq ft |
| Net asphalt | 12,083 sq ft |
| Drive and aisle centerline, curb to north end | 247.5 ft |
He's happy to see that this is in the range of the bids, but he can see that it's not exact because the trees obscure the view of the center island and part of the west row, and he's had to click a bit outside the curbs on both sides to see the edge, and at this zoom that's a lot of area. In fact he's measuring 2.9% too much here, which is too much when comparing bids. He saves the project anyway, because it will be handy to check later work against.
Step 2: The Permit Site Plan and a Tape Check
He gets a copy of the site plan from the building permit from the church's files in the office. It shows the dimensions, a drawing of the islands, and where the building is in relation to the lot. He scans it and uploads it to the Floor Plan Calculator. He then uses the Set Scale tool to draw along the 195 ft west edge of the lot to set the scale.
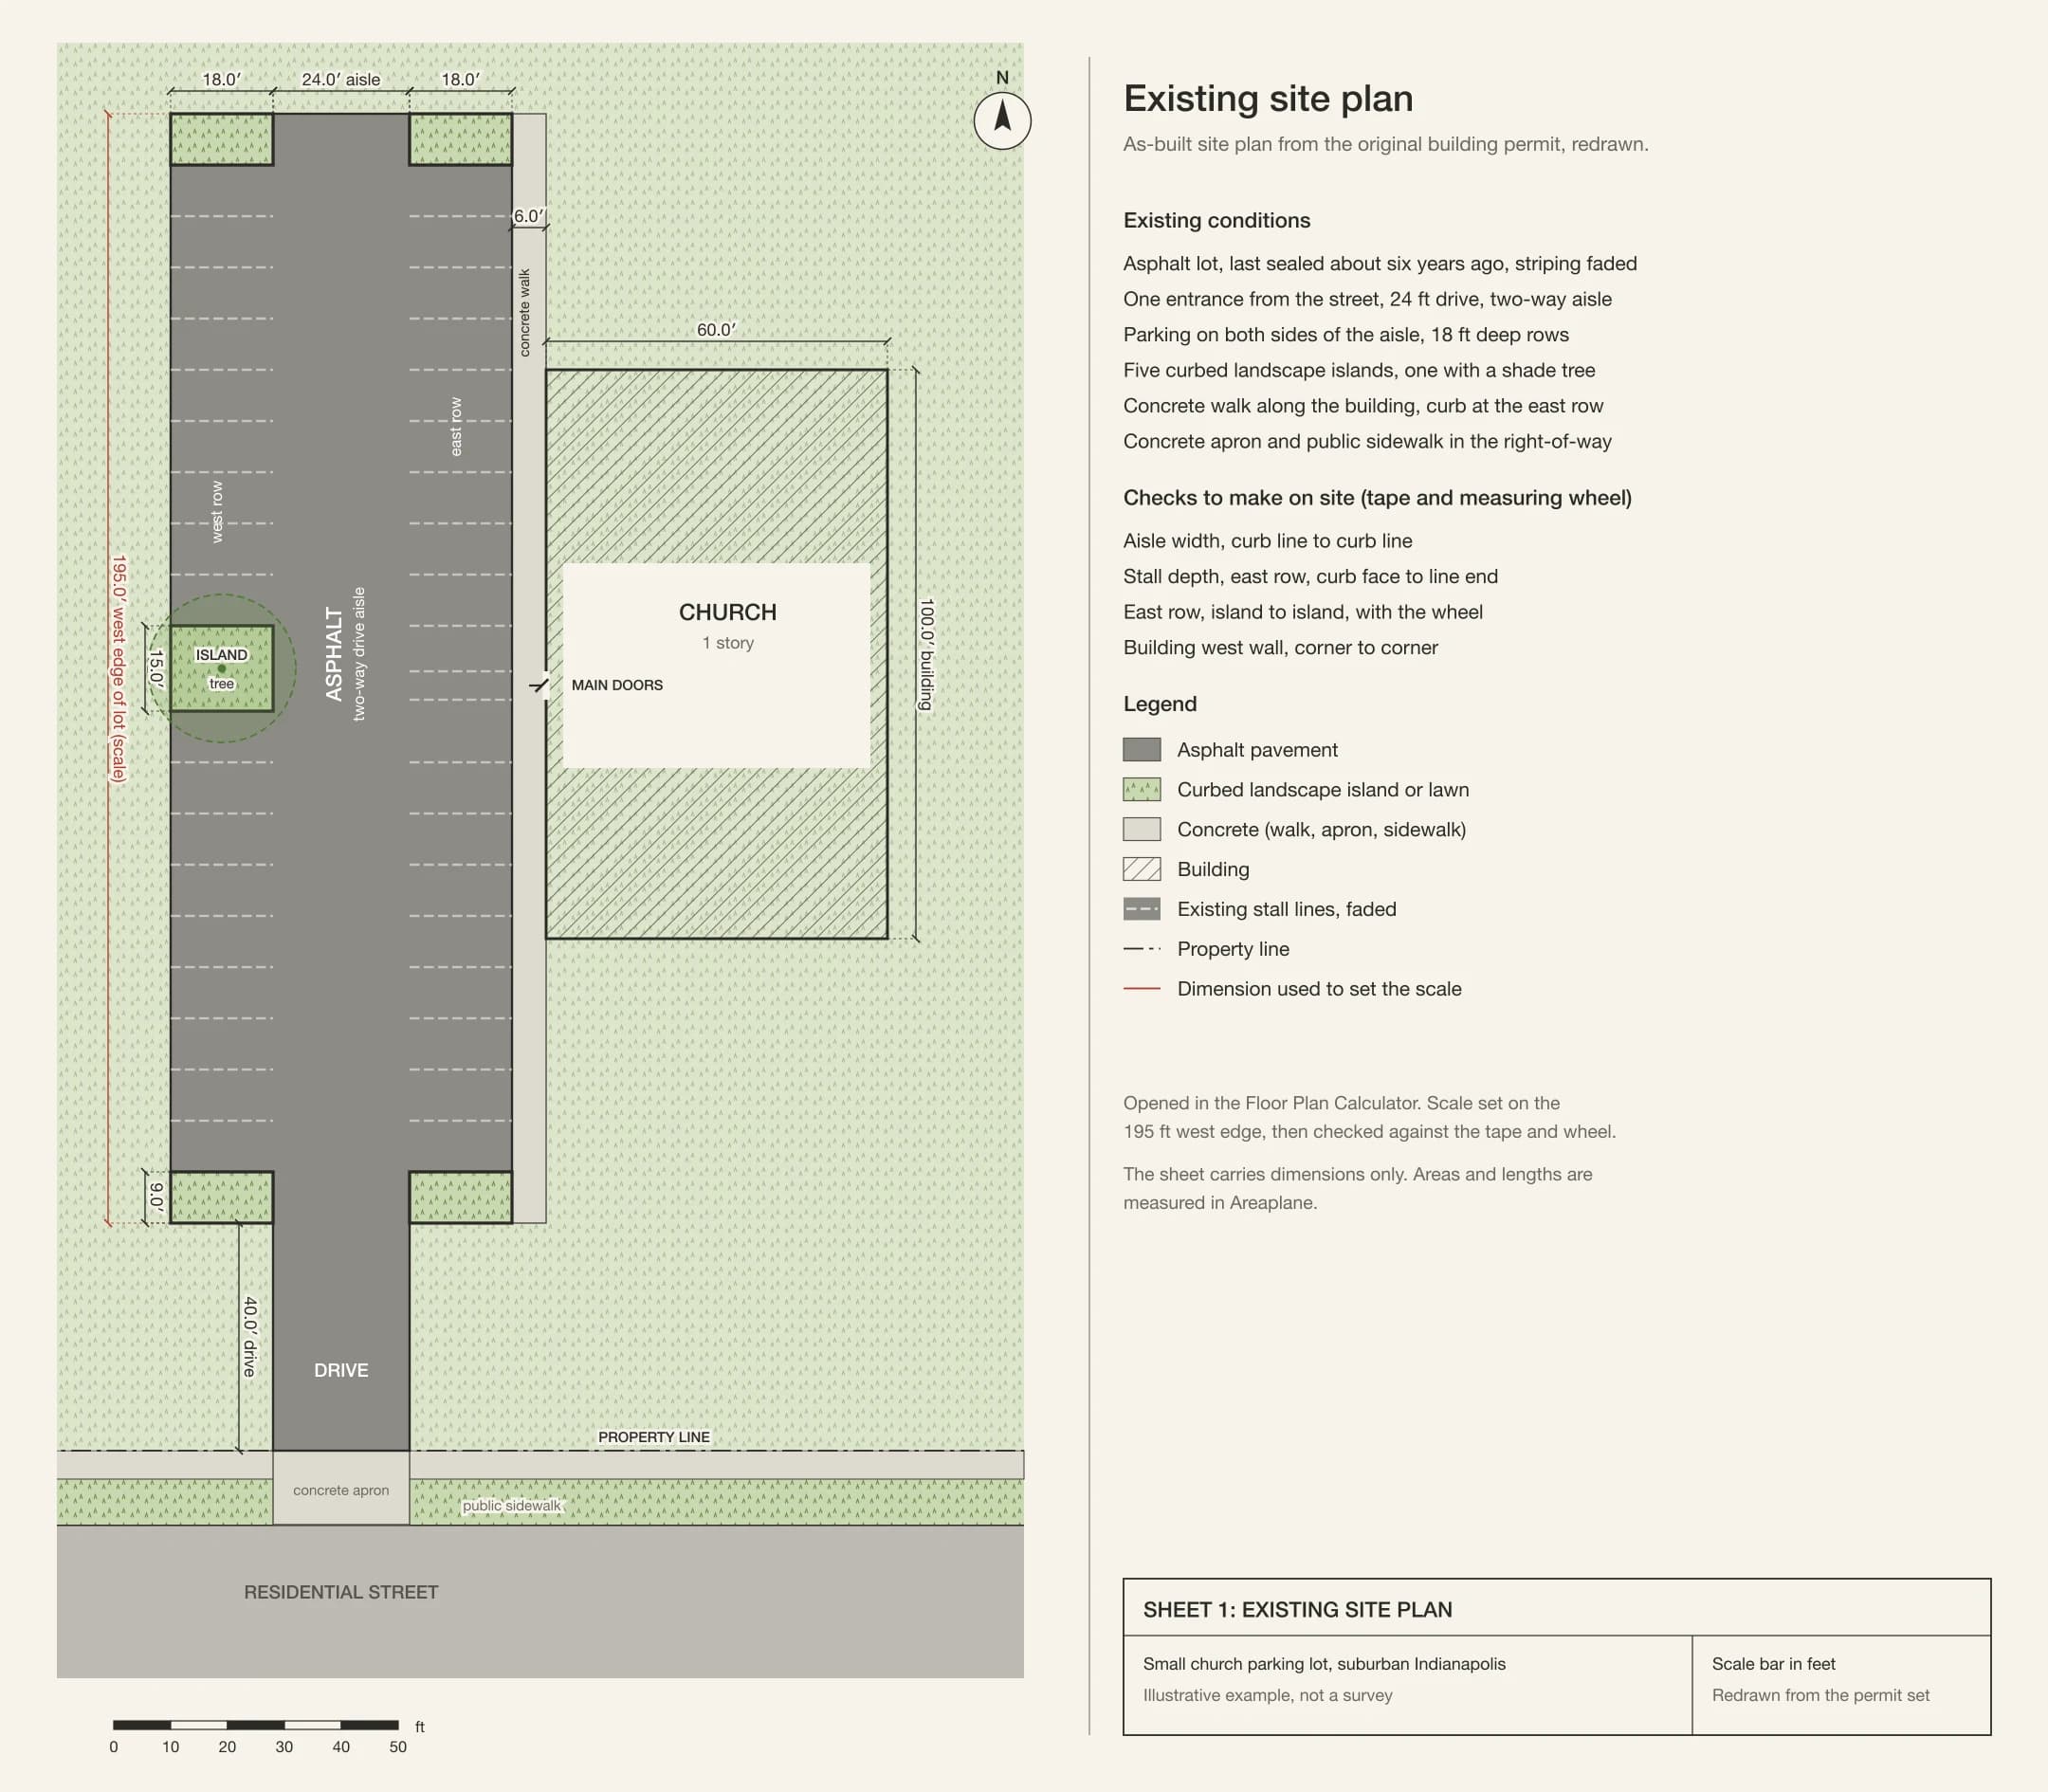
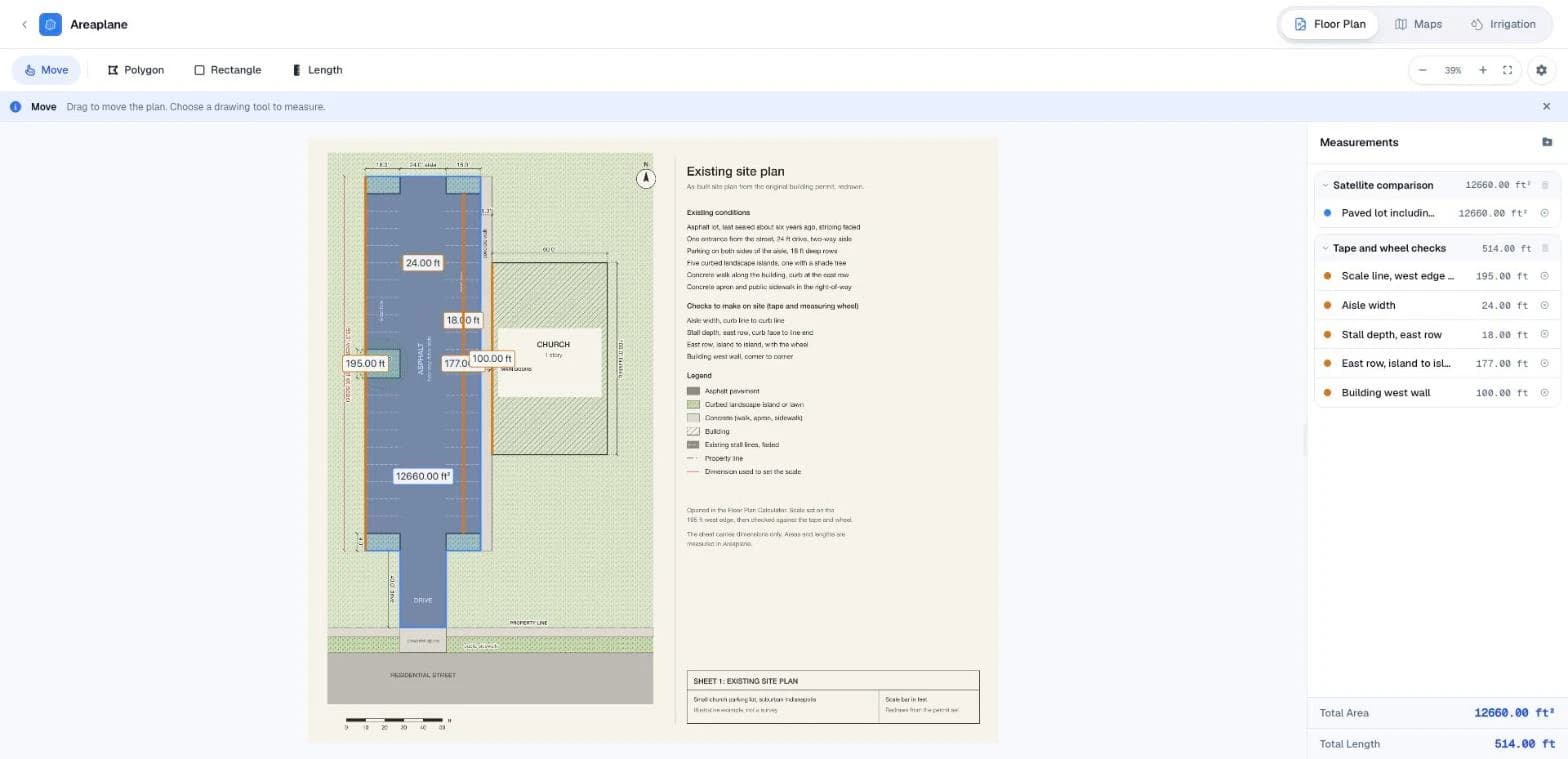
The site plan will be for what the contractor intended to build, but things don't always get built the way they're intended. He checks some dimensions on site with a tape and a measuring wheel he borrows from a neighbor, and compares them to the lengths he measures on the site plan using the Length tool.
| Check | Areaplane on the plan | Tape or wheel |
|---|---|---|
| Aisle width | 24.0 ft | 24 ft 1 in |
| Stall depth, east row | 18.0 ft | 18 ft 0 in |
| East row, island to island | 177.0 ft | 177 ft 6 in (wheel) |
| Building west wall | 100.0 ft | 100 ft 2 in |
The measuring wheel reads a bit long because it's not rolling on smooth ground, but 1/2' in 177' is close enough to show that the plan is correct.
Step 3: What Gets Sealed, and the Cracks
He then traces the outline of the asphalt to be sealcoated with 5 Rectangles in the "Sealcoat" category. The drive, the aisle, the east row, and two rectangles for the west row. He also traces the islands and puts them in their own category. The concrete along the building, the concrete apron and the sidewalk on the public way will not be sealcoated.
He walks the lot with some chalk and marks all the cracks 1/4" wide or more, then draws them on the sheet and traces them with the Length tool in the "Cracks to fill" category. Most of the length is in the joints between the lanes the contractor paved in. Hairline cracks will be filled by the sealcoat. If there were cracks more than an inch wide, or areas where the asphalt had broken up into small blocks, they'd need to be patched before sealcoating, but there are none here. He also notes 4 oil spots in the east row that will need to be primed before the sealcoat is applied, or it won't stick in those spots.
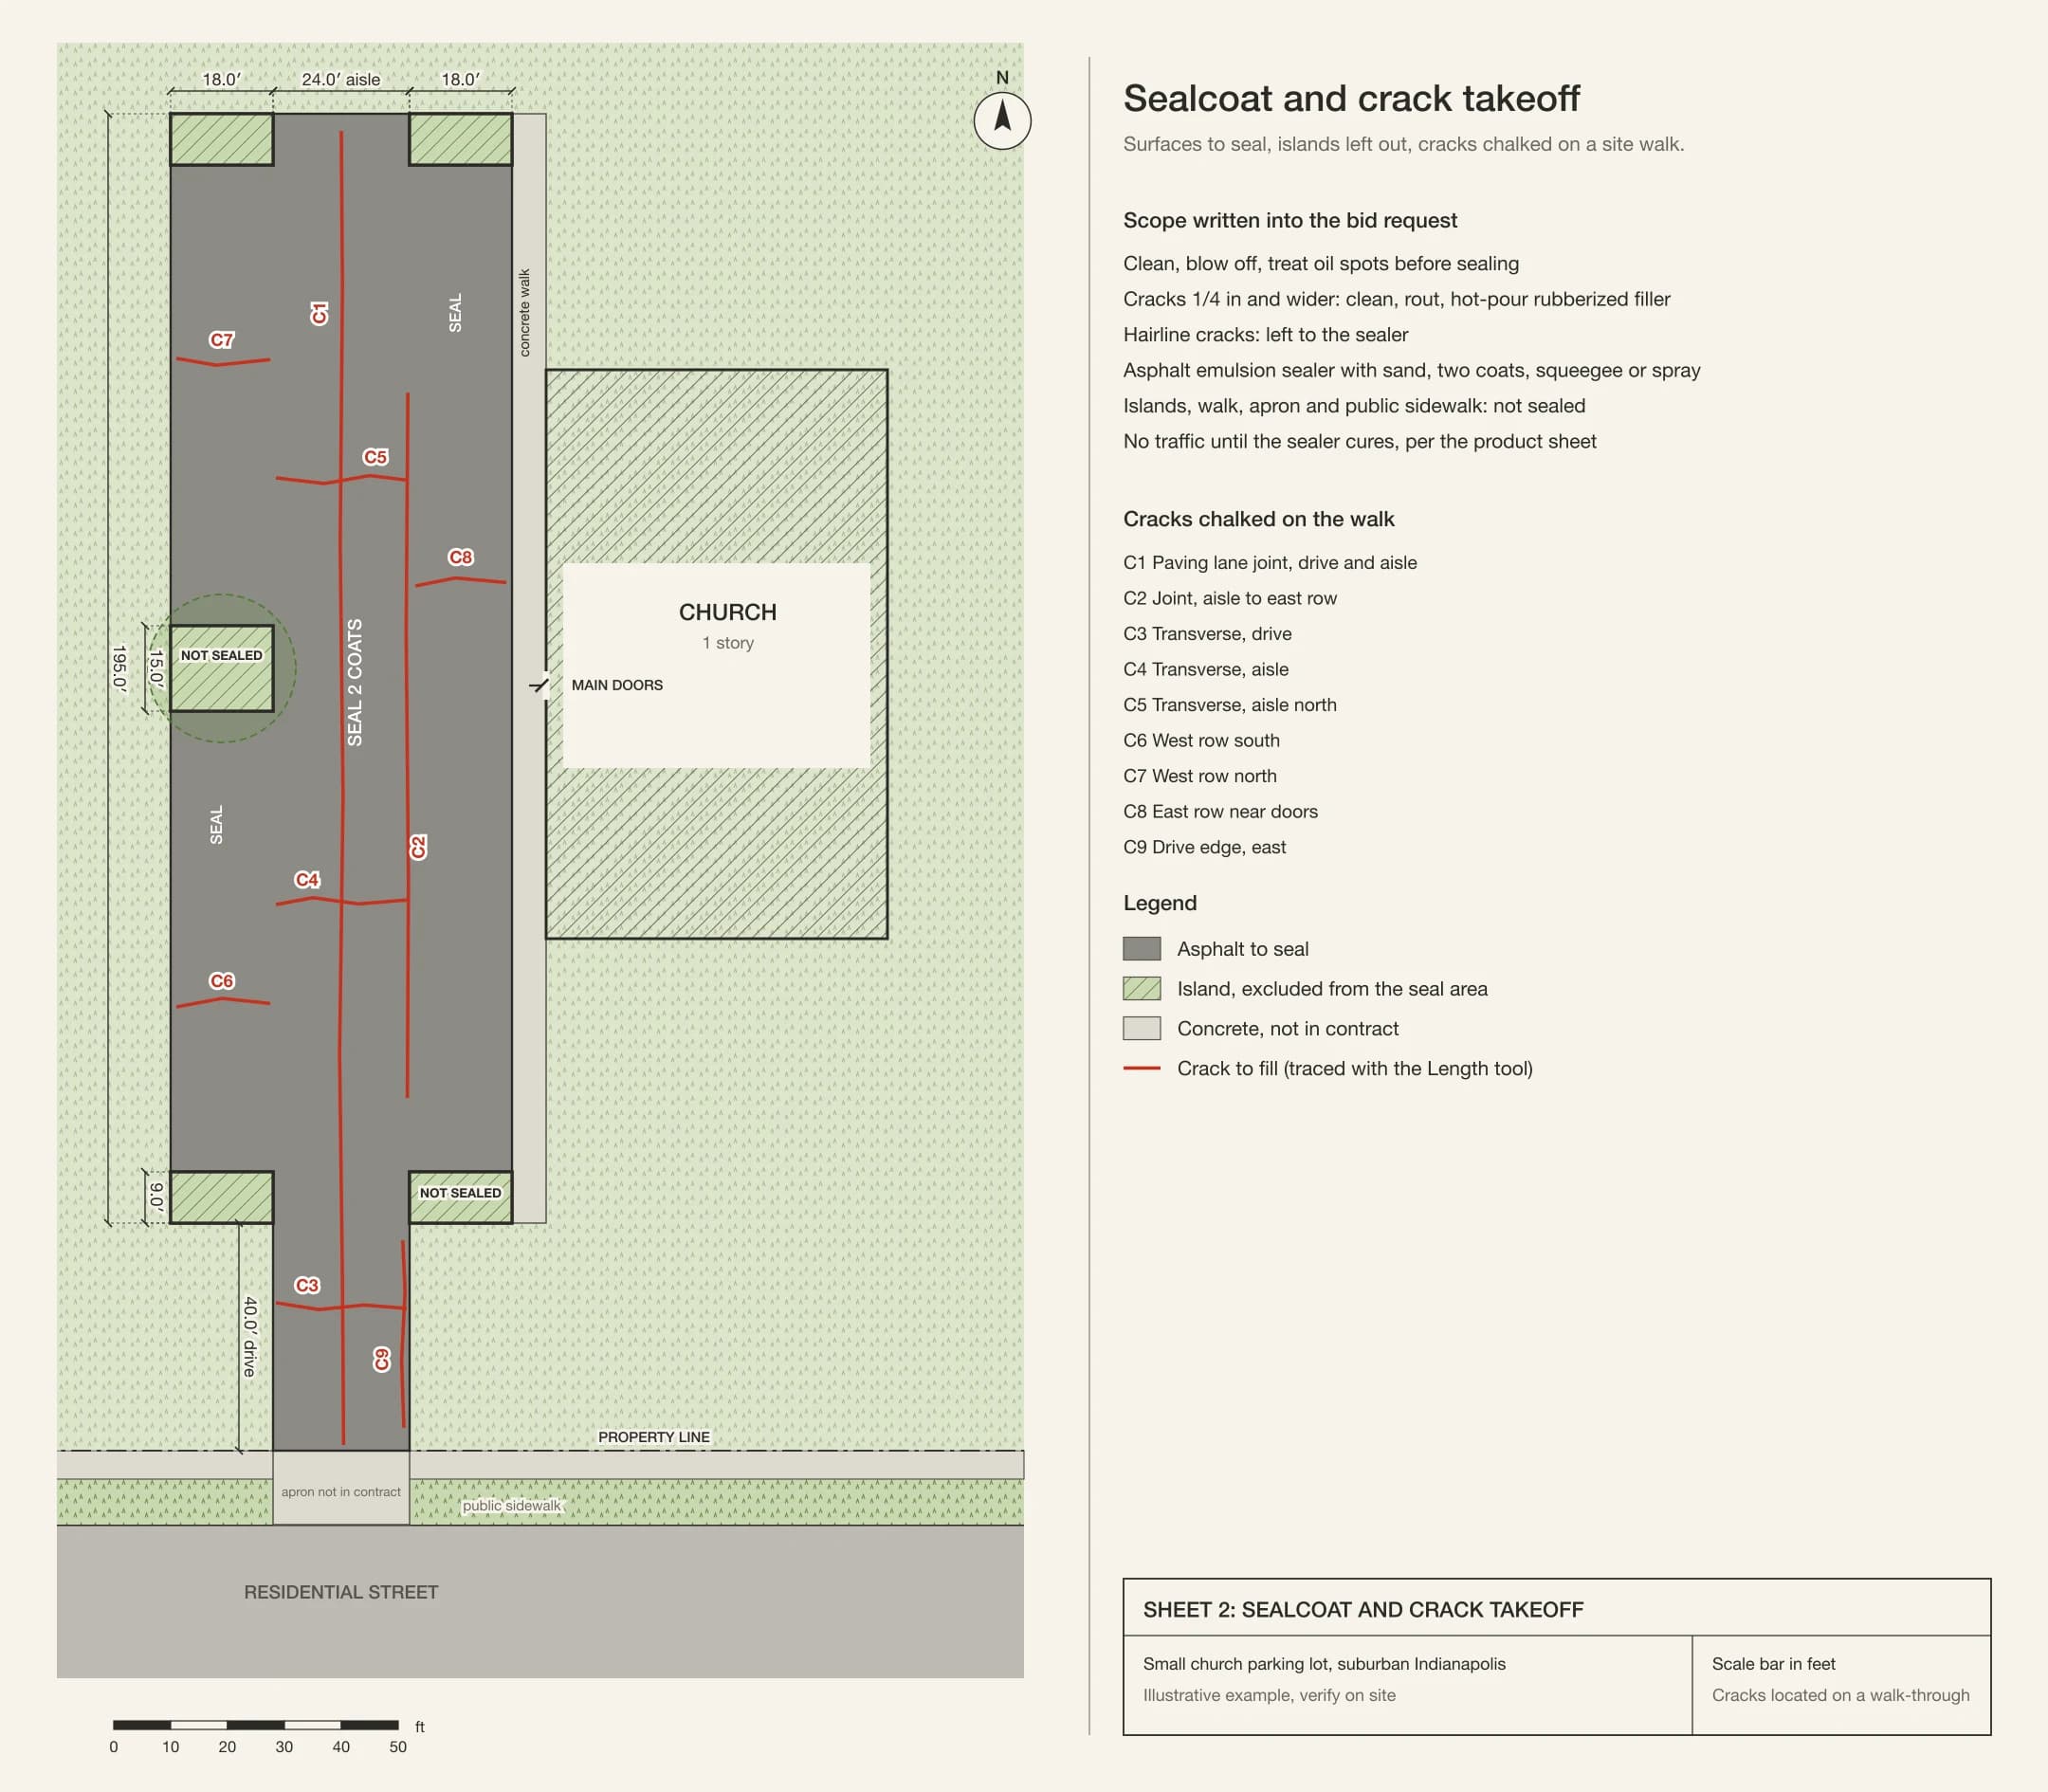
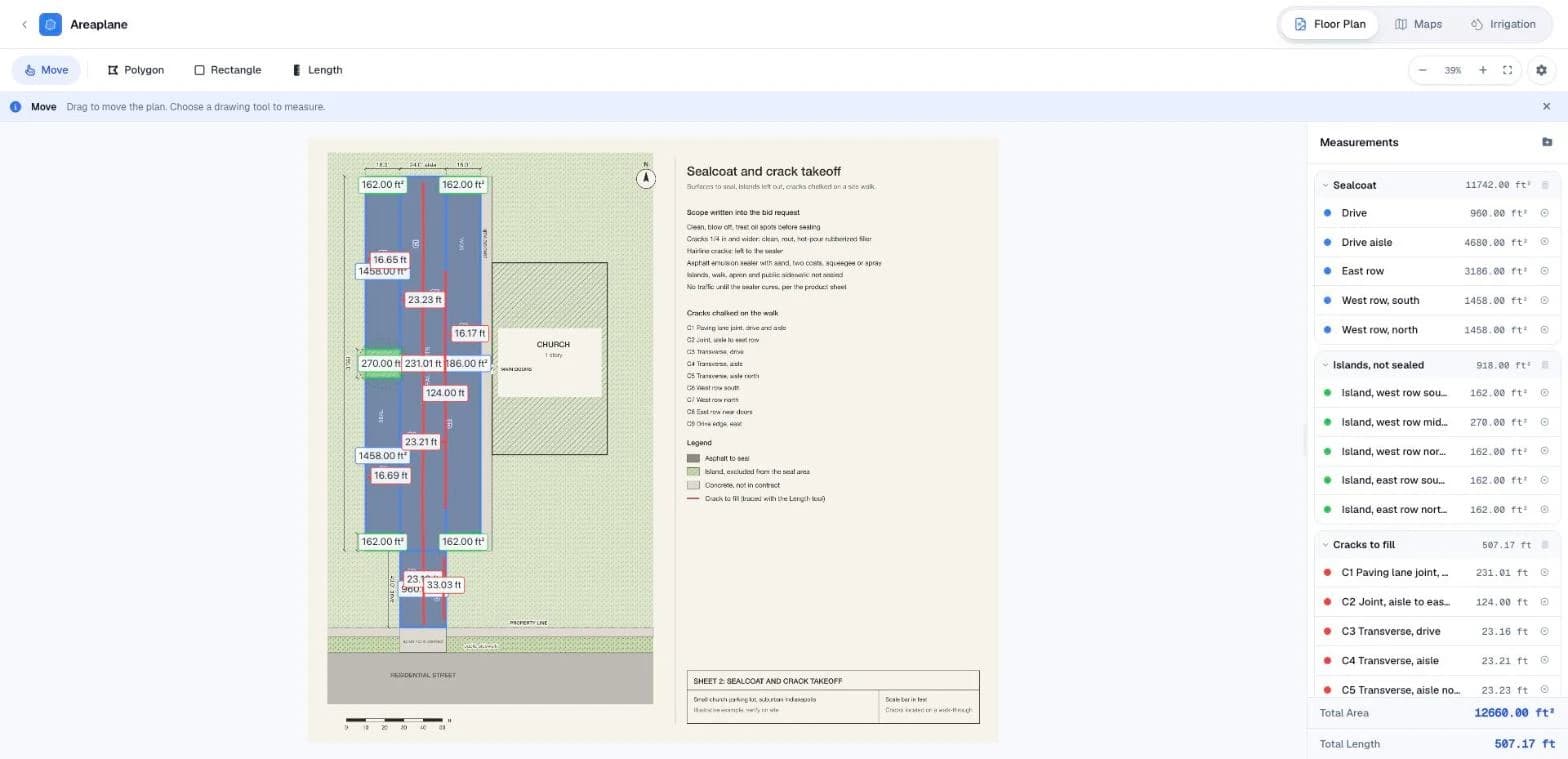
| Surface | Area or length |
|---|---|
| Drive, 24 × 40 ft | 960 sq ft |
| Drive aisle, 24 × 195 ft | 4,680 sq ft |
| East row, 18 × 177 ft | 3,186 sq ft |
| West row, 18 × (81 + 81) ft | 2,916 sq ft |
| Asphalt to seal | 11,742 sq ft (1,304.7 sq yd) |
| Islands, not sealed | 918 sq ft |
| Paved outline including islands | 12,660 sq ft |
| Cracks to fill, C1 to C9 | 507 ft |
One can check this by calculating 11,742 + 918 = 12,660, which is the same number as given for the gross outline. Keep the 12,660 in mind; it shows up again in one of the bids.
Step 4: Turn Areas into Materials
Although he will not be purchasing the material himself, it is good to know what is needed to check the validity of the bids.
Sealer
Two thin coats of sealer are better than one thick coat. Adding sand to the sealer will increase traction and help it stay in place in turning areas. The sealer will be priced by the gallon, so one needs to make sure that enough sealer is included in the bid to seal the parking lot area twice.
A typical product data sheet for an asphalt emulsion based sealer states that the mixed material will cover 60 to 80 square feet per gallon per coat (depending on texture of the existing pavement and amount of sand added to the mix). Let’s use a coverage rate of 70 square feet per gallon of mixed material per coat in the following calculations. (Note that 20 gallons of water need to be added to each 100 gallons of sealer concentrate, and 3 pounds of sand to each gallon of concentrate.) (Check the data sheet for the product you are considering; the numbers may be different).
| Step | Arithmetic | Result |
|---|---|---|
| Mixed sealer per coat | 11,742 ÷ 70 | 167.7 gal |
| Two coats | 167.7 × 2 | 335.5 gal mixed |
| Concentrate | 335.5 ÷ 1.20 | 279.6 gal |
| Water | 335.5 − 279.6 | 55.9 gal |
| Sand | 279.6 × 3 lb = 839 lb ÷ 50 lb bags | 17 bags |
Crack filler
The amount of hot pour rubberized filler that is required will depend on how large the cracks are when they have been cleaned out. Let’s assume that the cracks have been cleaned out to about ½ inch by ½ inch and that the rubberized filler will be flowed over the top to form a band about 2 ½ inches wide and 1/16 inch thick. The cross-sectional area of this filler would be 0.25 + 0.156 = 0.406 square inches.
| Step | Arithmetic | Result |
|---|---|---|
| Volume per foot | 0.406 sq in × 12 in | 4.875 cu in |
| Total volume | 507 ft × 4.875 ÷ 231 cu in per gal | 10.7 gal |
| Weight, at about 10 lb per gal, plus 10% waste | 10.7 × 10 × 1.1 | 118 lb |
| Boxes | 118 ÷ 30 lb | 4 boxes |
Striping
Since the new layout will be the same as the existing layout, with 9 x 18 ft stalls, there will not be any line between the stalls and the island curb. The group of stalls nearest the doors will need to comply with ADA requirements. This group will be re-laid out with an 11-foot wide van accessible stall, an 8-foot wide stall, and a 5-foot wide access aisle. (ADA requires two accessible parking spaces, one of which must be van accessible, for a parking lot with 26 to 50 parking spaces, and the spaces need to be marked with posted signs). (Check with your city or the State of Indiana to see if there are additional requirements that need to be met).
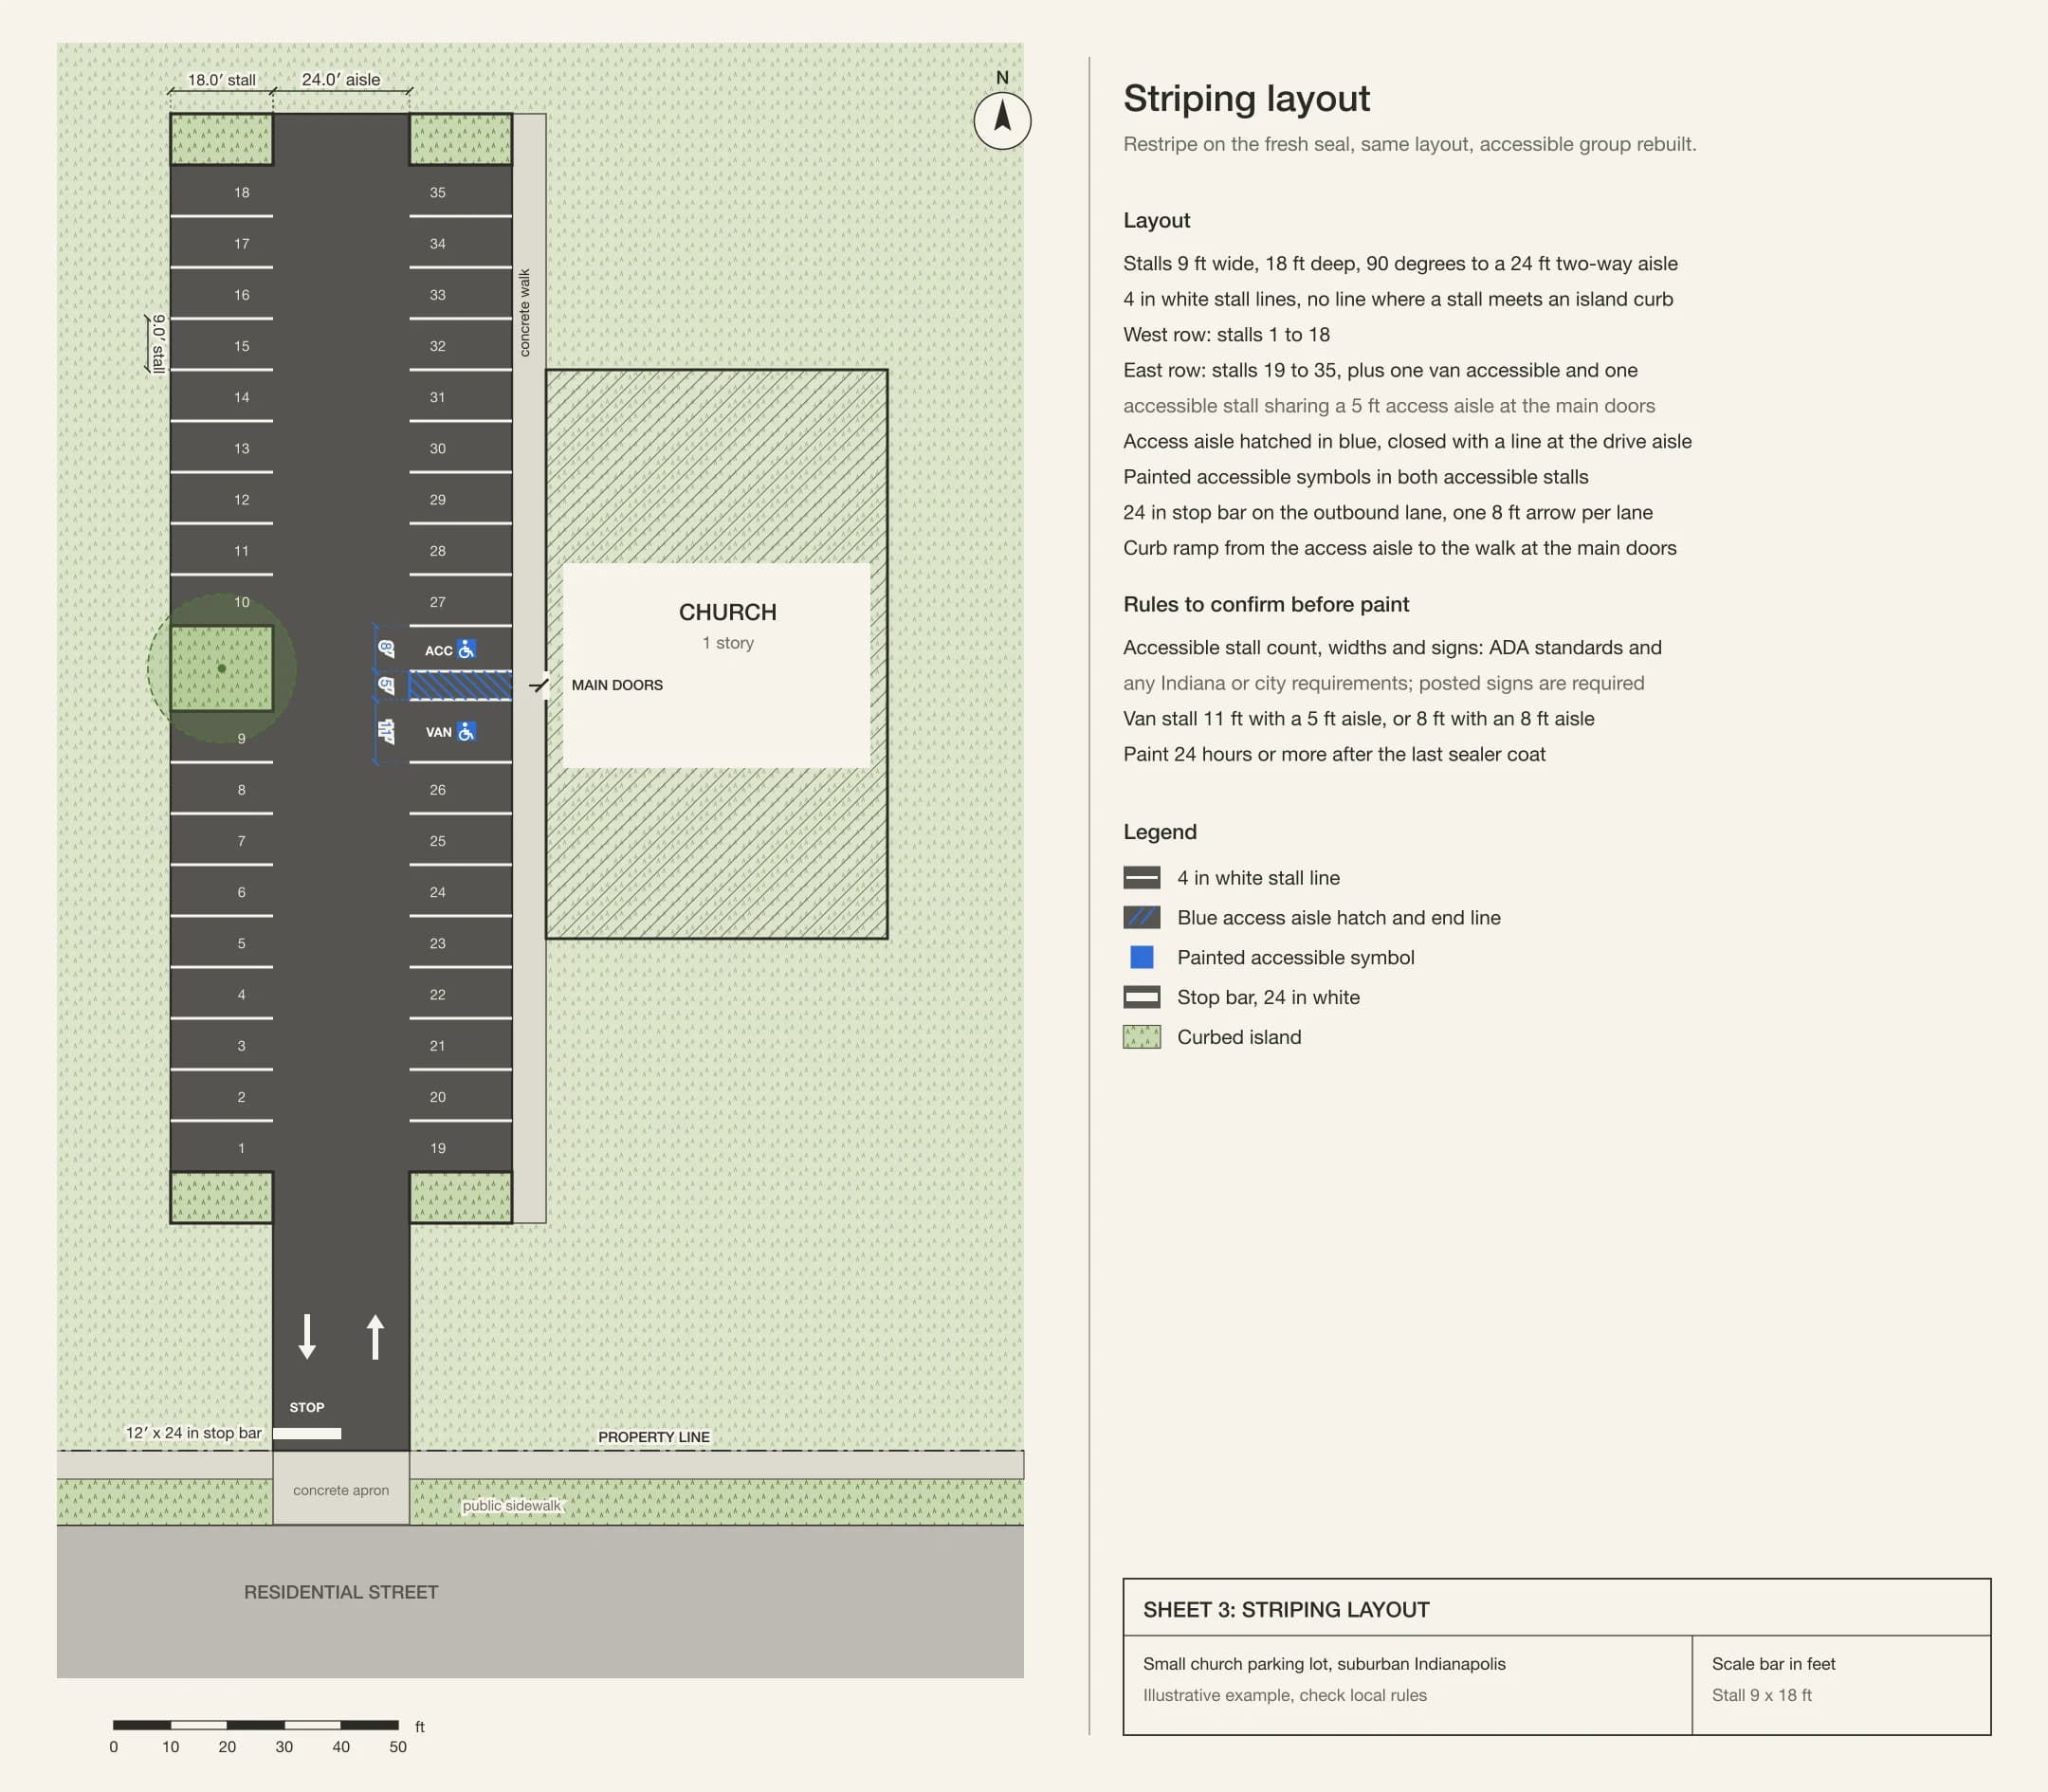
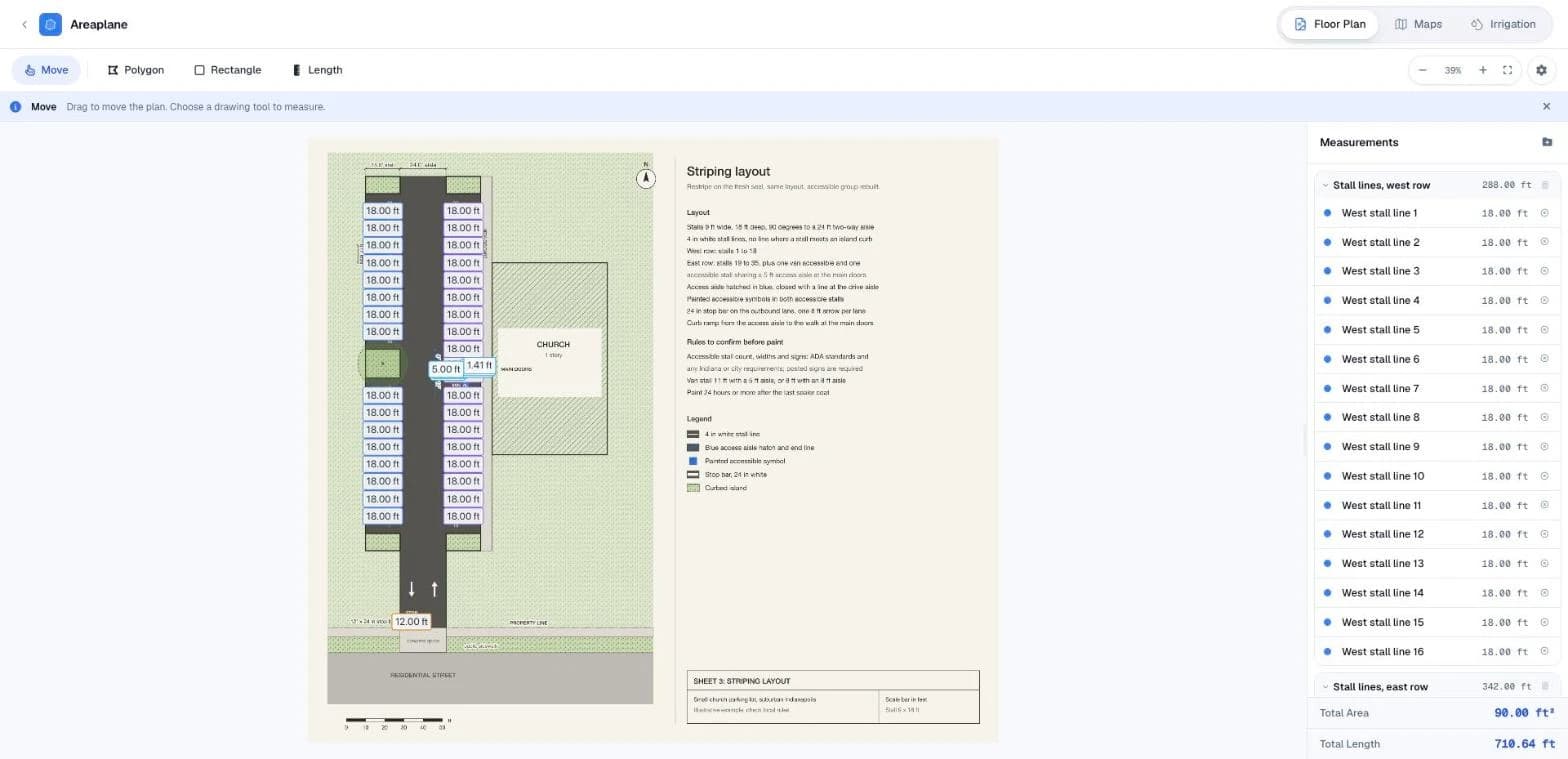
To compare the bids, convert the striping to feet of 4-inch line. For example, a 24-inch wide stop bar is equivalent to six 4-inch lines. Also, convert the square footage of stencil painted arrows and symbols to feet of 4-inch line. Each stencil arrow takes about 10 square feet of paint, and each symbol about 6 square feet (check the stencil you are using). Each square foot is equivalent to 3 feet of 4-inch line.
| Item | Arithmetic | 4 in line equivalent |
|---|---|---|
| Stall lines, white | 35 × 18 ft (16 west, 19 east) | 630 ft |
| Stop bar, white | 12 ft × 6 | 72 ft |
| Arrows, white | 2 × 10 sq ft × 3 | 60 ft |
| Aisle hatch and end line, blue | 63.6 + 5.0 ft | 68.6 ft |
| Accessible symbols, blue | 2 × 6 sq ft × 3 | 36 ft |
| Total | 866.6 ft (762 white, 104.6 blue) |
At 15 mils wet, one gallon of traffic paint will cover 231 / 0.015 = 15,400 square inches = 106.9 square feet. This is equivalent to 320.8 feet of 4-inch line. The white paint will take 762 / 320.8 = 2.4 gallons, and the blue paint will take 0.3 gallons. Thus, the cost of the paint is not a large part of the cost of the striping; most of the cost is for the layout and the trip to do the striping.
Step 5: Normalize the Three Bids
To compare the bids, determine the cost of sealcoating per square foot of measured area per coat, the cost of crack filling per foot at the measured 507 feet, and the cost of striping per foot of 4-inch line equivalent.
| Bid A | Bid B | Bid C | |
|---|---|---|---|
| As written | $4,268.40 | $3,690.00 | $4,421.00 |
| Sealcoat | 12,660 sq ft × $0.24 = $3,038.40, 2 coats | $2,350 lump sum, 1 coat | 11,750 sq ft × $0.27 = $3,172.50, 2 coats |
| Sealcoat per measured sq ft | $0.259 | $0.200 | $0.270 |
| Per sq ft per coat | $0.129 | $0.200 | $0.135 |
| Concentrate listed vs needed | not stated | 120 of 140 gal (86%) | 285 of 280 gal (102%) |
| Cracks | 300 ft allowance, $1.50/ft after | $520, cold pour, no footage | 460 ft × $1.35 |
| Cracks at 507 ft | $760.75 | unknown | $684.67 |
| Striping | $780 lump sum | $820 lump sum | $627.50 itemized |
| Striping per ft of 4 in line | $0.90 | $0.95 | $0.72 |
| Adjusted to measured quantities | $4,579.15 | not comparable | $4,484.67 |
Bid A uses the gross outline area, including the islands, which includes 918 square feet of grass and curb. Although this bid has the lowest unit price, it is not the lowest bid when applied to the actual area to be sealed. Also, there is not enough crack filler in this bid to fill the measured 507 feet of cracks; this bid is short 207 feet. Bid B is less expensive, but it is for only one coat, and the cracks will be filled with a cold pour filler. At the rate used above, the sealer concentrate in Bid B is enough for only 86% of the parking lot area, and that is for only one coat. Bid C uses the measured area, which is within 8 square feet of the area calculated above. The number of gallons is given in this bid. The cracks will be filled by the foot in this bid, and even with the cost of filling the additional feet of cracks, Bid C is the lowest in real price.
The Committee decides to accept Bid C, but they will write into the bid that the crack filling will be for the measured 507 feet at $1.35 per foot, and that they will pay for the number of feet measured in the field. Also, the contractor will need to provide cure times in writing, taken from the product data sheet.
Step 6: Schedule Around Services
There were a couple of restrictions: it needed to be 50 degrees F and rising, it couldn’t rain for 24 hours, and the lot had to be kept clear of traffic until it cured, and the paint had to wait 24 hours after the second coat. Fortunately, all of that could be met within a week from one Sunday to the next.
| Date (2026) | Work | Lot |
|---|---|---|
| Jul 12 | Satellite first pass | Open |
| Aug 8–15 | Permit plan scanned, tape and wheel checks, takeoff | Open |
| Aug 28 | Bids normalized; committee picks C | Open |
| Sun Sep 20 | Services; closure notice in the bulletin, cones after the last service | Closes 1 pm |
| Mon Sep 21 | Sweep, blow off, prime oil spots, rout and hot-pour cracks | Closed |
| Tue Sep 22 | First coat | Closed |
| Wed Sep 23 | Second coat; evening program moved to members' homes | Closed |
| Thu Sep 24 | Layout and paint after 24 h cure; signs set | Closed |
| Fri Sep 25 | Cones pulled at 7 am | Open |
The rain date was the following week, Monday through Friday. A closure notice was put in the church bulletin for two Sundays before, asking people to plan accordingly. A printout of the site plan with the closed areas marked was taped to the front doors so the funeral home and the food pantry could still deliver up to the street. They were happy to accommodate. The scaled drawing made laying out the striping easy. The sheet was saved to his phone and the crew chalked off the van stall in about ten minutes.
The Final Numbers
| Line | Estimate | Final |
|---|---|---|
| Sealcoat, 2 coats with sand | $3,172.50 | $3,172.50 |
| Crack fill, hot pour, $1.35 per ft (507 ft measured, 512 ft paid) | $684.67 | $691.20 |
| Restripe, as itemized | $627.50 | $627.50 |
| Accessible parking signs and posts (church bought) | $180.00 | $180.00 |
| Total | $4,664.67 | $4,671.20 |
The project came in $6.53 over estimate because there were 5 feet more cracks than they found during the chalk walk. The church ended up paying $402.80 more than Bid A as written, but Bid A would have cost $4,579.15 once the cracks ran out, and that included 918 sq. ft. of islands that wouldn’t be sealed. It only took fifteen minutes to get through the board meeting, most of that spent on the table in Step 5.
What He Would Do Differently
- Ask for a bid form with the measured quantities on it. Two of the three contractors would have changed their bids had they known the quantities.
- Chalk the cracks on a dry morning after a rain so they show up better.
- Order the signs earlier. The posts were set the same day as the paint and the signs arrived the day before.
- Save all of this for the next sealcoat in three or four years.
Use This on Your Own Lot
- As a first pass, you can outline the area and islands on satellite imagery using the map tool, but don’t bid based on that.
- Find a permit set or as-built site plan and upload it to the Floor Plan Calculator. Scale it to the longest dimension and check a few other lengths with a tape or wheel measure.
- Trace around the areas to be sealed, not including islands, which should be a separate category to be deducted.
- Chalk the cracks, trace them with the Length tool and figure the crack filler based on a cross section.
- Figure the striping in linear feet of 4″ line and check with the city about the number of accessible stalls and signs needed.
- When you get bids back, divide by the quantities to see the price per sq. ft. per coat, per linear foot of crack and per linear foot of line.
- Schedule the cure and paint times according to your busiest days.
For more on measuring paved areas, see how to measure a driveway or patio, measuring area on satellite imagery, and measuring square footage from a plan. For a residential paving project from start to finish, see the driveway replacement walkthrough.