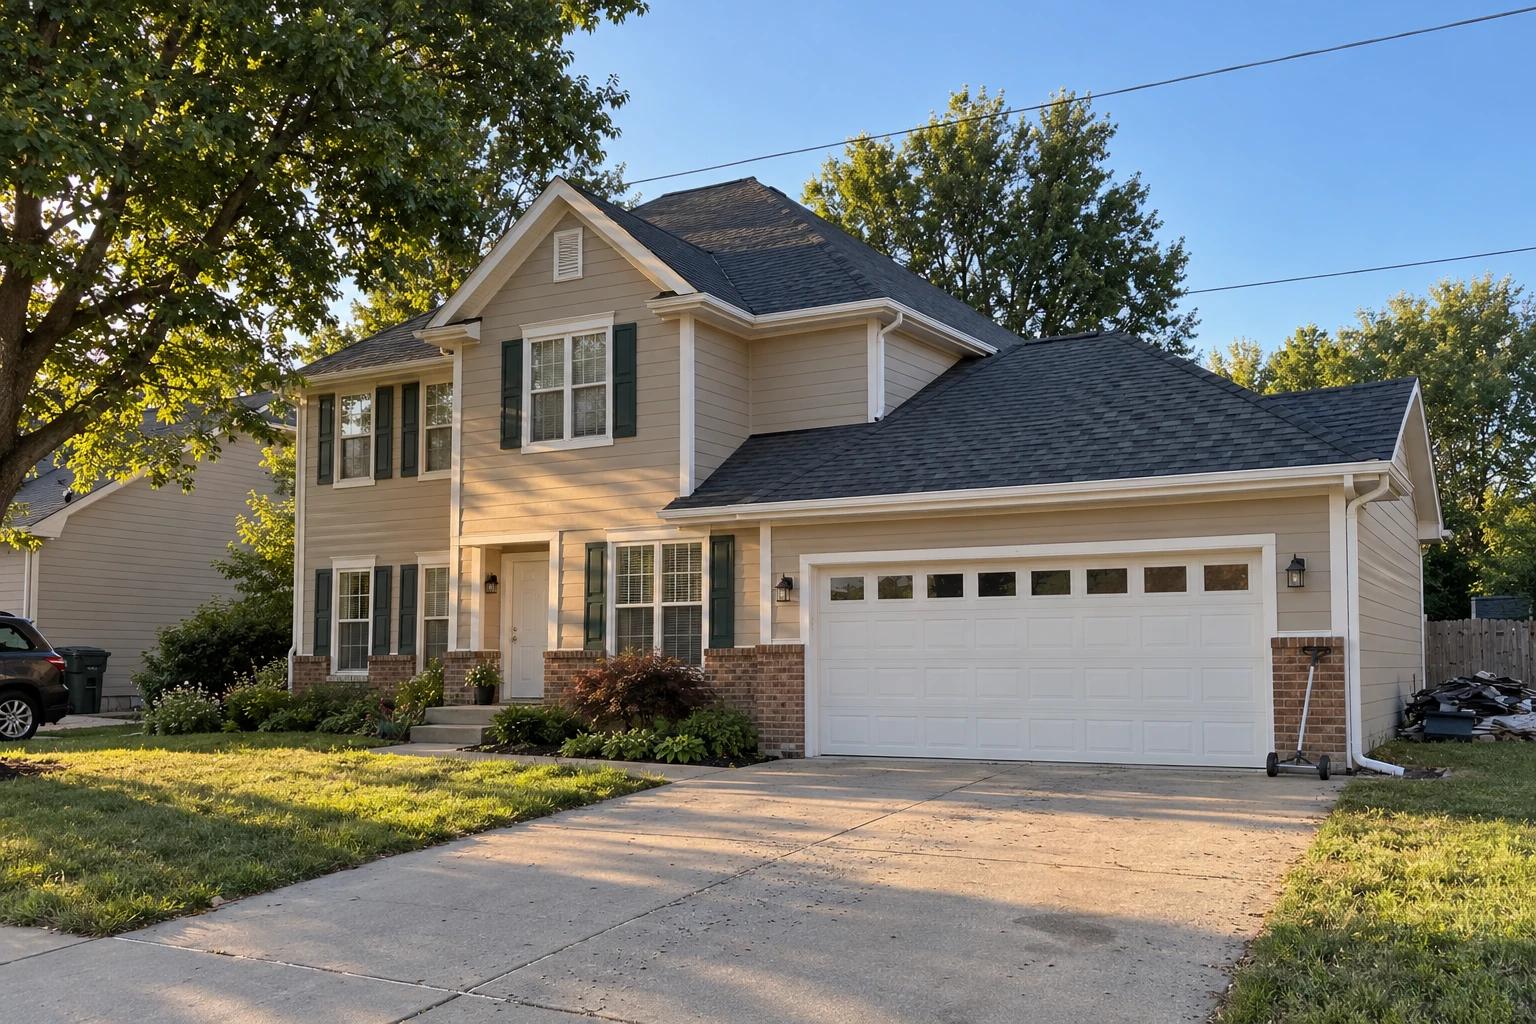
Hail is not something that most people in the Kansas City area expect in late April, yet it happened. And a nice two story house that was built in the 80s had enough damage to the gutters and shingles to warrant an insurance claim. The homeowners called two different roofers and received two different quotes… one for 30 squares of shingles and another for 34 squares of shingles. That's almost $2000.00 difference at around $500.00 per square. The homeowners wanted to know what the actual size of their roof was before signing a contract.
The homeowners never got on the roof. They measured from the ground, from a ladder at the eave, and in the attic, and then did the takeoff themselves. This blog post follows it from start to finish, until a contract was signed.
The Project
| House | Two stories, 30 × 46 ft, with a 6 × 17 ft two-story front bay; attached one-story garage, 22 × 24 ft |
| Roof | Main hip roof with a front gable over the bay, both 6:12; garage gable, 4:12 |
| Existing | One layer of architectural shingles, about 20 years old, hail bruising on every slope |
| Goal | Know the real number of squares and linear feet before comparing quotes |
| Rule | Nobody walks the roof. Ladder at the eave and attic only |
Tools used in this example:
- Google Maps Area Calculator for a first footprint on satellite, and
- Floor Plan Calculator to takeoff the roof plan, drawn from tape measurements.
Step 1: A Satellite Footprint, and What It Can't Tell You
The homeowner in this case entered their address in the search box of the map tool, switched the map to Satellite, and then used the Area tool to draw a polygon around the outside edge of the roof including the eave overhangs. This gave an area of 2,281 square feet.
This is the footprint area of the roof. Since the roof is sloped, it will have more area than this. The pitch or slope of the roof can't be determined from this, so the homeowner multiplied this number by the Pitch Factor for a 6:12 slope (the homeowner guessed the slope was 6:12) and then added 15% for waste. 2281 * 1.1180 * 1.15 = 29.3 squares. Since one roofer quoted 34 squares, that quote seemed a bit high. However, there was a large maple tree in the front yard that obscured the eave corner on the north west side, and the image was over a year old, so it was time to take some measurements.
The satellite images in the map tool are provided by Esri. Areaplane is not associated with Google in any way. Satellite images can be offset slightly, and can also be taken at a slight angle so the roof may be leaning one foot or so to one side. While this is accurate enough for budget purposes, roofing materials are sold by the bundle or the roll, so you'll need to be a little more accurate to place your order. A few percent across 2,300 sq ft is a couple of squares.
Step 2: Tape, Ladder, and Attic
The homeowner measured the length of each wall at the ground, and then using a ladder at the eave measured the distance from the wall to the outside edge of the fascia board. The eave overhangs measured 1'6″ and the rake overhangs measured 1'0″. Adding these numbers to the wall lengths gave the length of each edge of the roof, so the footprint could be drawn from tape instead of pixels.
Be sure your ladder is on solid ground, set at an angle of about 4 to 1, and extends 3 feet above the eave. Have someone foot the ladder for you, and keep your belt buckle between the ladder rails at all times. Nothing here needed more than reaching the fascia and laying a board on the bottom course. Don't walk on the roof. Hail damage can cause the granules to come loose which act like ball bearings on a 6:12 slope. Leave walking the roof up to the roofer and the adjuster.
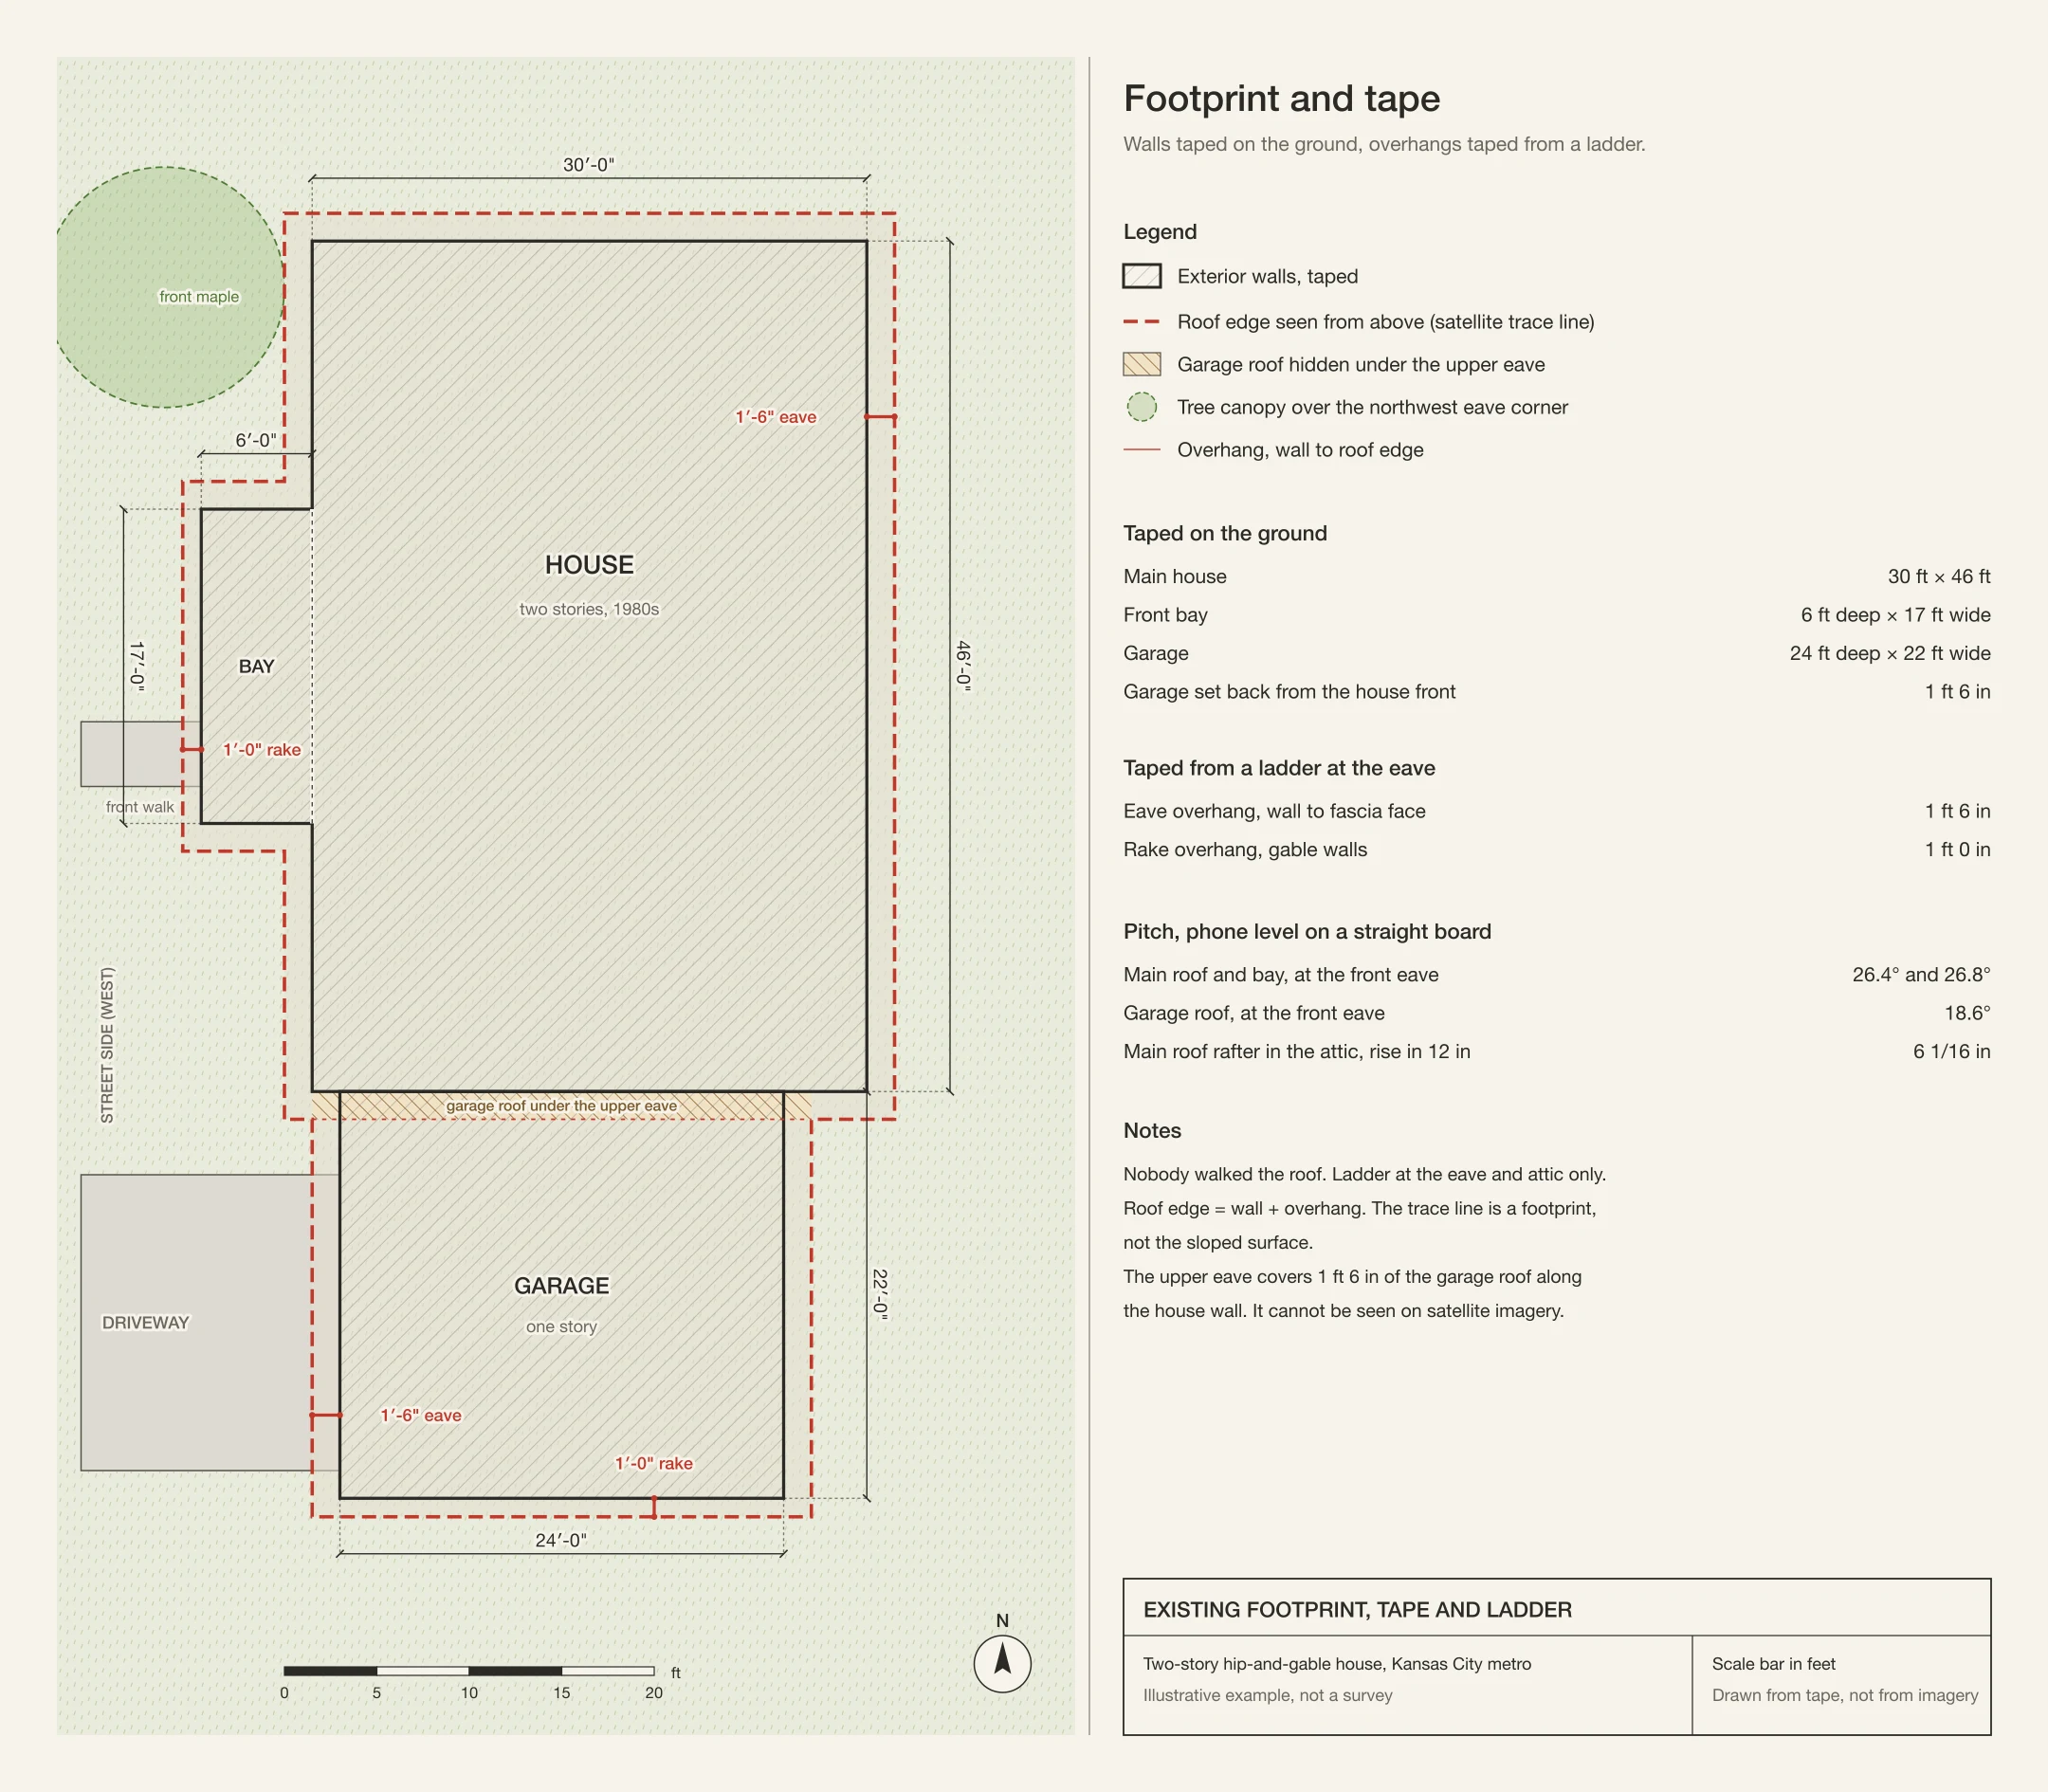
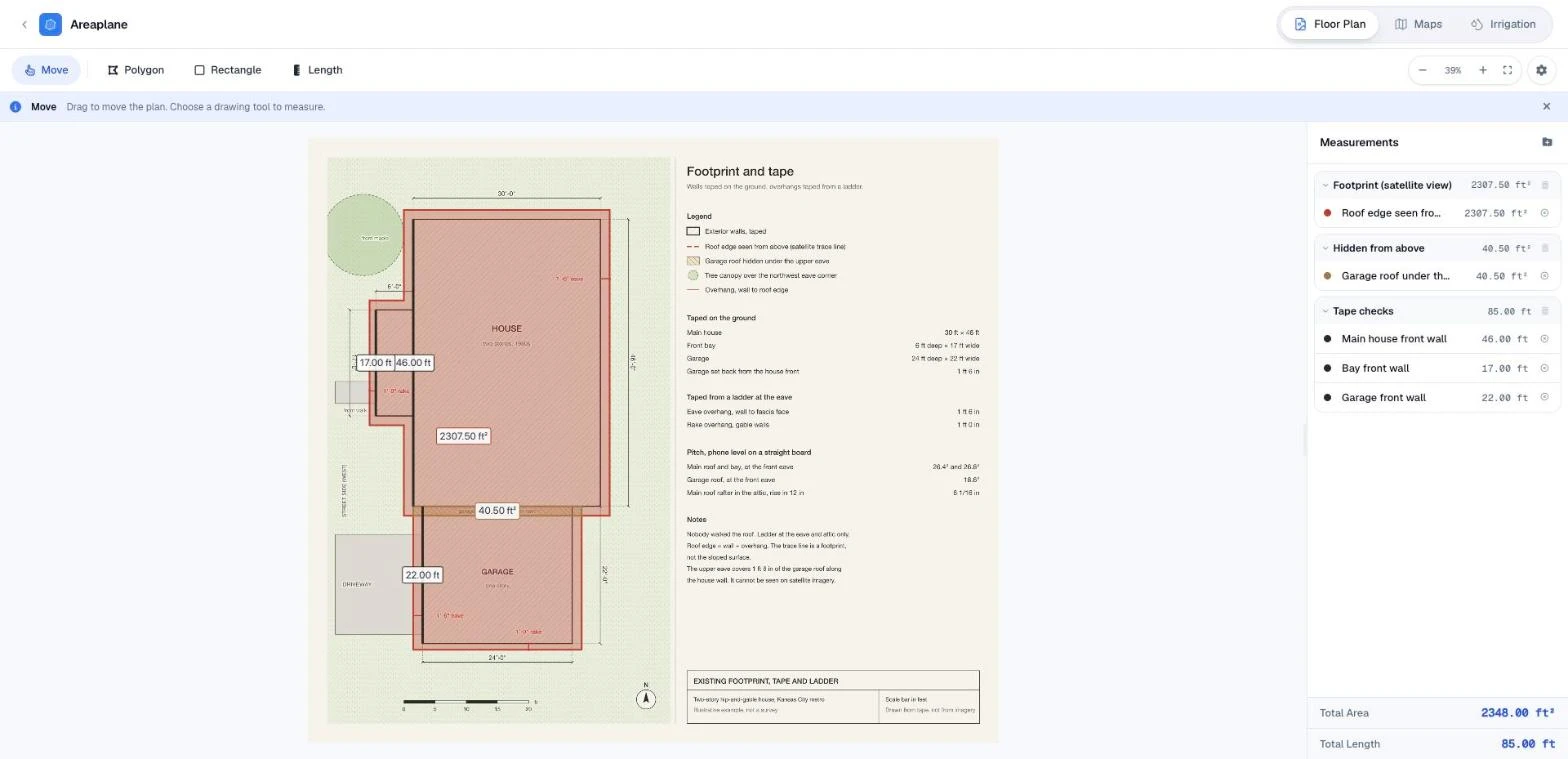
The homeowner then loaded the sheet into Floor Plan Calculator, scaled it using the Set Scale tool and the length of the main wall (46'), drew a polygon around the outside edge of the roof using the Polygon tool, and then measured the three front walls using the Length tool.
| Check | Result |
|---|---|
| Main wall, bay wall, garage wall on the sheet | 46.00, 17.00, 22.00 ft, matching the tape |
| Roof edge from tape and overhangs | 2,307.5 sq ft |
| Satellite trace | 2,281 sq ft, 1.1% under |
| Garage roof hidden under the upper eave | 40.5 sq ft |
Pretty close, right? Good enough to work with. But the satellite trace missed the fact that the second story eave sticks out over the garage roof 1' 6" at the wall of the house. That hidden strip is 40.5 square feet. It gets shingles too.
Checking pitch without climbing
From a ladder they laid a 2' long board as straight as they could get it on the shingles at the eave of the roof and measured the angle with a level app on their phone. Main roof = 26.4 and 26.8 degrees. Garage roof = 18.6 degrees. To convert to Rise:Run multiply 12 by the Tan of the Angle. Main Roof = 12 x Tan(26.4) = 6.01 inches. Garage = 12 x Tan(18.6) = 4.04 inches. So the main roof is a 6:12 and the garage is 4:12. To verify the 6:12 they went up in the attic with a 12" level and measured 6 1/16" of rise on a rafter. Good enough to call it 6:12 pitch.
Step 3: Draw the Roof Plan
From the footprint they drew in the roof. Since it's a hip roof with the same pitch on every side, the distance from each side's eave to the ridge is the same. The house is 33' wide so it's 16'-6" from each side. That makes the main ridge 16' long (49' - 33'). The gable roof over the bay rises 5' over its 10' half-width so the ridge runs back until it's 10' from the main roof eave where it's the same height as the front slope. The valleys run from the eaves of the bay roof to the point where the bay ridge hits the front slope of the main roof.
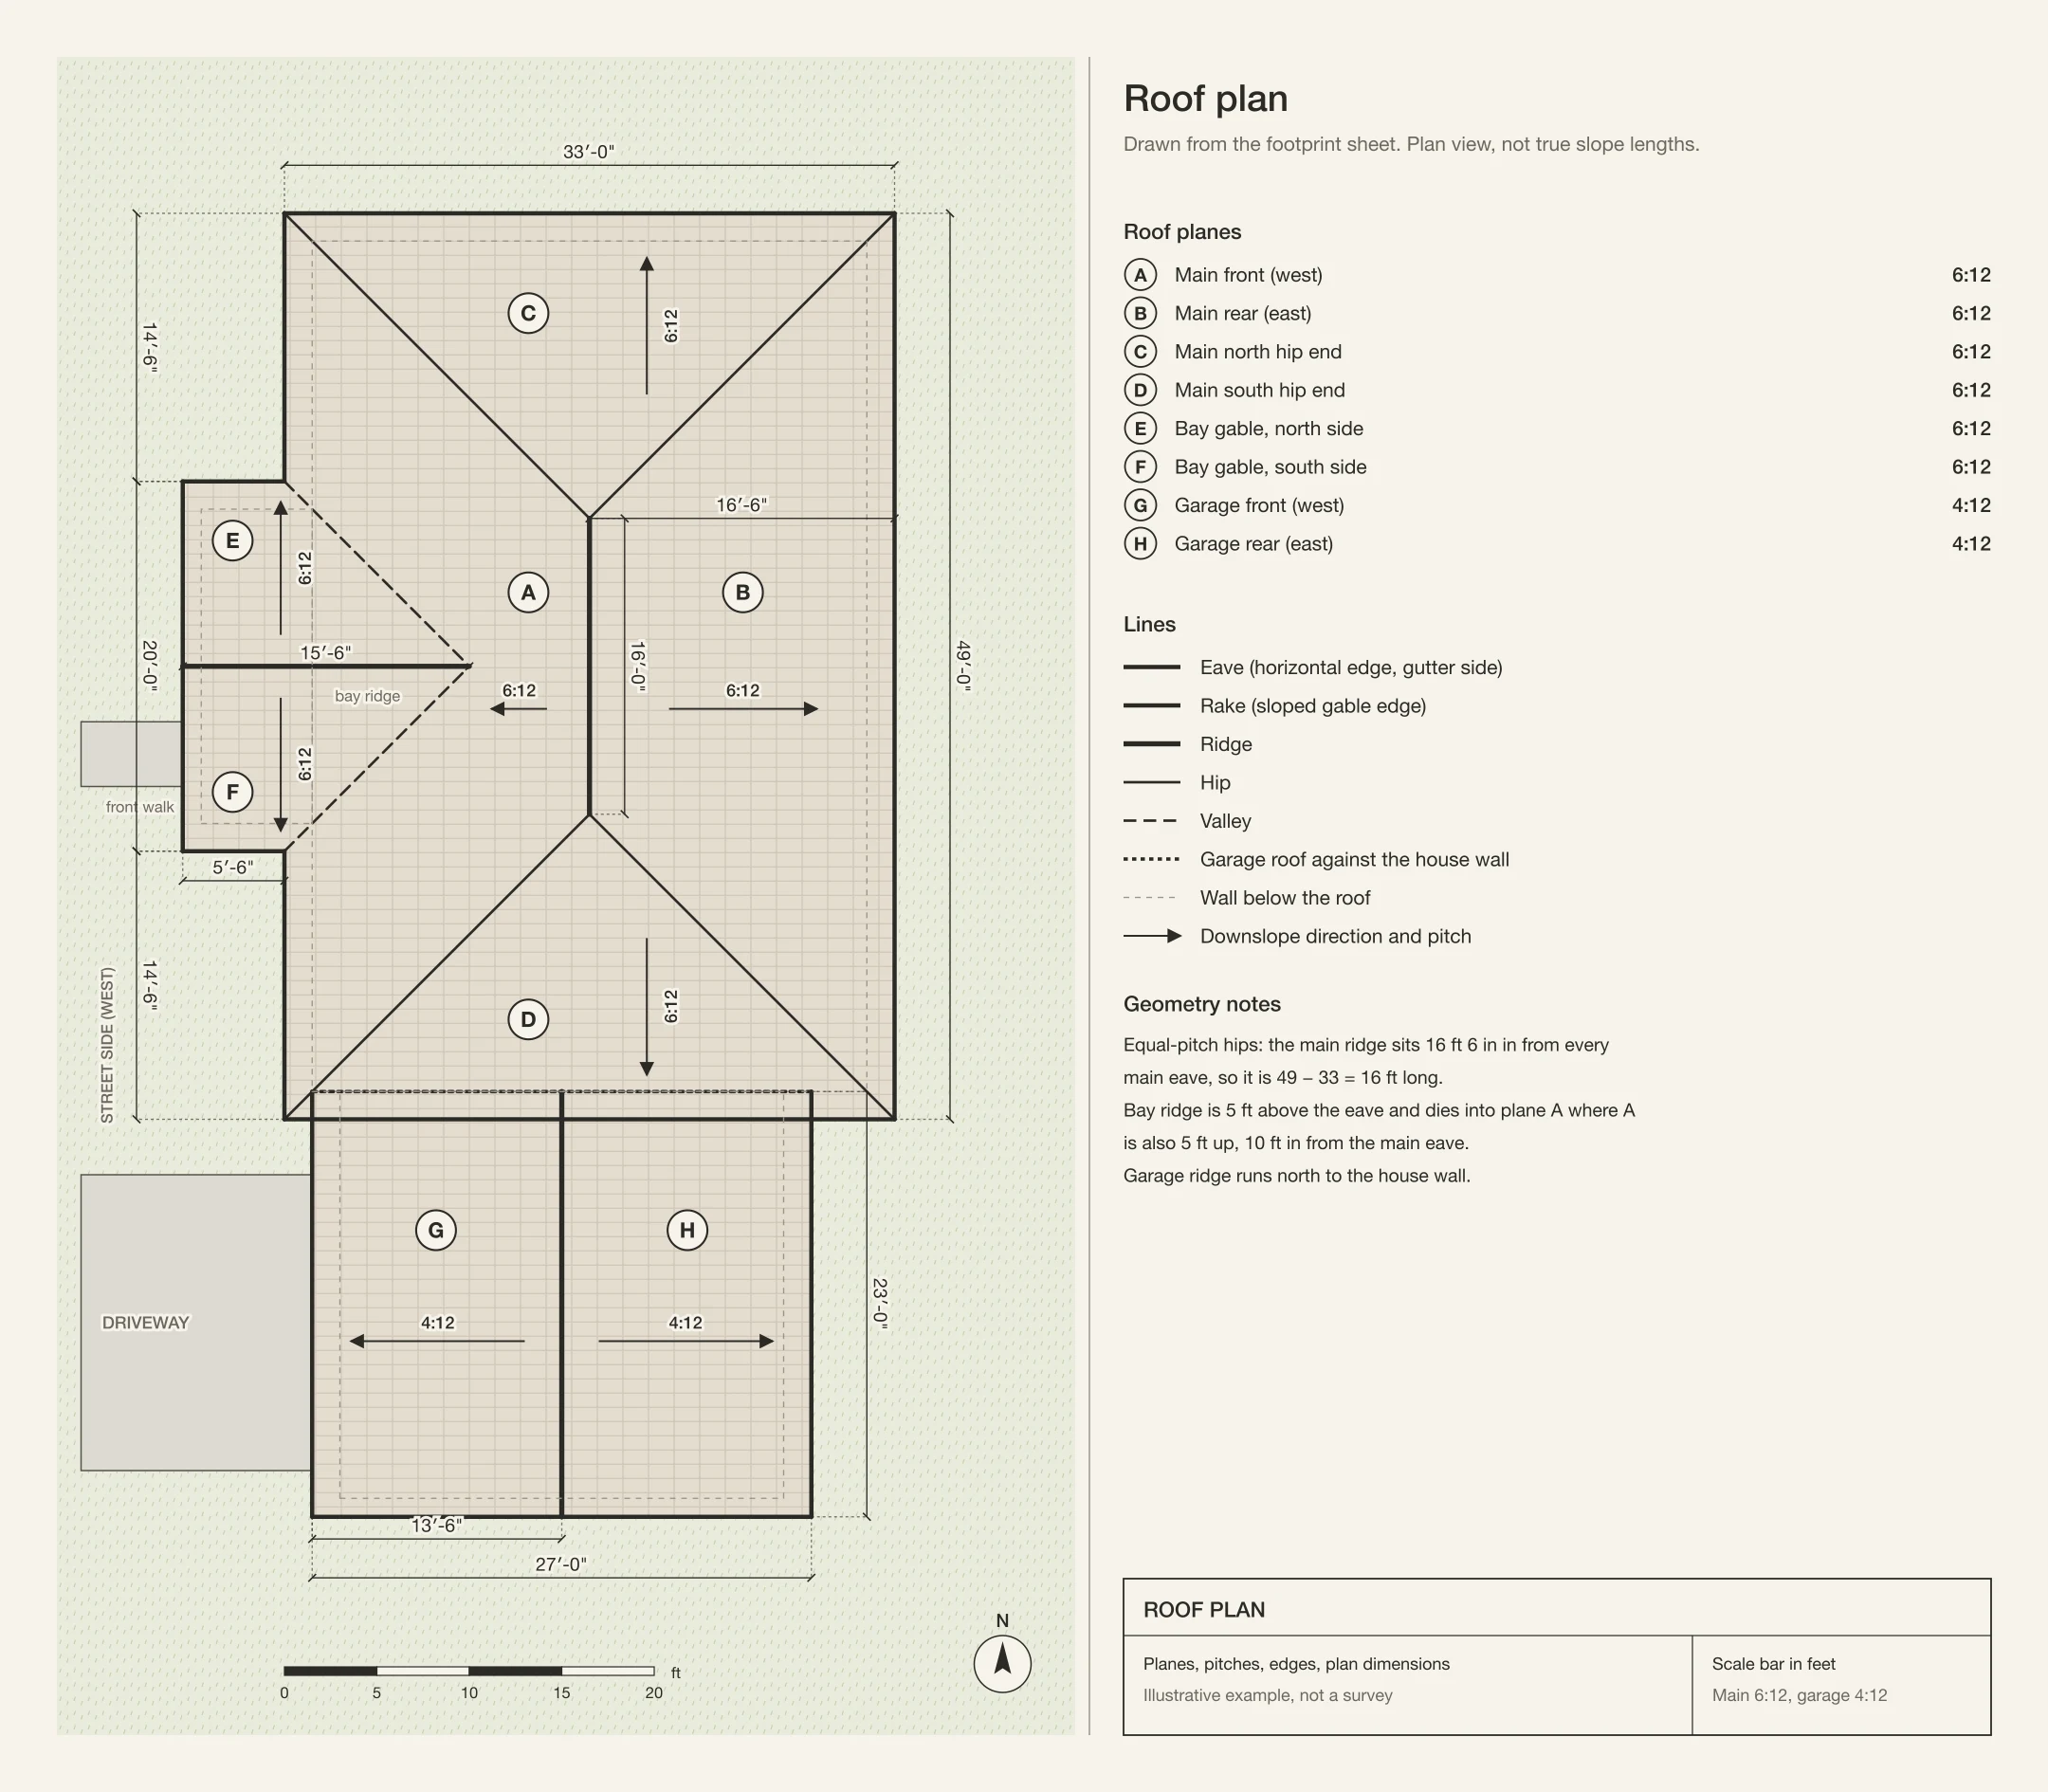
They traced each plane as a Polygon in Floor Plan Calculator. They're split into two Categories for the two different pitches. What the app tells you here is the Plan Area, that is the area if it were flat.
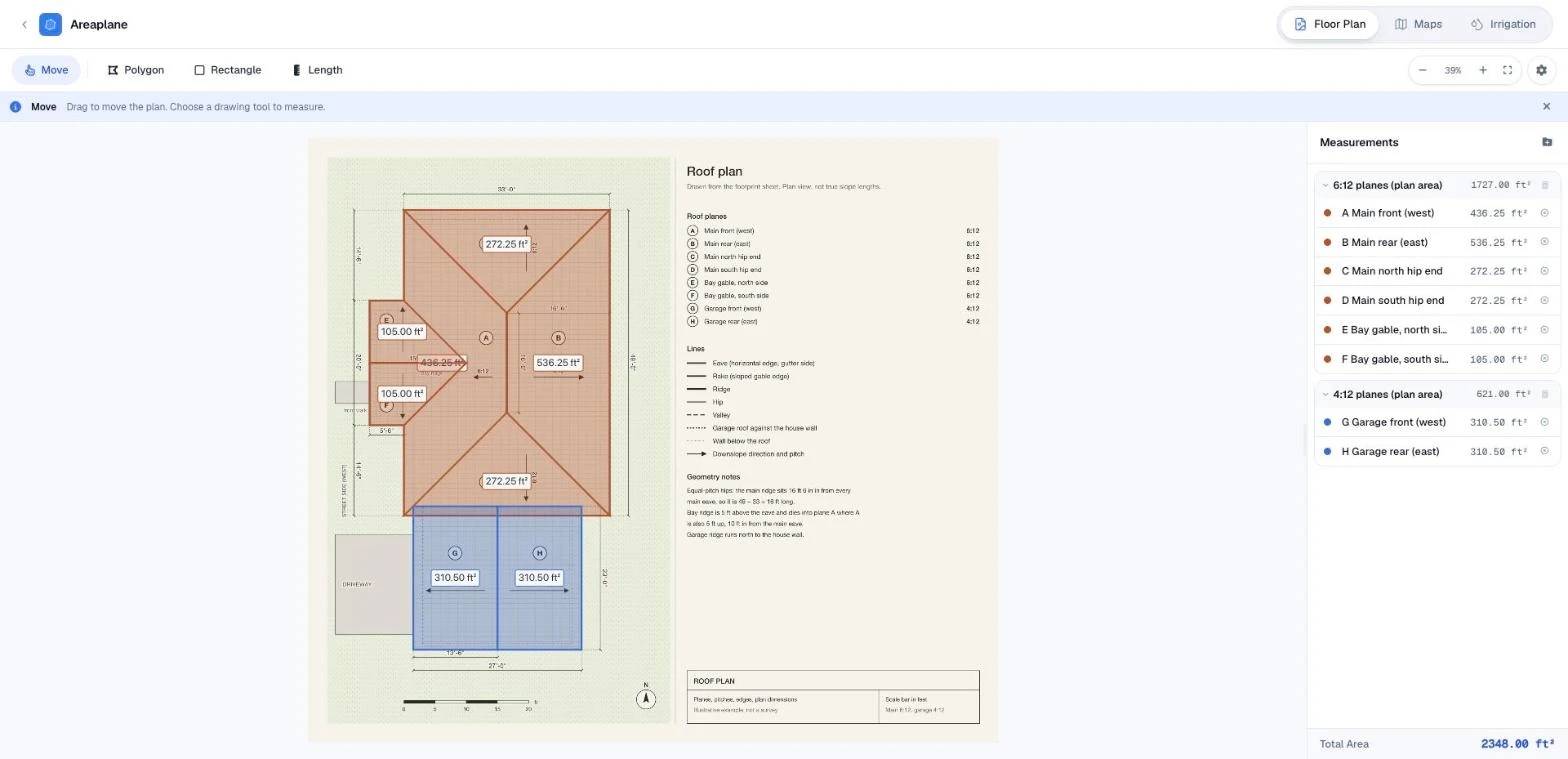
| Plane | Pitch | Plan area |
|---|---|---|
| A Main front | 6:12 | 436.25 sq ft |
| B Main rear | 6:12 | 536.25 sq ft |
| C, D Hip ends | 6:12 | 272.25 sq ft each |
| E, F Bay gable sides | 6:12 | 105.00 sq ft each |
| 6:12 subtotal | 1,727.00 sq ft | |
| G, H Garage sides | 4:12 | 310.50 sq ft each |
| 4:12 subtotal | 621.00 sq ft | |
| Total plan area | 2,348.00 sq ft |
The total area is the footprint + the hidden part = 2307.5 + 40.5 = 2348. The area of Plane A is the area of that whole trapezoid with the triangle covering the bay roof subtracted out. The triangle is 100 sqft, so the whole trapezoid is 436.25 + 100 = 536.25
Step 4: From Plan Area to Squares
To get the actual area of each plane, multiply the Plan area times a factor based on the pitch: Square Root ( 1 + (Rise / 12)² ). Hips and valleys run diagonally across two slopes, so to get their actual length, multiply their plan length times a different factor for each pitch: Square Root ( 2 + (Rise / 12)² ) / Square Root (2).
| Pitch | Angle | Pitch factor | Hip/valley factor |
|---|---|---|---|
| 3:12 | 14.04° | 1.0308 | 1.0155 |
| 4:12 (garage) | 18.43° | 1.0541 | 1.0274 |
| 5:12 | 22.62° | 1.0833 | 1.0425 |
| 6:12 (main, bay) | 26.57° | 1.1180 | 1.0607 |
| 7:12 | 30.26° | 1.1577 | 1.0817 |
| 8:12 | 33.69° | 1.2019 | 1.1055 |
| 9:12 | 36.87° | 1.2500 | 1.1319 |
| 10:12 | 39.81° | 1.3017 | 1.1607 |
| 12:12 | 45.00° | 1.4142 | 1.2247 |
They used two different Waste factors: 15% for the hip roof with valleys and 10% for the plain gable roof over the garage. Why? A plain gable roof doesn't have a lot of waste. The shingles just go right up the roof edge to edge until you get to the ridge. A hip roof, on the other hand, cuts a triangle out of every course at each hip. Add in some valleys, and you've got a pretty cut up roof. If the roof had dormers and was really cut up, like on a big McMansion, you might use 17 or even 20% for short runs. It's always good to separate out the different parts of the roof and not take a simple part like a garage and add a bunch of waste when it doesn't need it.
| Section | Plan area | × factor | Sloped area | Waste | With waste |
|---|---|---|---|---|---|
| Main and bay, 6:12 | 1,727.0 | 1.1180 | 1,930.8 sq ft | 15% | 2,220.5 sq ft |
| Garage, 4:12 | 621.0 | 1.0541 | 654.6 sq ft | 10% | 720.1 sq ft |
| Total | 2,348.0 | 2,585.4 sq ft = 25.85 squares | 13.7% overall | 2,940.5 sq ft = 29.41 squares |
That's 29.41 squares of shingles. 3 bundles per square, so 29.41 x 3 = 88.2, or 89 bundles of shingles. Starter strip and ridge cap are also needed, which are separate products. How much? Use the edge lengths from below.
Step 5: Edges and Linear Items
The takeoff sheet has the planes separated out by pitch. And all the edges are separated out by type with their plan lengths. They traced all the edges with Length and put each type in its own category.
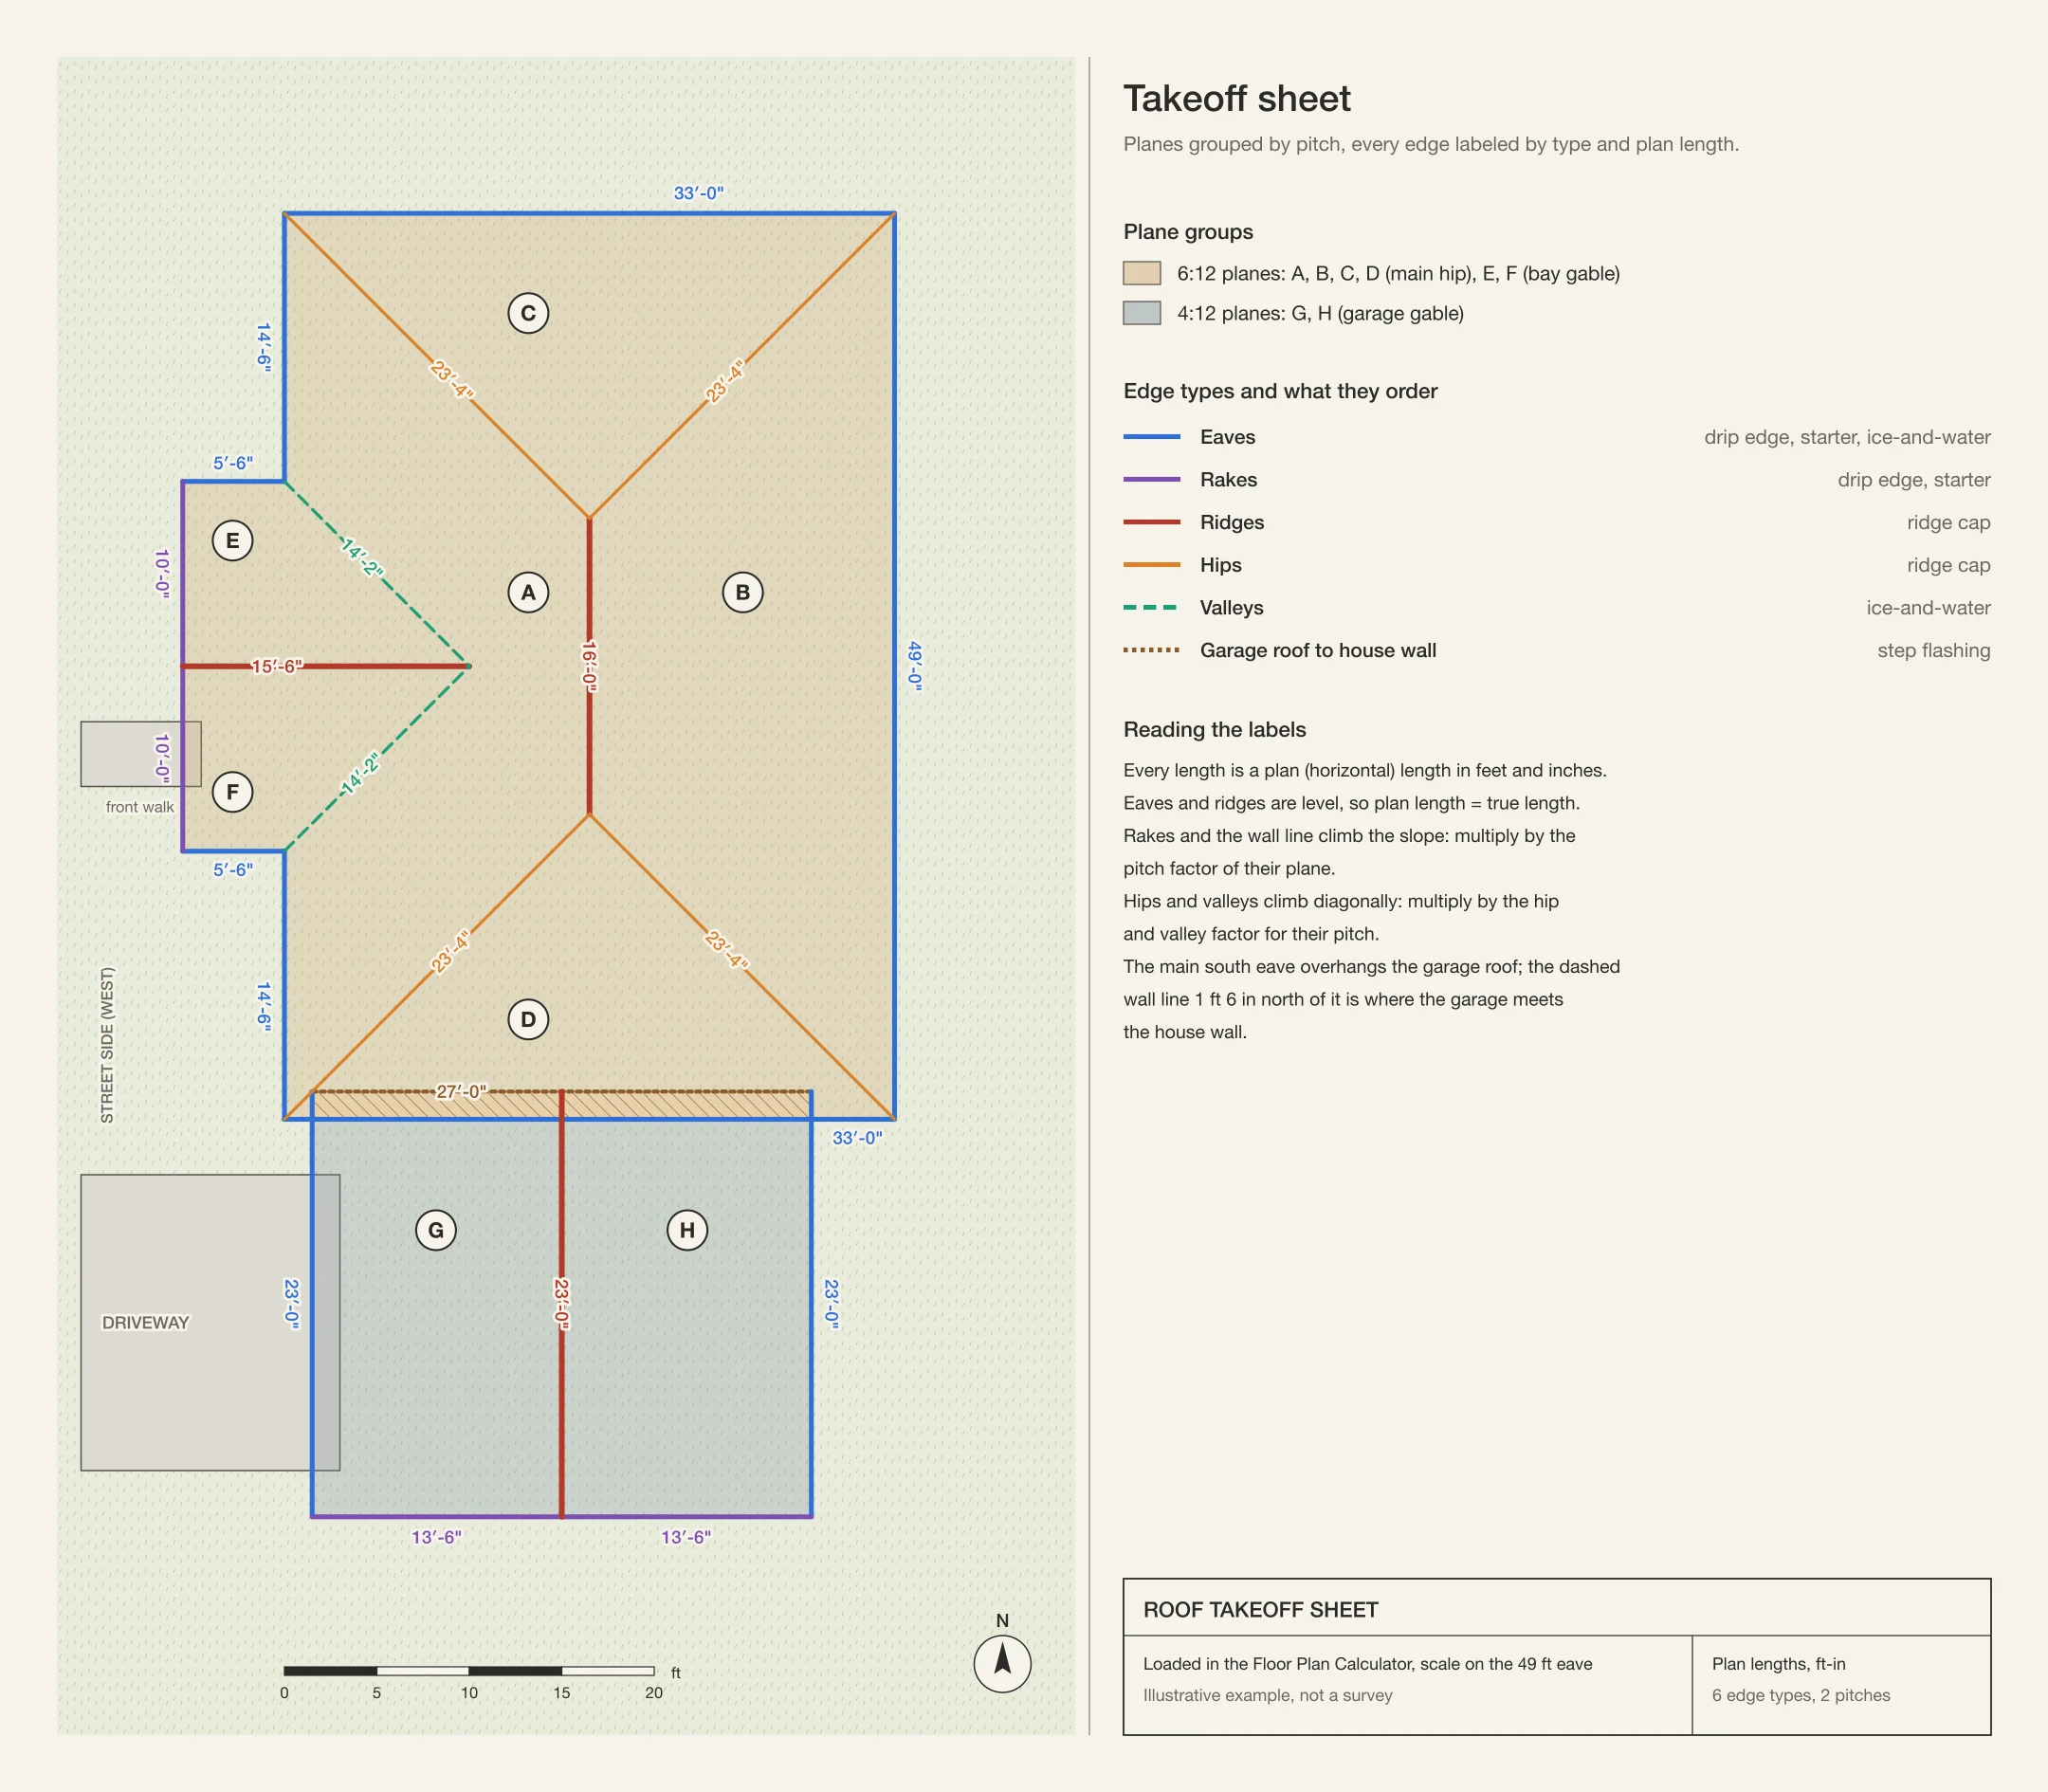
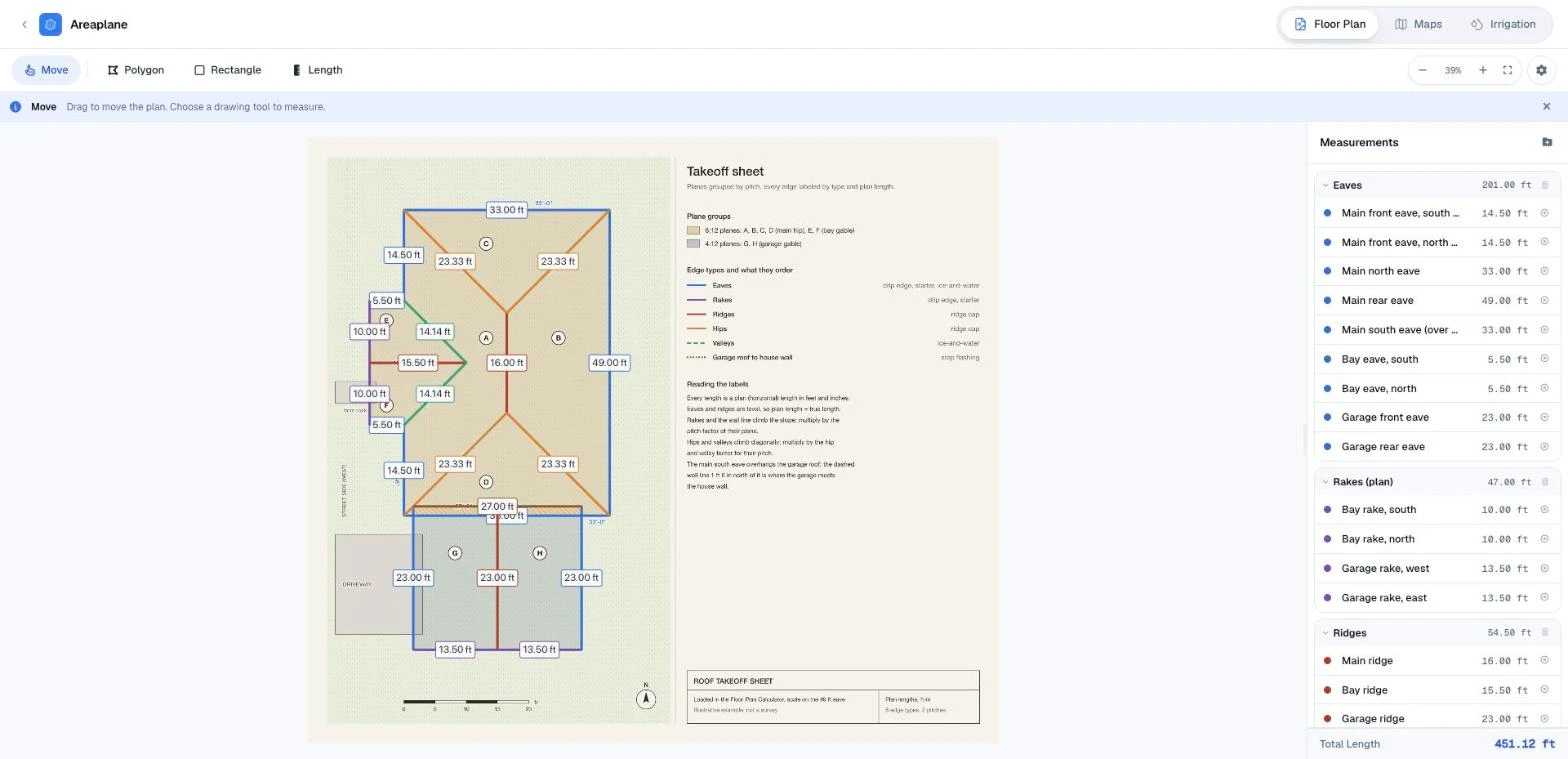
Eaves and ridges are level, so their plan lengths are the same as their actual lengths. Rakes and the wall are along one roof slope, so their actual lengths are found by multiplying their plan lengths times the pitch factor. The hips and valleys are found the same way with their factor.
| Edge | Plan length | Conversion | True length |
|---|---|---|---|
| Eaves | 201.00 ft | level | 201.0 ft |
| Rakes, bay (6:12) and garage (4:12) | 20.00 + 27.00 ft | × 1.1180, × 1.0541 | 50.8 ft |
| Ridges | 54.50 ft | level | 54.5 ft |
| Hips, 4 × 23.33 ft | 93.34 ft | × 1.0607 | 99.0 ft |
| Valleys, 2 × 14.14 ft | 28.28 ft | × 1.0607 | 30.0 ft |
| Garage roof to house wall | 27.00 ft | × 1.0541 | 28.5 ft |
Those lengths turn into orders:
| Item | Basis | Arithmetic | Order |
|---|---|---|---|
| Drip edge, 10 ft pieces | Eaves + rakes, 251.8 ft | × 1.05 for laps ÷ 10 = 26.4 | 27 pieces |
| Starter strip, about 100 ft a bundle | Eaves + rakes, 251.8 ft | × 1.05 ÷ 100 = 2.6 | 3 bundles |
| Hip and ridge cap, about 25 ft a bundle | Hips + ridges, 153.5 ft | × 1.05 ÷ 25 = 6.4 | 7 bundles |
| Ice-and-water shield, 3 × 66.7 ft rolls | Eaves + valleys, 231.0 ft | × 1.10 for laps ÷ 66.7 = 3.8 | 4 rolls |
| Synthetic underlayment, 1,000 sq ft rolls | 2,585.4 − 693 sq ft under ice-and-water = 1,892.4 | × 1.10 ÷ 1,000 = 2.1 | 3 rolls |
| Step flashing | Garage roof to wall, 28.5 ft | replace, not reuse | |
| Coil nails, 7,200 a box | 89 bundles × 22 shingles × 6 nails = 11,748 | ÷ 7,200 = 1.6 | 2 boxes |
Starter strip and cap come in different sizes, so read the wrapper to see what it covers. 6 nails per shingle is a good high wind nail pattern, but 4 is the minimum in most places. The 2652 nails are spares to use in the starter and cap. Depending on the city and which code they've adopted, ice barrier might be required along the eaves. In the Kansas City area it varies from city to city, but on this roof it's going in the valleys anyway. For just the valleys it would take 1 roll.
Most codes, following the model residential code, require drip edge at the eaves and the rakes, so both lengths are included in the drip edge line. The garage roof is 4:12 pitch, which is where most codes allow the normal single layer of underlayment. Below that, from 2:12 to 4:12, they usually require additional underlayment, so watch out for low slope garages and porches and measure the pitch carefully.
Step 6: Compare the Quotes
| Squares | Implied waste over 25.85 | Price per square | Total | |
|---|---|---|---|---|
| Measured takeoff | 29.41 | 13.7% | ||
| Roofer A | 30 | 16.0% | $560 | $16,800 |
| Roofer B | 34 | 31.5% | $520 | $17,680 |
The first roofer (roofer A) actually measured on site and was pretty much exactly what the takeoff was (some rounding). The second roofer (roofer B) used the footprint and guessed the pitch by looking from the street (and added a flat %). To see how they got their number, multiply the footprint (2307.5 sq ft) times the pitch factor (1.2019 for an 8/12 pitch) to get the roof area (2773 sq ft), then add 20%, convert to squares (100 sq ft = 1 square), and you get 33.3 squares rounded up to 34. The biggest gable on the front of the house looks steep, but it's only 6/12 and the garage is 4/12.
Both quoted squares, but #1 quoted 250' of drip edge and ice/water shield for all valleys and eaves while #2 only quoted drip edge (no length given) and ice/water shield in the valleys. Neither quoted step flashing for the wall on one side of the garage, so the homeowner asked both to add it (new, not reused). It's also good to check their measurements of other parts, like the hip/ridge cap. Here, there is 153.5' of hips and ridges according to the takeoff, so a question to the roofers would be "The takeoff says there is 153.5' of hip/ridge. How much are you including in your quote?"
In the end, the plan and takeoff sheets were sent to both roofers and roofer B came back with a revised quote after climbing a ladder to recheck the pitch. They came in at 30 squares and a total of $15,600 (reduced from the original by $2,080). Since their cost per square was lower, the job went to them. Since the insurance company is paying according to their own estimate, it was important to have the correct number in the quote.
Schedule
| Date (2026) | Work |
|---|---|
| Apr 28 | Hailstorm |
| May 8 | Adjuster inspection |
| May 9 | Satellite footprint in the map tool |
| May 10 | Wall tape, ladder overhangs and pitch, attic check |
| May 11–12 | Footprint, roof plan, and takeoff sheets, measured in the Floor Plan Calculator |
| May 13–15 | Two quotes |
| May 18 | Roofer B revises to 30 squares |
| May 20 | Contract signed |
| May 27 | Reroof permit |
| Jun 9–10 | Tear-off, decking repair, underlayment, shingles |
| Jun 16 | Final inspection |
The Final Numbers
| Line | Budget | Final |
|---|---|---|
| Tear-off and architectural shingles, 30 squares | $15,750 | $15,600 |
| Ice-and-water shield at the eaves, 201 lf | $352 | $352 |
| Decking replaced (budget 4 sheets, found 3) | $340 | $255 |
| Reroof permit | $150 | $150 |
| Total | $16,592 | $16,357 |
The 30 measured squares were priced at $525 per square in the budget, which was a ballpark number for the area that was used until quotes were obtained. 3 sheets of soft decking were found (1 less than budgeted) at the eave side of the garage.
What They Would Do Differently
- Draw a plan to show the roofers on day 1 so they quote correctly the first time.
- Get all the details (squares, waste, and pitch) from the roofers in writing. Roofer B only put squares in their quote, so the assumed 8:12 pitch wasn't known.
- Don't rely on satellite footprint if there are trees or the 2nd story overhangs. It was lucky that the 2 errors nearly canceled out.
- Now that the project is done, the files will be kept to know where the valleys, flashing, and replaced decking are.
Use This on Your Own Roof
- Use the Area tool in the map tool to draw the roof edges on satellite. That's plan area, not roof area.
- Tape the walls on the ground and use a ladder at the eave to get the overhangs. Draw the footprint and then the roof plan.
- Get on a ladder and use a phone level+straight board or go in the attic and use a level+tape to check the pitch. Don't get on the roof.
- Load the plan into Floor Plan Calculator, scale it, trace the planes noting the pitch, and trace the edges noting the type.
- Calculate the area by multiplying each plane by the pitch factor, add waste for complexity, and round off to bundles.
- Convert the edges to drip edge, starter, cap, etc and compare to the quote line by line.
See How to Measure Your Roof for Solar Panels and the satellite measurement walkthrough for more information on getting the footprint and pitch. See How to Measure Square Footage from a Floor Plan for more on tracing plans.